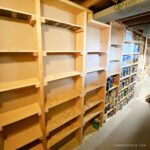
We all have things to store away and supplies we need access to from time to time. I am here to share my built in locker storage wall. It’s a full 15 feet of concealed storage that looks great and provides organized hidden storage for all the things.

A DIY tutorial to create a built in locker storage wall using metal lockers and a wood frame. An awesome concealed storage solution.
Welcome to my basement storage area where I keep all the good stuff. As much as I try to whittle down the amount of stuff we have it seems there will always be things to store. I’m sure I’m not alone in this conundrum so if you’re looking for a user friendly solution to conceal your stash check out how I made this built in locker storage wall.

Metal and Wood
I have a soft spot in my heart for a metal and wood furniture. Remember this coffee table? Or this giant green console I wrapped in plywood? For this wall I knew I wanted concealed storage and I happened upon these Ikea Ivar metal lockers. They have lots of variations to choose from so I created a combination of two taller end units and eight stacked shorter units.

Concealed Storage
- craft supplies
- gift wrap
- serving platters and baskets
- faux flowers
- ribbon and rope
- sewing accessories

Do you need a solution to hold all the stuff? This locker wall has been the best addition to my home. And while I installed this in my basement I think it’s pretty enough to be almost anywhere in your home. Down below I will show you the steps to build this locker storage wall. Be sure to read through all the steps first so you understand the general flow.

Supplies:
- Ikea Ivar metal lockers
- 2×4 stud lumber
- 3/4″ birch plywood
- 2 1/2″ spax wood screws
- 2″ spax wood screws
- 5/4 x 4″ boards (toe kick)
- 2″ brad nails
- pocket hole jig
- 1 1/4″ pocket hole screws
- nail gun
- 3/4″ lath screws
- miter saw
- table saw or circular saw
- drill
- measuring tape
Tip #1: This project works best if you build as you go. Start at one end and work your way across.
Tip #2: Apply edge banding to all the visible cut plywood edges before installation.

Base
Step 1: Build a 2×4 base. The base needs to be the width of the lockers plus 3/4″ for any vertical plywood dividers (not including the end wrap pieces). I built multiple base sections and secured them together using 2 1/2″ wood screws. The depth on my base is 10″ and I used a 5/4 board for toe kick.

Step 2: Beginning on the far left cut a vertical plywood end piece the height of the end locker + 3 1/2″. Be sure to jigsaw the little cut out portion at the base to mimic the profile of the locker / base. Secure this end plywood piece to the base from the interior.
Then attach 3/4″ plywood platforms to your base using 2″ screws. This can be done in pieces however try to avoid placing seams where two lockers meet, it’s better to place the seam under the middle of a locker piece.

Locker Dividers
Step 3: Attach vertical plywood pieces in between each locker piece using pocket holes. The plywood piece is exactly the width of the lockers x the height of two units stacked together.

Step 4: Install toe kick to the front of the 2×4 base. Use 2″ brad nails and scarf joints at the seams to secure the boards to the base.

Secure Lockers
Step 5: Secure the metal locker unit to the wood base using 2″ spax. At the front the unit is secured to the toe kick.

Step 6: Secure the metal locker to the vertical plywood divider using 3/4″ lath screws.

Step 7: Then stack the top locker unit on top of the bottom unit. Secure the top unit to the vertical plywood dividers on both sides again using lath screws.

Locker Storage Plywood Frame
Step 8: Once all units are in position attach a plywood piece across the top.

Step 9: For the top plywood piece that sits lower use pocket holes to secure top horizontal piece to the vertical plywood at the interior joint. Then use 2″ wood screws on the end joints.
Thanks for joining me for this locker storage wall project. Please leave any questions in the comments below and be sure to follow me on social media for sneak peeks, tools and project inspiration:
Instagram / Pinterest / Facebook / Youtube / Twitter
SHOP THIS PROJECT:


I love this project and the attractive way you have “boxed” the units together. The wood adds a level of looking custom with the attractive contrast of light wood next to metal. I’ve looked at the IKEA site and wonder if you could link the shorter cabinets as they don’t seem to be listed with the taller unit. Thanks also for helping me feel like I can do these projects without always needing help from the hubs.
Hi again- I found the short units by clicking on size arrow. Thanks again for the great idea!
Thanks Phyllis, glad you found the shorter locker unit.