It’s a two for one kind of project and everyone can get behind that idea. Today I have all the details on these storage shelves built right into the studs. Not only did I build a wall but that wall also serves a storage shelves!

A DIY tutorial to build storage shelves using stud lumber. Build a wall with built in storage shelves between the studs.
As homeowners I think we are constantly trying to make the best use of the space we have and that especially rings true for the basement. If you want the best functional storage you really need to build it custom for the space and these storage shelves are no exception.

Storage in the Studs
I am in the process of dividing the basement space for a hangout spot for my teenagers so I built a wall. But not just any wall. Instead of standard 2×4 studs I opted to use 2×8 lumber which not only gives added strength to the wall but more importantly allows for built in storage. A 2×8 has 7 1/4″ of depth and that is the PERFECT size for a gallon paint can.

Two Shelf Styles
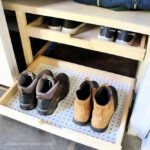
In the spirit of using wood I have on hand you can see I installed two different styles of shelving:
- 2×8 scrap pieces screwed through the studs
- 2×2 cleats with 1/2″ plywood shelves

Divider Wall
On the other side of the storage shelves will be a finished basement hangout space for my teenage kids. I installed sheetrock first (leftover from the ceiling makeover project) and then clad the wall in vertical shiplap. You can see the shiplap butts right up against the stone wall foundation and I absolutely love the contrast. Plus it was such good practice for scribing boards.
Down below you’ll find step by step details on the process of installing these stud storage shelves. Be sure to read through entirely and consider your space needs as each home is unique.

Click here for a printable PDF version of the storage shelves plans.
Supplies:
- 2x8x8 stud lumber
- 1/2″ plywood scraps
- 2 1/2″ spax wood screws
- impact driver
- level
- tap con concrete anchors
- hammer drill
- 1″ drywall screws
- circular saw
- square
- construction adhesive
- nail gun & 1 1/4″ brad nails

Stud Framing
To begin start with the bottom plate. If you are in a basement or on a concrete pad definitely use pressure treated lumber. Secure the bottom plate to the concrete using 3 1/4″ tap con concrete anchors and a hammer drill.
Then using a laser level attach the top plate to the joists. You can see I have to work around a vent so my top plate is in sections. Secure the top plate to the joists using 2 1/2″ wood screws.
Finally mark your spacing for the studs depending if you want 16″ or 24″ – typical stud spacing – mine are 24″ on center. I installed the vertical studs using pocket holes and 2 1/2″ wood screws. You can also toe nail into position.

Installing Shelves
Determine your shelf spacing and use scrap pieces as your guides for ease. See above how I am attaching the cleat to the stud using a spacer as my guided.

Once the cleats are in position then attach the shelf pieces.

I highly suggest installing all the shelves BEFORE attaching sheetrock. This allows you access from both sides of the wall.

Sheetrocking the Wall
Next attach sheetrock to the studs. I used 3/8″ sheetrock that I had leftover from another project and attached it using 1″ drywall screws.

Not the prettiest rock job but it will do for this basement wall. You can see the gap between the sheetrock and the stone foundation wall. Don’t worry this gap will be covered with shiplap.

Shiplap Wall
Begin attaching the shiplap to the sheetrock. I opted to start at the most visible corner and scribed the first board up against the stone wall. Use a laser level to ensure your boards stay plumb. Then attach the shiplap to the wall using construction adhesive and 1 1/4″ brad nails.

Cutting down the shiplap is very easy using a square and circular saw.

Scribing Shiplap
You can see above I have a very tricky seam where the wall meets the stone foundation. To make it look finished you will need to scribe the shiplap to match the curves of the rocks. I shared to process in my Instagram Highlight here and I highly suggest Leah’s video here at See Jane Drill for a great explanation of how to scribe.

The last piece is scribed and now attached to the wall. I applied chaulk on the back side (because I have access from behind the wall) to help with creating a tight seam.

Lime Mortar Seam
Then I taped off the shiplap in preparation for lime mortar. I used lime mortar on the stone wall to refresh the seams and fill lots of holes and cracks.


And now I have a pretty seam where the shiplap meets the stone. I am sure over time this will develop cracks as the seasons / humidity changes but it gives a seamless transition between the two materials.

Shiplap Wall Finishes
I added baseboard and trimmed out the vent. Then applied wood putty to any visible brad nails, let dry and sand. You can see a sneak peek of the slat ceiling up above.

Lastly to seal the shiplap I used Varathane clear satin poly.
Thanks for joining me for this stud storage shelves project. Please leave any questions in the comments below and be sure to follow me on social media for sneak peeks, tools and project inspiration:
SHOP THIS PROJECT:


Boy am I impressed w your ability to handle that rock! We rocked our garage and it’s incredibly heavy. Your wall and storage wall is just amazing! WELL DONE!
Thank you Jaxs, so heavy but this was only 3/8″ so not ‘the heaviest’. Saves me from going to the gym 😉