Here’s a solution for your basement ceiling that you can do yourself and looks pretty snazzy. All you ever wanted to know about how to install a wood slat ceiling. Because in certain spaces having an accessible ceiling just might be your best option.

A DIY tutorial to install a slat ceiling. Finish that basement with a wood slat ceiling that’s easy to install.
Welcome to my basement where I’ve been working hard to finish the space for my teenage kids to hangout. First I built a wall cladded with shiplap, then I repointed the stone foundation walls and now I installed a wood slat ceiling. What could be next?

Ceiling Before
Just for giggles you can see in the before photo above what is your classic basement ceiling. Exposed joists with lots of electrical, plumbing and HVAC running every which way. To make this space more finished and cozy I decided to add wood slats.

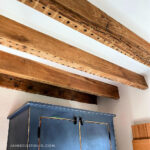
Wood Slat Ceiling
And now the ceiling is complete. I love the touch of modern lines from the wood slats mixed with the natural stone wall, knotty shiplap and green metal console. It’s the complete mix of elements that makes my heart flutter.

I stained the wood slats a mix of dark walnut and briarsmoke to blend in with the existing joists. Then to attach the joists I used trim screws. Trim screws have a pretty brass finish and a smaller head than regular screws.


Basement Ceiling Solution
- conceals electrical, plumbing and HVAC
- easy to install DIY project
- able to scribe against the stone foundation
- customizable to fit most spaces
- easy to uninstall should I ever need to remove for access

Like most basements we have a lot of mechanical obstacles to contend with. Also given the historical nature of our home it has undergone many, many transformations over time so it’s a bit of a patchwork quilt. I knew there would be no real good way to hide all these obstacles so I just worked them into the space. And I’m actually loving how they become part of the room without feeling too annoying.

There’s plumbing and electrical everywhere plus a big, grey HVAC return vent. Maybe some day I will paint the venting but for now it’s au-naturale.


Wood Slats Easy to Customize
The best feature of using 1×2 wood slats on the ceiling is the ease of customizing to fit around your obstacles. As long as you secure the boards to the joists then you can cut around any items that may be in your path.


This view looking up is pretty fantastic if you ask me! It’s worth noting that I used SELECT pine boards which are almost double the cost of regular pine and triple the cost of furring strips. But like anything you pay for what you get. I wanted a tidy look with few knots (as opposed to the shiplap wall) so I choose select pine. If you’re looking for a more rustic look you could use furring strips and save a ton of money.
For more details on how to install this wood slat ceiling scroll down a bit.


Supplies:
- 1×2 select pine boards
- sander
- stain & foam brush
- miter saw or circular saw
- measuring tape
- drill
- 1 1/2″ trim screws

Step 1: Sand your boards. Even though they are select pine there still may be rough edges and dirt marks to remove.

Step 2: Stain the boards. I highly recommend staining the boards before installation.

Step 3: Cut the boards to length and place in position.

Step 4: Attach one end to the joist using a 1 1/2″ trim screw. Use a small piece of 1×2 scrap on its narrow side as a spacer. This will give you an even 3/4″ space between each slat.

Step 5: Attach the board at every joist and be sure to use the spacer at every screw to guarantee equal spacing.

When you come to obstacles do your best to notch the boards using a jigsaw. Or cut the board in two pieces for a natural seam around the obstacle.

For the light fixture I choose to give the brown finish a bit of a makeover to make it fit better with my aesthetic. I used the Modern Masters metal effects kit in rust to give a nice crusty finish. It looks right at home up against the wood, metal venting and copper pipes.
Thanks for joining me for this wood slat ceiling project. Please leave any questions in the comments below and be sure to follow me on social media for sneak peeks, tools and project inspiration:
SHOP THIS PROJECT:


Looks very neat. Nice work Jaimie. What color would you suggest painting the copper pipes and duct work?
Thanks Chris. I’m going to leave the copper pipes as is – I did clean them up with some steel wool and I love the metal look. For the duct work I’m probably going to spray it Rustoluem Gunmetal Gray. It’s a flat metallic that I used on the support post already and I have lots of ‘soft ducts’ that need to be painted so spray paint it is.
Hi Jaime,
Where did you buy the boards and can you tell me the cost of the project?
Thank you,
Cathy
Hi Cathy, the boards are from Home Depot.
Hi Jaime – Your projects are amazing! I have a question for you. If you were to paint the wood wall you installed in the basement, what type/brand of paint would you use? I have a similar wall that I would like to paint white. Thanks and keep these wonderful post coming! – Mary
Thanks Mary, if I were to paint the shiplap I would first prime it with BIN Shellac (those knots are brutal and likely to bleed through) then regular latex paint. I’d use Benjamin Moore Advance in satin but any latex paint will do.
Hi! How far apart we’re your screws placed ?
The ceiling looks amazing.
Thanks Carrie, the screws are not equidistant as they must be placed in the joists so they the distance between each joist is not consistent (old house problems) but the screws all line up together so it feels nice on the eyes.
Hi,
I’m hoping to put a slat ceiling in my basement family room. My question is, do you have to insulate the ceiling before applying the slats?
That’s up to you and there are varying schools of thought on whether or not to insulate the basement ceiling. Definitely worth a google search.
Thank you so much for this tutorial! I want to do this in my basement but wasn’t sure of the actual process. First I will be taking down ugly BLACK drop ceiling…
Can you do this in a bathroom?
Hi Kim, Most definitely. Here’s a bathroom with a similar treatment: https://www.instagram.com/stories/highlights/17842250753263238/ Scroll through all the slides until you get to the ceiling portion. Hope that helps!
What made you use 1 x 2 pieces and not slightly larger 1 x 3 or 1 x 4 so you would not need as many? I love this idea but was thinking of using 1 x 3 (I will need about 60 of these to cover the space I want to begin with)
Hi Jeff, Good question – I just like the narrow 1.5″ width of the 1×2 but yes the wider boards would look great. Good idea
I read that you used screws to affix the slats to joists. Do you think I can use my Ryobi finish nailer instead? I think it would make the job go much quicker. Thoughts?
Hi Chaya, yes you can definitely use a nail gun. I choose screws because if I ever need to remove any slats for access to plumbing or electrical the screws make it easier to remove and replace.
Did you finish the basement/hangout space? I can only find this ceiling treatment and the shelving/wall parts of it.
Hi Karen, for the most part yes. I still have a little bit of ceiling left to do and then I can take full reveal shots. I did put in this storage as well: https://jaimecostiglio.com/diy-built-in-locker-storage-wall/
This is a great idea! We were originally thinking of going with spraying everything black and have no ceiling. But with this idea, we could insulate for sound. How did you deal with warped boards? It seems like very few are actually straight these days when trying to purchase at HD/Lowe’s.
Hi Jeff, in response to your question about warped boards in this case a little warping is okay because my joists are definitely not straight and since the boards are hidden with the sheetrock I actually need them to ‘bend and warp’ with the joists. But I agree if you’re looking for super straight boards better to shop at a lumber yard 🙂
Did you have to pre-drill the screw holes? In older houses, the joist wood can be so hard.
Hi Nancy, Yes I predrilled for the screws in order to countersink with no splitting.
Beautiful! My basement has a long steel I beam that I’d like to box in. Have you or any other readers dealt with boxing in an I beam?
Thank you.
Looks great. I’m 77 and contemplating the task. Hanging and taping the walls I can handle but the drywalling the ceiling is daunting.
My biggest concern is code specifically using materials that have no redeeming fire hinderence.
It’s not only about a future sale but my families personal safety.
But it does look very aesthetic and practical.