Got basic woodworking tools and a few scrap boards? Come with me and let’s build this simple side table perfect for that spot in the family room between the sofa and lounge chair. A special thank you to Katie at Addicted 2 DIY for organizing this #5toolchallenge today. I’ve joined up with a few other awesome DIYers to create a build using five tools.

A DIY tutorial to build a simple side table using five basic tools and scrap wood. Make the perfect side table with these easy plans.
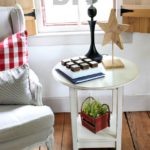
My project is this cutie square side table for our family room. But you absolutely must see the other #5toolchallenge projects from my DIY friends. Please be sure to stop by and leave them a comment or show some love by pinning their project.
#5toolchallenge projects:
- Ladder Golf Game – Katie @ Addicted 2 DIY
- Spool Bed Bench – Gail @ My Repurposed Life
- A Frame Desk – Anika @ Anika’s DIY Life
- Modern Shiplap Hall Tree – Sadie @ The Awesome Orange
- Rustic Wooden Bench – Charlotte @ At Charlotte’s House

Don’t let those angles scare you. Because they are all the same 5 degree miter cut that makes it easy! And also this is one project you won’t need a pocket hole jig to complete. But I do love my pocket hole jig don’t get me wrong.

Simple Side Table:
- square shape fits almost anywhere
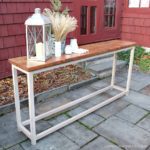
- X design cross supports add interest
- no pocket hole jig necessary
- used cabinet screws as visible hardware
- 5/4 top made from scraps (easily swap out for 1x or 2x board)

And you know this just happens to be the perfect spot for my wine! Funny how that works out 🙂


To build this simple side table I highly suggest checking through your scrap wood pile first and adjust the plans to fit the boards you may have on hand.

Below I will share the plans with step by step instructions. Be sure to scroll down for actual build photos and notes before beginning your side table.
Click here for printable PDF version of these plans.
Supplies:
- Tool #1: miter saw
- Tool #2: table saw
- Third Tool: scroll saw (or you could use a jig saw)
- Tool #4: drill
- Tool #5: sander

Start but cutting the boards on the miter saw. Naturally you need a miter saw in order to make the 5 degree miter cuts.

I opted to use 2×3 boards for the top cross support. But before I use the 2×3 I like to rip off the rounded edge and make them square. I used my table saw to rip off about 1/8″ on each side.

For the cross supports on this side table I used half lap joints. And you can cut these notches using a jig saw or a scroll saw. Although I prefer the scroll saw because I have more control.

I highly recommend sanding the cross supports before attaching them to the legs.

And lastly the most used tool in my collection is the impact driver.
Please remember to visit my DIY #5toolchallenge friends and check out their fun projects:
- Katie @ Addicted 2 DIY
- Spool Bed Bench – Gail @ My Repurposed Life
- A Frame Desk – Anika @ Anika’s DIY Life
- Modern Shiplap Hall Tree – Sadie @ The Awesome Orange
- Rustic Wooden Bench – Charlotte @ At Charlotte’s House
Thanks for joining me for this simple side table project. Please leave any questions in the comments below and be sure to follow me on social media for sneak peeks, tools and project inspiration:
Instagram / Pinterest / Facebook / Youtube / Twitter
SHOP THIS PROJECT:


Every time I see your builds I’m reminded that 1. I need to change my blades because my edges are never that smooth and 2. your mind is so creative! Love this! xx
Thanks Charlotte, changing blades is the bane of my existence so I don’t blame you one bit.
Such a great scrap wood project Jaime! That 5/4 top is amazing! Totally makes the project in my opinion. 🙂
pinning!
gail
Thank you Gail. 5/4 is my new love, it’s the perfect thickness IMO and I’m so glad I kept the scraps on hand 🙂
i love your design, and I’m going to adapt it to fit into my bathroom, probably using oak. I do have a question about how you secured the legs to the top. Did you use glue and screws, just making sure you don’t go through the top?
Hi Larry, yes to attach the legs to the top I used 3″ countersunk wood screws up through the cross supports. I believe it’s pictured in Step 5 in the plans. Good luck!
i love your design
Funny! I made my wine a table too!
It’s the perfect accessory. I use mine all the time and not just for wine. So glad I’m not the only one.