Making your home function to the best of its ability is quite a lofty goal but with a little muscle and determination you can achieve amazing things! Building these built-ins not only improved the functionality of my son’s bedroom but makes me feel like anything is possible.

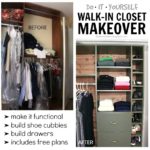
A tutorial for building built-ins the easy way using an Ikea dresser and cabinet to create Shaker style built ins in a bedroom.
I set my sights on this built-in makeover project many years ago and finally just bit the bullet and decided to go for it. No regrets here, in fact I’m so elated with the results it’s making me want to take on the next big job. Let’s start at the very beginning because chances are you may have some existing built-ins like me that just don’t function very well. Below were my son’s bedroom built-ins with storage cabinets below, bookshelf style storage above and no bedroom door.

The closet to the far right is charming and fine despite needing some interior work which I shared here. As you can see there is a lot of non-functional space on the right built-in and the storage cabinets below are giant, vast black holes for piles of clothes. In addition he had no door on his bedroom which meant very little privacy from his older sisters. This was not ideal and I knew I could create a better solution for this space.

I removed the existing built-ins while keeping the closet in tact. There was a good amount of plaster repair needed, paint to strip off the wood floor and a rogue alarm wire to be re-routed before I could even begin building the new built-ins. But one step at a time and ultimately the finished project turned out better than I could have ever envisioned. See for yourself!

I believe this checks off all the requirements:
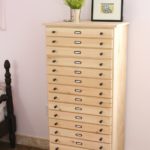
- dresser style drawer storage
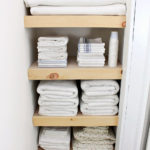
- shelf style closed storage
- a proper door to close the bedroom
And the icing on the cake is the slight nod to the Shakers whom I adore aesthetically. They are well known for built-in cabinetry and amazing storage solutions all made with impeccable craftsmanship. The Shakers may cringe though when they realize I used an Ikea dresser and cabinet for my built-ins. Such is life.

The stately look of built-ins says something about permanence, they have a solid hold on the room as if to say ‘we are here for the long haul’. You can see these built-ins aren’t too deep, only extending out into the bedroom about 22″. I trimmed out the built-ins and closet using a board from the previous built-ins and made sure to match up to the existing baseboard on the walls.

The previous built-in was poorly constructed, not plumb and had no baseboard trim. In addition the wide open shelf was non-functional, wasted space. This is classic janky style furniture.

The new built-ins are an upgraded version with so much more functionality and style. I’m pinching myself writing this knowing that I built these beauties all by myself!


Now I’m secretly very jealous that this is my son’s bedroom and not mine! I think I may need some Shaker style built-ins in the master very soon. And if you’re wondering about that tiny gap between the top drawer and the dresser top that’s one tiny downfall of using Ikea furniture. I may actually add a thin piece of flat trim to the dresser just to fill in that gap a bit.

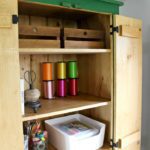
The upper cabinet space has two adjustable shelves plenty deep for a ton of clothes. I probably should paint that plywood white but I actually kind of like the natural contrast.

On the left side of the doorway I torn out the old built-ins and made a sliding barn door for his bedroom door. It’s the perfect solution for this spot being that his bedroom opens out right onto the stair landing without much wiggle room.

In the photo above of the old built-ins you can see the bookshelves are fine and great for storage but the lower cabinet was a hot mess.
Now there’s a beautiful, understated sliding barn door that matches most of the other doors in our home. I like to think it was fate telling me to install that door there.


Below I will detail the steps I took to building these built-ins. Every room situation is different so please make note of your space, measurements and existing conditions. Consider the depth of the dresser and cabinet as well before beginning to ensure the best use of your space. I have estimated these built ins cost about $500 in materials.
Supplies:
- Ikea Tarva dresser
- Ikea Sektion kitchen cabinet (30″ x 24″ x 30″)
- 2 Ikea Grimslov cabinet door fronts (15″ x 30″)
- 2 Ikea Utrusta hinge packs
- 1 Ikea Utrusta hinge door dampers
- 6 – 2x2x8 pine boards
- 1 – 2×4 @ 27″
- shims
- 2 1/2″ wood screws
- 2″ wood screws
- 3/4″ plywood (cabinet top and back)
- 1×8 tongue and groove boards
- cove moulding trim
- clear drawer bumpers

Step 1: Build a frame to sister up to the existing closet studs. I used 2×2 boards for ease. Be sure to place the cross supports at heights where you will attach the dresser and cabinet carcass.

Step 2: Assemble the dresser. I left the drawer fronts off for painting. Attach a 2×4 in between the front two legs. This provides stability and a place to attach the baseboard to the built-ins later. Secure the dresser to the right side framing checking for level and plumb. Shim as needed. I temporarily taped a piece of 1×2 trim at the right side to be certain I had the proper spacing to later trim out the dresser.

Step 3: Build the left side wall again using 2×2 boards. Be strategic about the cross supports to ensure places to secure the carcasses, the vertical wall planking pieces and the baseboard trim later on. Secure this wall to the dresser carcass, to the wall studs and to the floor. Note the dresser leg and dresser top is forward of the 2×2 frames by 3/4″. This is to allow for the trim pieces later.

Step 4: Build the cabinet and install above the dresser. Take note the cabinet is 30″ wide and the dresser is only 29 1/2″ wide. You will need to trim off 1/2″ from the top, bottom and shelves of the cabinet before assembly. In addition check your depth. I opted to use 3/4″ plywood for the backing and top of the cabinet to create a sealed space.
Then attach the tongue and groove planking to the frame to create the built-in wall. Start at the front edge and determine with a scrap piece of trim the proper placement then use finish nails and secure to the frame. Finally add the trim pieces, ceiling moulding and baseboards. Prime everything.


I opted to fill in the routed crevice on the Grimslov doors to achieve more of a Shaker looking door. Also you can see above you will need to rip off 1/4″ from the long edge of each door (not the hinge side) in order to fit.

Install the doors using the Ikea Utrusta hinges. You will want the hinge dampers to prevent slamming, one on each door is plenty.

For the drawer hardware I used these pulls.

And the secret to making the drawers flush to the trim is to add these bumpers. The drawers sit inset on the dresser 3/4″ so if you aren’t adding a face frame and want to make them flush the easiest solution is to add bumpers.

I hope you enjoyed this project as much as I did! Thanks for sharing along in my process. Please feel free to leave your questions in the comments and I will be sure to answer.
Follow along on social media:
Instagram / Pinterest / Facebook / Youtube / Twitter
SHOP THIS PROJECT:


This is clever and you did a beautiful job. I actually found this by searching “how are Shaker built-in drawers made?” I love that you show the whole process. Thank you for sharing!
Thanks Kaye, I know it may be cheating a bit to used ready made drawers but it’s a good solution for those of us who find building drawers challenging! I only wish I had the patience and skill of those Shaker carpenters 🙂 So glad you stopped by, I love hearing from readers.
I love your son’s desk! Do you have a diy for it and more images? Thanks!
Thanks Megann, yes my sons desk details are here: https://jaimecostiglio.com/diy-painted-pipe-base-wood-desk/
Hi – The upper cabinet is melamine so how did you paint it?
Hi Stacy, for the upper cabinet I only painted the exterior of the doors. Just sanded them with 150 first then painted using Satin Enamel. Sand in between coats. They are still looking great 4+ years later with a teen boy using them daily.