I live in a primitive saltbox farmhouse so I don’t feel guilty for one second hopping on the farmhouse style train. In keeping with the aesthetic I built a basic farmhouse style barn door for my son’s bedroom. This door is a very easy build with just a saw, drill, wood glue and screws and you can make your own sliding barn door.

A DIY tutorial to build and install a basic farmhouse style sliding barn door. Make a functional sliding door with off the shelf lumber and pretty hardware.
Our farmhouse is full of barn doors but for some reason one bedroom was missing a proper door. There were two full length shutters acting as a door for this bedroom and I remedied that problem with a DIY sliding barn door. This project was part of the larger built-in renovation I recently tackled and now my son has a grand, new space.

For some areas a sliding barn door is just the perfect solution. They keep walkways free and clear and you don’t have to worry about swinging clearance area. You can see above my son’s bedroom opens out directly almost onto the back staircase so having a sliding door here makes complete sense.

Door Track Hardware
If you follow me over on Instagram you will know I ran into one minor issue with the sliding barn door hardware and our low ceilings. I had ordered a pretty hardware track kit with open wheels but once I had the track installed I realized the wheels were too big. Silly me I should have ordered a lower profile hardware set. I was able to remedy the problem using garage door pulley wheels I had on hand.

The door stays plumb with a plastic door guide. Again I made a little modification by chopping off one side in order to place the guide up against the threshold to keep the closed door behind the guide. Also if you look closely I attached a piece of adhesive backed dark green felt to the door side of the guide. This allows to door to glide easily especially over the grooved joints.

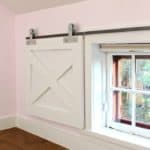
The view from the hallway above of the understated barn door is perfection. I love the contrast of the black hardware nuts and finger pull.

Back inside the bedroom you can see with the door closed I have just enough clearance on the left side for the door to open. It’s the perfect amount of wall space for the door and it ties in beautifully with the built-ins. Down below I will share the process of building the basic farmhouse sliding barn door and how I modified the hanging hardware to fit the low ceiling clearance.
Supplies:
- 2 packages 1x6x8 beach cottage tongue & groove boards (6 boards per bundle)
- 1 – 1x8x6
- 1 – 1×10 @ 30″
- spax wood screws – 1 1/4″
- miter saw
- drill
- wood glue
- clamps
Hardware:
- 1 – 1x4x6 pine wood board
- stain
- sliding barn door hardware kit
- interior door pull
- exterior flush finger pull
- garage door pulleys
- textured matte black spray paint
- low ceilings? use this track

Step 1: Construct the door. I used 6 full size boards and then ripped one board down the middle and used it on either long side for a total of 7 boards wide. You want your door to be wider than the frame opening. Slide the tongue and groove joints together then attach clamps. Cut 2 – 1×8 boards about 3″ shorter than width of door and secure to boards using wood glue and 1 1/4″ wood screws. TIP: Install the top cross support 1″ down from the top in order to attach hardware later. Add the middle 1×10 support in the same manner.

Step 2: This view above is the exterior side of the door. I don’t mind the rough knots. Fill crevices as desired, prime and paint the door.

Step 3: Prepare the door frame. I kept the trim on and simply removed the existing hinges from the old shutters.

Step 4: Fill the hinge areas with flat trim. Cut off excess with flush cut bit in a multi-tool then add wood putty in any gaps.

Hardware
Step 5: Secure the wood ledger board to the wall above the door frame. Then attach the barn door track as outlined in the hardware instructions.

Step 6: I ordered these pretty wheels on the left side not realizing they wouldn’t fit my low ceilings. The remedy was to remove the pretty wheel and swap in garage door pulley wheels.

Step 7: Before assembly apply texture matte black spray paint to garage door pulley wheels, nuts and bolts.

In Step 8: Insert the garage door pulley wheel and use spacers and washers as necessary to ensure proper spacing.

Step 9: Finally attach the hardware to the door. You can see here I had to add an additional 1×2 cross support near the top to catch the hardware. Avoid this mistake and attach your cross supports about 1″ from the top.

Step 10: Lastly install the bottom door floor guide to keep the door from swinging out into the room.

For the hardware you will need an interior pull and an exterior flush finger pull. The finger pull took a little carving with my multi-tool but both are simple to install.

Another project complete and now my son can enjoy a bit of privacy from his sisters. I hope you have the perfect spot for a farmhouse style sliding barn door.
SHOP THIS PROJECT:


Nice job. I enjoy all your projects. Thank you for sharing.
I may need this in my bathroom hallway, can’t wait for your opinion
I would love a barn door. I am in Masvingo. Where are you
Love this particular design! It’s more contemporary and neat than others I’ve seen (and I’ve seen a lot). I need to build 2 of these and I’m so excited to get started after seeing yours. The tongue and groove board construction seems so simple and sturdy with the 3 simple cross boards.
Hmm….do you remember what your door measurement was? I’m just trying to gauge how many packages of boards I need. Both of my doors need to be about 42×86.
Figured it out. Thanks!