
Now that everyone is in full-on organizational mode, purging and cleaning all those closets, I thought it would be a great time to share my walk-in closet makeover.
Fair warning there are A LOT of photos in this post because frankly who doesn’t love an organized closet 😉 But for real I tried my best to show you the before and after in all cases plus how I rebuilt, reconfigured and added-on to the existing built-ins. In addition there are free plans down below to match these built-ins if you’re feeling tempted.

This walk-in closet has 3 walls of built-ins and the fourth wall is a window. Above is the long wall and below is the short wall:

The long wall before and after:

And below is the 3rd wall of built-ins, before and after:

Ready? We arrive to a walk-in closet with pre-existing built-ins. Sturdy, tons of storage, some functionality. Brown laminate. Plus wallpaper.
Let’s address the problems (in addition to brown laminate and wallpaper).
1. Bathroom added below this closet made for interesting placement of vent pipe and exhaust fan tubing. They simply slid the built-ins over a few inches to accommodate but left everything visible.

Below is a mashed up picture of the whole wall:

2. When sliding the built-ins over you now prevent the door from opening fully. That’s annoying.

So let’s fix those problems and make all the built-ins function exactly as we want.
– less hanging space (there was a TON of hanging space)
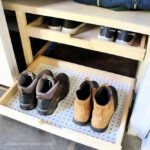
– shoe cubbies (you can never have enough shoe cubbies!)
– additional drawers

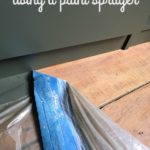
I took 2 sides of built-ins completely out of the room to remove all the wallpaper and paint the pieces outside. You can read all about the painting process here. Needless to say my Homeright Finish Max paint sprayer is a miracle worker.

I painted everything with two coats of Benjamin Moore artichoke. I know this color is not for everyone but we live in a really old (1740) antique home, nearly all the walls are white with london fog trim so this closet is one place I felt like I could add some color and still keep it campy.
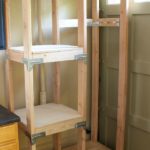
Then I started the rebuild. I drew up plans based on the closet space available and the layout I wanted.

Everything was assembled in the closet.

The cedar planked backing was added to the frames of each piece.

I used precut spacers for the shoe cubbies, this keeps each shelf the exact same height.

Installed the drawers. Both built-ins are secured to the wall using L brackets inconspicuously.

And finally installed some simple framing in front of the vent pipes (first I had to repair the bathroom vent but that’s a whole other story!). The natural wood board on the right was secured to the framing to hide everything. Then all holes were filled and sanded and final coat of paint was put on.
Tada!

Another addition that is necessary in a closet but doesn’t have take up floor or wall space is the sliding mirror. Details on how I built and installed the mirror are here.

It was a lot of work, I’m not going to lie, but so worth it to make the space functional and beautiful for years to come. See the door opens all the way now!

And I now have a sconce that adds so much charm and light whereas before the built-ins were installed directly over the electrical box :.


Still tons of hanging space, so much shelf space plus 11 drawers and shoe cubbies.


On the sloped wall I changed out the drawer pulls and added stained wood boards to finish off the top ledge.

I just love the contrast of the paint against the cedar backing. And having just that touch of cedar makes it all ‘closet like’ without covering every inch of wall space in cedar.
One last photo standing in the doorway looking into the closet:
Below are the actual sketch up plans I used to rebuild the built-ins. There are no step out instructions, basically start with your base and sides then work your way up. The dimensions are exactly as I have the pieces in the room, you will need to adjust to your space.


Thank you for taking the time to look through my walk-in closet makeover. It was a joy to work on and I’m so happy it’s complete. In all fairness I must tell you that I actually don’t use this closet but I gave it to my two girls. They share the closet and it works out swell with plenty of space for two tween girls, all their clothes, shoes and accessories fit just fine.

Sources:
cedar planks (backing): Cedar Safe
ceiling light: Sea Gull Lighting 8869 (weathered copper)
built-ins paint: Benjamin Moore artichoke – advance satin
wall paint: Benjamin Moore simply white – flat
trim paint: Benjamin Moore london fog – semi-gloss
drawer pulls: Pottery Barn classic sink – brass
window shade: Home Depot Home Decorators bamboo woven (+ liner)
area rug: Homegoods
woven baskets: Ikea
red wire basket: Homegoods
I’m linking up to:


I love it, Jaime! The cedar backing is a gorgeous addition, too!
Very nice transformation! I wish my closet looked like that! 😛
Wow, it's fantastic! Love the green and cedar, and that sliding mirror. I bet you're living all that space!
*loving
It looks so awesome!! Closets are tons of work but sooo worth it!! I love the cedar backing!