You’ve been saving old windows for just the right project and I’m here to show you how to make that old window into beautiful wall art. We will make quilt panels and insert them behind the glass window panes for a bright and fresh repurposed project using an old window.

A DIY tutorial to repurpose an old window into wall art by making quilt pieces to fit inside the panes. Grab your scrap fabric pieces for this fun project.
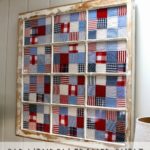
An old window serves as the perfect frame for a quilt. Whether you use a new quilt or if you have an old quilt that isn’t in the best of condition this is a great solution to create a colorful display. I just love the contrast of the soft, textured fabric against the sharp geometry of the window frame.

For this project I made new quilt panels using lots of scrap fabric pieces. I think the combination of the bright primary colors is so fresh and fun. I choose to quilt the pieces with a simple straight stitch just 1/4″ in from the seams. This quilting mimics the look of a window pane in the fabric.

The quilt pieces were made to fit the window panes using 2″ strip piecing which ultimately gives you 1 1/2″ squares.

You could just as easily use an old quilt or portions of a damaged vintage quilt to create the same effect. The window provides the perfect frame and you are saving it from the junk pile. I love a good repurpose project and this window frame into wall art fits the bill.


Below are the step by step instructions to create this quilt window wall art. Be sure to read through entirely before beginning. In regards to sourcing old windows there are quite a few ways to go about finding them. Architectural salvage stores are great but can be pricey so look for renovation projects in your neighborhood where they may be replacing old windows. Or even better yet become good friends with a contractor and they will be glad to give you old windows.
Supplies:
- old window (preferably with glass panes in tact)
- cotton fabrics
- quilt batting
- muslin fabric (backing)
- adhesive backed foam core
- sewing machine & thread
- rotary cutter
- clear quilting ruler
- scissors
- self healing mat
- xacto knife
- safety pins
- iron
- small brad nails or glazing points
- hammer
- sawtooth hangers

Step 1: Source an old window. My contractor friend happen to drop off this stack for me, so kind!

Step 2: Clean window and remove all dirt and grime.

Step 3: Scrap off any excess paint from glass panes. Also if you want to paint the window frame now would be the time.

Step 4: Using a rotary cutter, clear quilting ruler and self healing mat cut the cotton fabric scraps into 2″ strips. Strip piecing will make these quilt pieces come together faster. Alternatively you can cut 2″ squares and assemble one by one.

Step 5: Start sewing together the 2″ strips in random order making sure the colors are varied. For my window pane I needed 5 rows across and 7 rows down. Once you have 5 strips together then cut the strips every 2″.

Step 6: Lay out the cut strips into groups taking care with the color placement and pattern variations. Sew the rows together to make panels.

Step 7: Cut a piece of cotton muslin for the backing then make the quilt sandwich: backing, batting and top. Use safety pins to hold the sandwich together and quilt as desired.


Step 8: Place the panels in the washer and dryer to get that awesome puckered quilt texture. Fair warning: because the edges are not finished on these panels you may have a bit of a tangled mess when they come out of the dryer 🙂 Separate the panel pieces and press.

Step 9: Cut a piece of adhesive backed foam core slightly smaller than the window pane area.

Step 10: Peel off the paper backing and press the quilt panel onto the foam core. Then place the panel right side down into the window pane area. Use small brads or glazing points and hammer into the wood mullion to keep the foam core in position. Trim off any excess fabric than may protrude.

Step 11: Finally add two sawtooth hangers at the top back and hang your quilt window wall art.
Be sure to follow me on social media for project updates and sneak peeks:
SHOP THIS PROJECT:


Oh, wow, Jaime, this is SO pretty! Great work.
Your quilted window art just jumped right out at me over at Vanessa's! I LOVE it so much… it's just so bright and cheery!
This is amazing! I'd love to have you join my Pin Me Linky Party because this is an awesome idea! I'm going to pin it now! I am following via GFC, Pinterst, & Twitter!
Diana
Diana Rambles
Bento Blog Network
Link Rink
This is so awesome! I have a window from my Grandparents barn, and this would be a perfect project for me use for it.
This is great. I love it. Visiting from nifty thrifty things
This is over-the-top fabulous!! I've never seen anything like it, gorgeous 🙂
Really great idea and beautifully done!
This is so UNIQUE! Love the idea to use an old quilt. I picked up a vintage quilt a few years ago and it has some bare spots. This would be perfect.
Stopping over from Serenity Now.
I am in love! This is the cutest upcycled window I've seen to date. And I'm not kidding! You are so amazing to make this, and you are so kind for telling us how….
You ROCK!
Enjoy your window!
hugs x
Crystelle
http://www.crystelleboutique.com
I love this idea I just shared it on my FB page and I am pinning!
Everything about this project screams "awesome". What a great idea. Well documented, for the rest of us to learn from. I'm a farm girl and I want to do something like this. Thanks for the inspiration!
Oh Wow, this is beautiful! It gives me great ideas, thanks for sharing!
What adhesive should I use?
As you are using up your scrap fabric, its not such an issue. If you were to display sentimental pieces or salvage pieces from a damaged heirloom, I wouldnt recommend using adhesive anything to hold the fabric in place, as it would damage the quilt at some point.. also, if the fabric puckers or wrinkles in one spot that you dont want, the adhesive can grab ahold quickly and not want to let go. If you wrap the fabric around the foam core, you can pin the fabric to the core, insert the pins between the outer layers of foam core and it will hold just fine. Just make sure to push the pins in deep enough so that the foam core fits into the window frame after you do it. (Think of the foam core as an ice cream sandwich – pins go in the ice ream part.. )
Its a little more work but if conserving the work is important, its well worth it.