• Home
  • Blog
  • About
  • Contact
    • Disclosure
    • Privacy Policy
  • SHOP
  • Widget area for main menu

    • Email
    • Facebook
    • Instagram
    • Pinterest
    • Twitter
    • YouTube
  • Skip to primary navigation
  • Skip to main content
  • Skip to primary sidebar

Jaime Costiglio

build - paint - sew

  • BUILD
    • BEDS
    • BENCHES
    • DESKS
    • DRESSERS
    • GAMES & TOYS
    • SCRAP WOOD
    • SHELVES
    • STORAGE
    • TABLES
  • TOOLS
  • PAINT
    • CRAFTS
    • FURNITURE
    • HOME DECOR
  • SEW
    • GIFTS
    • HOME DECOR
    • POUCHES
  • HANDBUILT HOLIDAY
    • 2021
    • 2019
    • 2018
    • 2017
    • 2016
    • 2015
    • 2014
    • 2013
  • GIFTS
    • BABIES
    • KIDS
    • FOR HER
    • FOR HIM
    • TEACHERS
    • WEDDINGS
  • SEASONAL
    • 4TH OF JULY
    • FALL
    • HALLOWEEN
    • CHRISTMAS
    • SUMMER
    • SPRING
    • ST. PATRICK’S DAY
    • THANKSGIVING
    • VALENTINE’S DAY
    • WINTER
  • SALTBOX PROJECT
    • BATHROOMS
    • DINING ROOM
    • EXTERIOR
    • FAMILY ROOM
    • FOYER / MUDROOM
    • KIDS BEDROOMS
    • KITCHEN
    • LIVING ROOM
    • MASTER BEDROOM
    • PLAYROOM
  • SCROLL SAW

Old Window Repurposed as a Frame

October 7, 2013

old window repurposed as a frame
How to use an old window as a frame for quilt pieces.  A fabric scrap buster project that puts color on the wall and uses an old reclaimed window as a frame.
old window repurposed to frame quilt pieces

I’m finishing up the family room makeover by adding a little color on the long far wall.
When we moved in four months ago there was red on the walls, trim, railings, outlets, vents, stair risers – basically everywhere.
family room before
I painted the walls Benjamin Moore seapearl with white semi-gloss trim.
And now we have some wall art:
family room after wall art


framed quilt using an old window
framed quilt detail
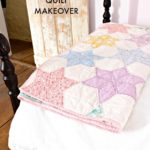
How to make an old window framed quilt:
 
1. Cut 3″ cotton fabric squares:
3" fabric squares
2. Sew into strips:


strip piecing quilt squares
3. Sew strips into rows:
quilt blocks for old window
4. Make quilt sandwich with backing, batting and top:
quilt sandwich
5. Windowpane quilt, wash and dry:


quilting the quilt blocks
6. Press and trim then lay out pieces:


lay out quilt blocks
7. I stripped this old window to remove some paint:
sand and clean old window
Sand smooth and apply one coat clear poly.
8. Cut cardboard to fit windowpane.
Place fabric right side down into window and press cardboard down for a snug fit.
Apply hot glue in corners of window and cardboard for security.


cardboard backing to hold quilt pieces in place
Attach hanging hooks and wire.
quilts pieces framed in old window

You may also like...

  • DIY Heather WreathDIY Heather Wreath
  • Wall Mounted Sink New LifeWall Mounted Sink New Life
  • Deck the Halls Mantel: DIY Spindle Candle HoldersDeck the Halls Mantel: DIY Spindle Candle Holders
  • DIY Vintage Quilt MakeoverDIY Vintage Quilt Makeover
Share this post:

Filed Under: CRAFTS, DIY, HOME DECOR, HOME DECOR, SEW, SEWING16 Comments

Reader Interactions

Comments

  1. [email protected] says

    October 7, 2013 at 2:12 PM

    It's so beautiful, Jaime. What a perfect accent for your room!

    Reply
  2. Amy Ruffo says

    October 8, 2013 at 1:46 AM

    Great idea!

    Reply
  3. Vickie @ Ranger 911 says

    October 8, 2013 at 3:17 AM

    Your room looks completely different with its fresh white paint! Your quilt art is a fun way to add color and interest to the wall. I love it!

    Reply
  4. jelly andrews says

    October 8, 2013 at 3:58 AM

    This is so adorable. I love the distress look of the windowpane. And it is easy to make too. Oh! I will definitely going to try this DIY project. Thanks for sharing the steps.

    Reply
  5. DaiseyJayne.com says

    October 9, 2013 at 12:46 PM

    Jaime this is just wonderful! It's so fresh and modern one way and warm and comforting another, really beautiful!

    Reply
  6. DaiseyJayne.com says

    October 9, 2013 at 12:46 PM

    Jaime this is just wonderful! It's so fresh and modern one way and warm and comforting another, really beautiful!

    Reply
  7. KC Coake says

    October 11, 2013 at 2:10 AM

    Wow! That is so pretty!
    KC

    Reply
  8. Michele Alger says

    October 11, 2013 at 6:58 AM

    Sincerely beautiful! I LOVE the rustic feel. Such a great idea.

    Reply
  9. Rhonda says

    October 11, 2013 at 9:21 AM

    Come visit us at http://obsessiveandcreative.blogspot.com/2013/10/craft-frenzy-friday-8.html
    We are having a party and it won’t be the same without your creativity!
    Craft Frenzy Friday!

    Reply
  10. Joselyn says

    October 12, 2013 at 3:47 AM

    So vintage Americana;I love it.

    Reply
  11. marty (A Stroll Thru Life) says

    October 12, 2013 at 4:35 PM

    Oh I love framed quilt squares and framing them with a window is genius. I would love for you to link up to my Inspire Me party that will go live Monday afternoon at 2:30PT. http://www.astrollthrulife.net Hope to see you there. Hugs, Marty

    Reply
  12. Rhonda says

    May 25, 2018 at 10:28 AM

    This is soooooooo gorgeous thanks for sharing I’m definitely doing if you don’t mind me asking what size window did you use I’m excited because i’m in the middle of remodeling thanks

    Reply
  13. Kirstie M Lynch says

    May 26, 2018 at 5:57 PM

    I love the quilt in the window but I would like to know where you got the dark wood table underneath of it please!!!!

    Reply
    • Jaime says

      May 27, 2018 at 7:30 AM

      Thanks Kirstie, the long table underneath is Pottery Barn from ages ago.

      Reply
  14. Pat Phillips says

    October 19, 2018 at 10:23 PM

    How did you attach the little quilts to the back of the window sections?

    Reply
    • Jaime says

      October 20, 2018 at 9:17 AM

      Hi Pat, The cardboard behind the quilted piece fits snug into the window. You can add a dab of hot glue to further secure.

      Reply

Leave a Reply Cancel reply

Your email address will not be published. Required fields are marked *

Primary Sidebar

Hi! I’m Jaime

Jaime Costiglio

Hello!

Thank you for stopping by.
Join me for lots of DIY.

Read more

Get new posts via email

Handbuilt Holiday: Gift Project Plans

handbuilt holiday gift project plans

Collection of DIY gift project plans to build.

The Home Depot Tool Prospective

THD Prospective

Tools to consider for the DIYer.

Archives

The Home Depot Logo
Copyright © 2023 Jaime Costiglio · Custom site by Moonsteam Design

Privacy Policy