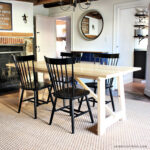
If you’ve been building furniture for some time chances are you have a bit of a wood stash on hand. So I’m serious when I say ‘shop your wood stash first’. Chances are you probably have all the pieces on hand to make something amazing and that’s the story with this simple shiplap table. I’m sharing how to build this DIY shiplap style table perfect for any space big or small.

A DIY tutorial to build a shiplap simple table. Make a simple table with shiplap top for any space complete with tapered legs.
This simple table came straight from my wood (hoarding) stash and makes me so proud of myself for holding onto what most folks might consider firewood. Once assembled with fellow wood stash pieces it serves a very important role as the centerpiece of our newly renovated keeping room.

Simple Table
I’m 1000% for furniture with purpose and this shiplap table sure does meet that requirement. I took an old door, a piece of worn out floor board and some posts from a previous table project, and combined them all to make a functional, beautiful shiplap table. It’s got all the charm and character you could want in a farmhouse style table plus the bonus factor of repurposing old wood into something new for our family.


Shiplap Charm
- square edge overlaps
- gaps between boards (allow for seasonal movement)
- full of knots and dings and dents

I’ve built many, many tables over the years but nothing comes close to this cutie. It has stolen my heart and I think that’s because I used well-loved and worn pieces of lumber that had a previous life. And now I brought it all back together with a new purpose and it fits seamlessly in our historic home.


Tapered Legs
Down below I have the plans to build this table as well as some real life building tips. You can see I opted to taper the legs just a bit on the interior corner. That’s personal preference because I didn’t want a ‘cankle’ look for this table. I’m so happy I added that taper. Combined with the open space below the table it makes the space flow and feel inviting.


Click here for a PDF printable version of the plans.
Supplies:
- 1 – 4x4x10’ post
- package 1x8x4 square edge shiplap boards (6 pack)
- 1 – 1x4x6 pine board
- 2 – 1x3x8 pine boards
- 2 – 1x2x8 pine boards
- 1 ¼” pocket hole screws
- 2” wood screws
- 1 ¼” wood screws
- 2” brad nails
- Wood glue
- 6 – figure 8 fasteners

Because I was using scrap lumber I actually built the top first. I needed the final dimensions of the top in order to determine the aprons. If you’re aiming for a specific size top then I highly suggest building the top FIRST and then the base.
Tapered Legs:
To make the tapered legs I saved the details in an Instagram highlight here. You will need to make a tapering jig (like the one I created here) and use Tamar at 3×3’s tutorial here.

To attach the top to the base I used figure 8 fasteners. Mark where you need the fasteners then predrill an inset area using a forester bit. Attach one side of the fastener to the apron and then once the table top is in position you attach the other side to the underside of the table top.

Table Finish:
To finish this shiplap simple table I used clear satin wipe on poly followed by clear wax.

Thanks for joining me for this shiplap simple table project. Please leave any questions in the comments below and be sure to follow me on social media for sneak peeks, tools and project inspiration:
SHOP THIS PROJECT:


This is very lovely. Thanks for sharing!
Thank you Karen, it was so fun to build and create out of my stash. And my family is getting great use out of it now!
It’s a lovely table. But why, in the pdf instructions, do you rip the “lap” off all the boards for the top? I understand taking off the outer edges for the breadboard-like trim.
Hi Leslie, “rip off ‘lap’ on each of the edge boards” meaning only the lap on the two exposed edges.
Your cankle description made me lol 🙂 can you tell me where your rug is from? It’s beautiful!
Thanks Joanna, a little taper does it good :). The rug is Loloi Jules in Merlot (9 x 12) https://amzn.to/3bh2giR (affiliate link) and we love it!
Thank you! Looks really beautiful in there with your wall color and the beams 🙂