• Home
  • Blog
  • About
  • Contact
    • Disclosure
    • Privacy Policy
  • SHOP
  • Widget area for main menu

    • Email
    • Facebook
    • Instagram
    • Pinterest
    • Twitter
    • YouTube
  • Skip to primary navigation
  • Skip to main content
  • Skip to primary sidebar

Jaime Costiglio

build - paint - sew

  • BUILD
    • BEDS
    • BENCHES
    • DESKS
    • DRESSERS
    • GAMES & TOYS
    • SCRAP WOOD
    • SHELVES
    • STORAGE
    • TABLES
  • TOOLS
  • PAINT
    • CRAFTS
    • FURNITURE
    • HOME DECOR
  • SEW
    • GIFTS
    • HOME DECOR
    • POUCHES
  • HANDBUILT HOLIDAY
    • 2021
    • 2019
    • 2018
    • 2017
    • 2016
    • 2015
    • 2014
    • 2013
  • GIFTS
    • BABIES
    • KIDS
    • FOR HER
    • FOR HIM
    • TEACHERS
    • WEDDINGS
  • SEASONAL
    • 4TH OF JULY
    • FALL
    • HALLOWEEN
    • CHRISTMAS
    • SUMMER
    • SPRING
    • ST. PATRICK’S DAY
    • THANKSGIVING
    • VALENTINE’S DAY
    • WINTER
  • SALTBOX PROJECT
    • BATHROOMS
    • DINING ROOM
    • EXTERIOR
    • FAMILY ROOM
    • FOYER / MUDROOM
    • KIDS BEDROOMS
    • KITCHEN
    • LIVING ROOM
    • MASTER BEDROOM
    • PLAYROOM
  • SCROLL SAW

DIY Built-In Playroom Storage Shelves

June 20, 2011

A place for everything and everything in its place.  Built-in storage shelves are hands down one of the best organizational solutions on the planet.  And these DIY playroom storage shelves I built for Grandma’s beach house are a prime example.  Let’s check it out!

built in storage shelves

Open storage shelves in grandma’s playroom makes for easy access for kids. Contain the toys but make them accessible with storage shelves.

I’ve built A LOT of shelves – bookshelves, open shelving, closet shelves – the list goes on.  And every single time I complete a built in project I always say to myself, “Why didn’t I do this sooner?”.  Even the simplest of storage shelves is 100% worth the time, effort and expense so I say go for it!
built in open shelving under tv

Open Storage

For this bonus playroom space at Grandma’s beach house we needed a storage solution for the toys but also a place to house the tv components.  In order to truly appreciate these built-ins you must see the before shot:

playroom before tv on wall
Yikes!!  There’s so much potential in that space it was killing me.  Grandma was faced with The Flat Screen Dilemma – how to hide all the wires without cutting a hole in the wall.  And then where to put the components.  Plus she needed a bit of toy storage for all the grandkids.

Playroom Shelves:

  • contain the toy mess
  • easily accessible
  • provide storage for tv components
open toy storage

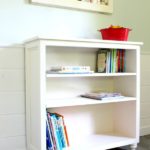
I think these simple storage shelves are a great solution for this space.  The toy mess is now contained but still easily accessible for little ones.  And the tv components have a home plus the wires are hidden.

So for this build I used 2 sheets of cabinet grade 3/4″ plywood and 6 – 1x2x8 pine boards to trim out the front.  In total about $150 worth of lumber and hardware.  This room will be painted soon – including the storage shelves – so they will look even more built in after the paint goes up.
playroom storage shelves

Storage Shelves

And because this playroom is part of the original garage the wall actually starts up about 7″ from the floor.  So in order to accommodate the wall rise and baseboard I had to cut out the matching profile from both sides using a jigsaw:

jigsaw back edge of vertical pieces
And then I made sure the bottom shelf rested exactly on top of the baseboard rise to help carry the load and make the shelves look built in.
built in shelves at baseboard
open shelving
Then the whole unit is secured to the wall with four L brackets so no little ones get hurt.
accessible toy storage

Cord Management

In order to hide all those unsightly wires from the TV I used a channel cord cover.  All the wire fit snugly into this cord management invention (which will also be painted the same color as the wall and shelves).
cable box shelf for tv components
One last BEFORE and AFTER for the full effect:
playroom beforeplayroom shelves after

Thanks for joining me for this playroom storage shelf project.  Please leave any questions in the comments below and be sure to follow me on social media for sneak peeks, tools and project inspiration:

Instagram / Pinterest / Facebook / Youtube / Twitter

SHOP THIS PROJECT:

storage shelves in playroom

playroom storage shelves

built in storage shelves

You may also like...

  • DIY Truck ShelfDIY Truck Shelf
  • DIY BookshelfDIY Bookshelf
  • DIY BookrackDIY Bookrack
  • DIY Animal Book CartDIY Animal Book Cart
Share this post:

Filed Under: BUILD, DIY, FURNITURE, ORGANIZATION, SHELVES, STORAGE16 Comments

Reader Interactions

Comments

  1. Inspire Me Heather says

    June 20, 2011 at 11:45 AM

    Great job Jaime, the shelves look fantastic! I like that you made them chunky, know what I mean? They look really sturdy and well built!

    Reply
  2. Janet says

    June 20, 2011 at 5:23 PM

    Wonderful idea! One shelf with so many functions! It looks great, I'm sure it's been greatly appreciated. 🙂

    Reply
  3. Cassie @ Primitive & Proper says

    June 20, 2011 at 6:12 PM

    what a fabulous use of space! you are a building genius!

    Reply
  4. Katy says

    June 20, 2011 at 10:10 PM

    This is super impressive, you go Jaime! Can't wait to see it painted..

    Reply
  5. pinktoesandpowertools says

    June 21, 2011 at 2:40 AM

    Cutting out the profile to accomodate the wall rise–can't buy that off the shelf!! This turned out fantastic Jaime.

    Reply
  6. Joselyn says

    June 21, 2011 at 3:25 AM

    Visiting from Coastal Charm. Love the clean line design. Turned out great. Awesome job!

    Reply
  7. beachcomber says

    June 22, 2011 at 10:59 AM

    a big improvement! stopping by from a beach cottage.
    cheryl x

    Reply
  8. Marnie says

    June 22, 2011 at 11:20 AM

    Great job. Glad to have found your blog via a Beach Cottage.
    x Marnie

    Reply
  9. Martha says

    June 23, 2011 at 9:44 AM

    Wow! It looks great!

    Reply
  10. Amanda says

    June 23, 2011 at 9:37 PM

    Great job, looks really good!

    Reply
  11. R @ Rebecca's Roundup says

    June 23, 2011 at 11:25 PM

    I want to do this! Do you mind sharing how much it cost? Can you comment on my blog or email me @ [email protected] to let me know? thanks a million!

    Reply
  12. Katy says

    June 24, 2011 at 12:18 AM

    It looks great. I love having a place for all the toys. I think it encourages the little ones to pick up too.

    Reply
  13. Michelle says

    June 26, 2011 at 12:08 AM

    Looks amazing! I am visiting from Tatertots and Jello and I would love if you would link this up this weekend to my Delicately Constructed Fridays linky party!!
    Have a great weekend!
    Michelle
    http://www.delicateconstruction.blogspot.com

    Reply
  14. Jordan McCollum says

    June 26, 2011 at 6:08 AM

    These are great! I'm jealous 😉 Here from I Heart Naptime.

    Jordan
    http://www.WaywardGirlsCrafts.com

    Reply
  15. Tauja Catchings says

    June 27, 2011 at 8:04 PM

    Wow-just stumbled upon your blog and I absolutely love it! Can't believe that you made this shelving unit yourself! It looks great!! Fantastic job!!

    Reply
  16. Shaunna says

    June 29, 2011 at 2:17 PM

    Excellent!! You are one talented lady! THanks for linking this one up too!!
    🙂
    shaunna

    Reply

Leave a Reply Cancel reply

Your email address will not be published. Required fields are marked *

Primary Sidebar

Hi! I’m Jaime

Jaime Costiglio

Hello!

Thank you for stopping by.
Join me for lots of DIY.

Read more

Get new posts via email

Handbuilt Holiday: Gift Project Plans

handbuilt holiday gift project plans

Collection of DIY gift project plans to build.

The Home Depot Tool Prospective

THD Prospective

Tools to consider for the DIYer.

Archives

The Home Depot Logo
Copyright © 2026 Jaime Costiglio · Custom site by Moonsteam Design

Privacy Policy