• Home
  • Blog
  • About
  • Contact
    • Disclosure
    • Privacy Policy
  • SHOP
  • Widget area for main menu

    • Email
    • Facebook
    • Instagram
    • Pinterest
    • Twitter
    • YouTube
  • Skip to primary navigation
  • Skip to main content
  • Skip to primary sidebar

Jaime Costiglio

build - paint - sew

  • BUILD
    • BEDS
    • BENCHES
    • DESKS
    • DRESSERS
    • GAMES & TOYS
    • SCRAP WOOD
    • SHELVES
    • STORAGE
    • TABLES
  • TOOLS
  • PAINT
    • CRAFTS
    • FURNITURE
    • HOME DECOR
  • SEW
    • GIFTS
    • HOME DECOR
    • POUCHES
  • HANDBUILT HOLIDAY
    • 2021
    • 2019
    • 2018
    • 2017
    • 2016
    • 2015
    • 2014
    • 2013
  • GIFTS
    • BABIES
    • KIDS
    • FOR HER
    • FOR HIM
    • TEACHERS
    • WEDDINGS
  • SEASONAL
    • 4TH OF JULY
    • FALL
    • HALLOWEEN
    • CHRISTMAS
    • SUMMER
    • SPRING
    • ST. PATRICK’S DAY
    • THANKSGIVING
    • VALENTINE’S DAY
    • WINTER
  • SALTBOX PROJECT
    • BATHROOMS
    • DINING ROOM
    • EXTERIOR
    • FAMILY ROOM
    • FOYER / MUDROOM
    • KIDS BEDROOMS
    • KITCHEN
    • LIVING ROOM
    • MASTER BEDROOM
    • PLAYROOM
  • SCROLL SAW

DIY Playroom Built Ins from Ikea Cabinets

January 26, 2013

diy playroom built ins
How to combine Ikea kitchen cabinets with a custom made base support, bench top and wall cabinet modifications to make playroom storage built ins.

diy playroom built ins before and after


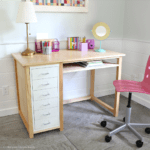
Made to look built in but actually free standing this storage set-up combines deep base units to make a bench:

diy playroom built ins bench

and wall cabinets for vertical storage which accommodate the window opening:

diy playroom built ins Ikea cabinet storage

On the left side is one 36″ two-door cabinet and on the right is one 18″ one-door cabinet:

playroom built ins using Ikea cabinets
Ikea cabinet built ins for toy storage
And below is tons of deep storage:
Ikea cabinet built ins for toy storage with bench
Ikea cabinet built ins with toy storage bench
Some notes on the build:
1. We were able to keep the brand new base molding in tact because the combined width of the units allows for a 2 1/2″ space between the ends of the unit and the wall:
built in bench with space
Just enough room to stick your arm in and search for lost plastic play figures!
2. The wall cabinets are secured to the wall in 3 places with 2″ metal L brackets:
built in cabinets secured to wall
3. I added a top cap plywood piece on the wall cabinets to give a finished look, cover the cam hardware and create a tiny lip edge without adding crown molding:
modified Ikea cabinet for toy storagemodified Ikea cabinet with plywood top
4. I added a 3/4″ plywood piece to the base of each wall unit, you need this to create clearance for the door(s) to function properly:
modified Ikea cabinet with plywood base
5. The hardware is basic from Home Depot, brushed chrome:
hardware pulls on playroom built ins
6. Costs:
Ikea cabinets as shown: about $800
Lumber for base support, bench top & wall cabinets: $75
Add hardware.
7. Inspiration:
Kate at Centsational Girl has great Ikea cabinet hack ideas here and here.
diy playroom built in bench and cabinets using Ikea kitchen cabinets
Here’s how to build the playroom built ins:
(I readied all pieces before transporting to a friend’s house for installation.)


1. Purchase Ikea kitchen cabinet units to fit your space.
* Don’t forget to add door dampers, they DO NOT come as part of the door hinge hardware and for $5 per pair they are well worth the investment.*2. Assemble base units (3 top cabinets to refrigerator – 30″w x 24″d x 15″h) and clamp together.
* DO NOT attach back panel at this point.*
Build base support on top of units (top is same as bottom).  I used 2x4s and primed 1x4s for toe kick.
The final depth of the base support is 23.5″ and the width is 1/2″ shorter on both ends.
* Be sure to predrill pocket holes now to attach support to base units later.
Paint visible toe kick Benjamin Moore satin impervo Simply White.

2x4 base for bench cabinets

3. Cut 3/4″ Purebond birch plywood for bench top.
I cut mine at 91″l x 25.5″w, prime and paint visible side.

4. Assemble wall units.
Cut 3/4″ ply to fit exactly under each cabinet, this is necessary for door clearance.
Cut 3/4″ ply finished tops, mine overhang 3/4″ in front and 1/2″ on each side.
Prime.

5. Attach top piece to wall unit with glue and screws, make note of cab hardware location (marked with arrows):

top of ikea kitchen cabinets

Clamp, predrill and countersink 1 1/4″ #8 screws to secure top piece to wall cabinet:

attach plywood top to kitchen cabinet

7. Putty screw heads, sand and apply painters tape to protect cabinet finish:

painted plywood top on kitchen cabinet

Paint two coats Benjamin Moore satin impervo Simply White.

8. Paint edges and attach ply pieces to bottom of wall units:

painted plywood base on kitchen cabinet
9. Ready for assembly.
Clamp base units together and screw seams together at very top and very bottom peg holes:
bench base units clamped together
Now place base support on top of base units, clamp and secure support to unit through pocket holes.
(Sorry no picture.)
10. Cut out back panel for any electrical outlets using a jig saw:


cut out hole for outlet access


cut out hole in backing for outlet access
11. Attach bench top piece from inside base units.
Place wall cabinets in position and secure from inside base units as well.
*Be sure to secure wall units to wall first as noted above before screwing to bench.


assemble cabinets in playroom

12. Attach doors and hardware.

You may also like...

  • DIY Polka Spot Table MakeoverDIY Polka Spot Table Makeover
  • Build a Wood and Metal DeskBuild a Wood and Metal Desk
  • DIY Loft Bed with Lego Storage & Work SpaceDIY Loft Bed with Lego Storage & Work Space
  • Small Master Bathroom RenovationSmall Master Bathroom Renovation
Share this post:

Filed Under: BENCHES, BUILD, DIY, FURNITURE, FURNITURE, ORGANIZATION, PAINT, SHELVES, STORAGE17 Comments

Reader Interactions

Comments

  1. Art and Sand says

    January 26, 2013 at 2:16 AM

    Love your built ins. We added a window seat in our dining room and love it. I am sitting on the window seat, blogging, while my husband is making dinner.

    Reply
  2. newhousetohome says

    January 26, 2013 at 3:16 AM

    These fit perfectly! What a great addition to this playroom.

    Reply
  3. Our Pinteresting Family says

    January 26, 2013 at 4:18 AM

    You've done a fantastic job with these built ins. 🙂

    Reply
  4. ~KB says

    January 26, 2013 at 5:47 AM

    These built ins look great! I like your thought on the base unit. Something for me to consider when attempting to build a window seat for my daughter's bedroom though I'll have to double check heights. Anyhow great job! KB iheartdecoratingandbudgeting.blogspot.com

    Reply
  5. Katy says

    January 27, 2013 at 4:59 PM

    love it Jaime! good job! 🙂

    Reply
  6. Attempting Aloha says

    January 28, 2013 at 5:26 AM

    So so pretty, Jaime! Ugh! Makes me wish we weren't currently renters!!! Ha!

    Aloha,
    Charlie

    Reply
  7. TJ Lotz says

    January 29, 2013 at 2:14 AM

    I love the white color in that room.

    Reply
  8. Jenny says

    February 1, 2013 at 3:49 AM

    What a brilliant idea, and such a high-end look! Fantastic! Oh, all of that storage – perfection!

    Reply
  9. Custom Comforts says

    February 1, 2013 at 11:36 AM

    What a great idea and I have a space just like this in my upstairs bedroom. I'm going to pin this for future reference. Thank you so much.
    Cindy

    Reply
  10. Korrie@RedHenHome says

    February 3, 2013 at 4:06 AM

    This idea is working in my brain…hoping I can make something similar work in our family room/play room! It would be great to hide away all the legos 😉

    Reply
  11. Sharon @ Lilikoi Joy says

    February 8, 2013 at 3:08 AM

    So functional AND pretty! Great job! So glad I saw this featured at the Shabby Nest. 🙂 Sharon

    Reply
  12. Laura @ House of Thrifty Decor says

    February 16, 2013 at 3:23 PM

    Very cool!! Love this idea!!

    Reply
  13. Detlef says

    May 20, 2015 at 10:25 PM

    Combine Ikea kitchen cabinets with a custom made base support, bench top and wall cabinet modifications to make this playroom storage build … wstoragecabinets.blogspot.com

    Reply
  14. tammy galensky pentz says

    July 3, 2016 at 2:00 PM

    Which ikea cabinets are those?
    Thanks!

    Reply

Leave a Reply Cancel reply

Your email address will not be published. Required fields are marked *

Primary Sidebar

Hi! I’m Jaime

Jaime Costiglio

Hello!

Thank you for stopping by.
Join me for lots of DIY.

Read more

Get new posts via email

Handbuilt Holiday: Gift Project Plans

handbuilt holiday gift project plans

Collection of DIY gift project plans to build.

The Home Depot Tool Prospective

THD Prospective

Tools to consider for the DIYer.

Archives

The Home Depot Logo
Copyright © 2023 Jaime Costiglio · Custom site by Moonsteam Design

Privacy Policy