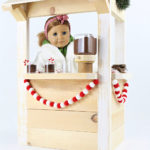
Friends this might go down as my favorite DIY 18″ doll build project ever. Please let me introduce you to the doll size camp hideaway. As usual every Friday leading up to Christmas Ana White and I share a new gift project idea and today is no different. Except this project is over the top cute!

A DIY tutorial to build an 18″ doll size camp hideaway. Make this handmade hideaway camp for your doll loving kids complete with a camping cot.
We’ve been sharing holiday gift build ideas for 7 years now through the Handbuilt Holiday series and we’ve amassed quite a collection (see them all here). But we’ve never done a doll size cabin or bunk house or hideaway, whatever you want to call it. It’s got everything and more and the absolute best part – you may just be able to build it using your scrap wood pile. At least that’s what I did, but I do have a rather large scrap wood collection.

Scraps aside Ana designed the plans with standard lumber sizes in mind to keep things economical. For instance, originally we had a larger overhang on the roof but then we couldn’t fit all the 1/4″ plywood pieces onto one handy panel so she shorten the roof. She’s always thinking smart like that.

Handmade Hideaway Features:
- platform style base with steps
- shaked roof
- x detail railings
- open sides for easy access
The structure of the 18″ doll camp hideaway is beautifully designed with solid 2×2 posts and 1×2 details to make building easy. My best advice for this project is to use wood glue and wood screws whenever possible to ensure secure joints.

I built a camping cot sized just right for 18″ dolls. The plans for the cot bed are in a separate post here. It’s very simple and made from 1/2″ x 3/4″ flat moulding and cotton fabric stapled to the frame. A few mitered cuts, some pin nails and a lot of wood glue make for a cute camping cot.

I just love the contrast of the stained wood against the bright white paint. I took inspiration from Jamin & Ashley at The Handmade Home who first built the Handmade Hideaway years ago. Their hideaway is actual kid size in their backyard and then American Girl copied their version when they made the doll size camp hangout. So we’re bringing it back to the DIY space with this DIY 18″ doll size camp hideaway.

Handmade Accessories:
- clean cabin award
- camping cot
- handpainted camp sign
- bunk number sign

There’s a bazillion doll accessories on the market but why buy when you can DIY? You know I can’t resist a handpainted sign and some scroll letters.


Be sure to grab the plans at Ana’s site here. She has the cut list and step by step instructions to build this 18″ doll camp hideaway. And check my notes below for finishing tips.

In order to apply stain only to the platform and steps you need to tape off the areas that will be white. Wrap painters tape around those pieces then apply the stain.

Once the stain is dry remove the painters tape. Now in order to paint the white portions without getting paint on the stained parts you need to apply painters tape on the stained areas.

And then cover the big portions with plastic. This keeps the spray paint off of the stained parts.

You’ll want to stain the roof slats prior to attaching them.

For the doll camping cot I used 1/2″ x 3/4″ flat moulding, wood glue, 3/4″ finish nails and 1 1/4″ brad nails. The plans can be found here. Get ready for some 60 degree miter cuts! And don’t worry if you miter saw doesn’t go to 60, I have a jig you can make to increase the angle here.


For the camp sign I designed the layout in Picmonkey and then printed it to size. Place the layout over a piece of 1/4″ plywood painted white and then trace the outline of each shape with a ballpoint pen. The pen leaves an indent in the wood and gives you a guide where to paint. I just love the handpainted look here.

Thanks for joining me for this project. Please leave any questions in the comments below and be sure to follow me on social media for sneak peeks, tools and project inspiration:
Instagram / Pinterest / Facebook / Youtube / Twitter
SHOP THIS PROJECT:


very cute idea lots of detail
Jaime,
This is incredible! I can’t wait to make this for my nieces they are going to absolutely love it!
Thanks Erin, it’s such a fun project and a great gift.
This is such an adorable project! I had been wanting to DIY this exact project, you have just given me the motivation to give it a try. I love all your details. Thank you for sharing!
Thank you Lorena, I had the most fun putting it altogether. Good luck with yours!
This is such a cute project! I was wondering if it would be possible to make the roof a bit taller without damaging the integrity of the structure? I was thinking of just adding a few inches to the 2x2s but wasn’t sure if that would make it unstable. Thank you so much for the idea and instructions!
Hi Emily, Great idea and yes I think it would be fine. You may consider adding cross supports (under the roof) between the angled roof supports. Good luck!
This is the cutest thing ever! Where can I find the instructions for the cot? Size of signs?
Thank you so much! My daughter will love this!
Hi JoAnn, I haven’t posted plans for the cot yet (too many things right now!). The large poster sign in the back is 6 1/2″w x 6″h, the Bunk 18 sign is 6 1/2″l x 2″h, and the cabin award is 3 1/4″w x 2 1/4″h. Good luck!
Super cute! Love all the little details!
Can you share where you got the quilt and pillow for the cot? Also, did you make the bedside table?
Thanks Jenn. I made the quilt and pillow awhile back as part of this bunk bed set here: https://jaimecostiglio.com/b-is-for-bunk-beds-2/. The details on sizing are in that post. The bedside table is a little wooden crate that I received with a travel mug but easy enough to make yourself. It measures 4 1/2″ on all sides.
Making this right now!! Where did you find the lantern? I can’t get link to work.
Hi Amy, The lantern is from Amazon. I checked the link and it seems to be working fine now. I’ll leave it here as well: https://amzn.to/2QK2Ue5 (affiliate link). Good luck with your hideaway!
Thanks!!
Any chance I could get measurements for the cot? I think I can figure it out, but need some cut measurements.
I can’t find the cot plans either. Someone please let me know if you do! I also didn’t see the quilt dimensions on the post referred to that she mentioned.
Plans for the cot are here: https://jaimecostiglio.com/diy-18-inch-doll-cot-bed/
Can’t seem to find the link for plans, leads to ana’s Site but then she directs back here, anyone find any actual build plans?
Hi Daina, the plans are on Ana’s site here. Be sure to scroll down: https://www.ana-white.com/woodworking-projects/camp-hangout-18-or-american-girl-dolls
Jamie, it appears that the plans are no longer on Ana’s site – I click the link at the site above and it goes to “Page not found”? Is something wrong?
Hi Jessie, the plans are here: https://www.ana-white.com/woodworking-projects/camp-hangout-18-or-american-girl-dolls
Love this build. I was wanting to get plans for the cot though I could not find them on your site.
Plans for the cot are here: https://jaimecostiglio.com/diy-18-inch-doll-cot-bed/
Hello!
I would love to make this – but it would really need the doll cot! Are there plans/dimensions for the cot? Thanks!
Would you be able to give us the dimensions/measurements of the wood pieces on the cot?
Plans for the cot are here: https://jaimecostiglio.com/diy-18-inch-doll-cot-bed/
Hello Jaime,
This looks great and I’m planning on building it for my niece for Christmas!
Like a few have asked, have you been able to put together the plans for the cot? It adds so much to the finished project that it’s basically essential.
Thanks! 🙂
I’m reading through Ana’s plans and I’m wondering if you have any tips for making the smaller cuts on a miter… I know she says cut from larger pieces but it’s hard to do once the peace is already small on one side. I rigged up an extension piece to use but it’s not sturdy
Hi Jaime, I make all the small miter cuts first (from longer pieces) and then anything with a square cut after. I wouldn’t cut a miter piece shorter than 4″, there’s no way to clamp it or hold it safely without jeopardizing your fingers.
What is the stain color used in this adorable project?