• Home
  • Blog
  • About
  • Contact
    • Disclosure
    • Privacy Policy
  • SHOP
  • Widget area for main menu

    • Email
    • Facebook
    • Instagram
    • Pinterest
    • Twitter
    • YouTube
  • Skip to primary navigation
  • Skip to main content
  • Skip to primary sidebar

Jaime Costiglio

build - paint - sew

  • BUILD
    • BEDS
    • BENCHES
    • DESKS
    • DRESSERS
    • GAMES & TOYS
    • SCRAP WOOD
    • SHELVES
    • STORAGE
    • TABLES
  • TOOLS
  • PAINT
    • CRAFTS
    • FURNITURE
    • HOME DECOR
  • SEW
    • GIFTS
    • HOME DECOR
    • POUCHES
  • HANDBUILT HOLIDAY
    • 2021
    • 2019
    • 2018
    • 2017
    • 2016
    • 2015
    • 2014
    • 2013
  • GIFTS
    • BABIES
    • KIDS
    • FOR HER
    • FOR HIM
    • TEACHERS
    • WEDDINGS
  • SEASONAL
    • 4TH OF JULY
    • FALL
    • HALLOWEEN
    • CHRISTMAS
    • SUMMER
    • SPRING
    • ST. PATRICK’S DAY
    • THANKSGIVING
    • VALENTINE’S DAY
    • WINTER
  • SALTBOX PROJECT
    • BATHROOMS
    • DINING ROOM
    • EXTERIOR
    • FAMILY ROOM
    • FOYER / MUDROOM
    • KIDS BEDROOMS
    • KITCHEN
    • LIVING ROOM
    • MASTER BEDROOM
    • PLAYROOM
  • SCROLL SAW

“W” is for Wood Tags #2 (Christmas version)

November 16, 2012

Paint: giant wood tags

A fun alternative to the standard wreath, wood tags handpainted with Merry Christmas for your front door:
Inspired by the Ballard Designs holiday wood tags:
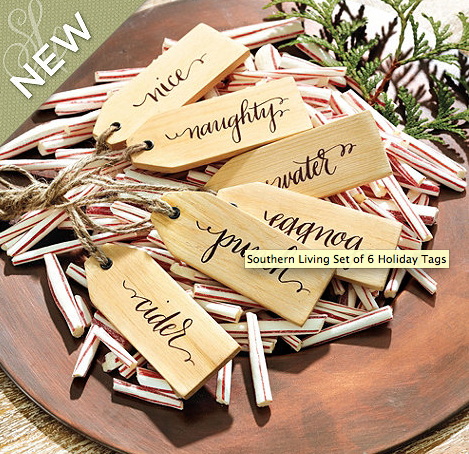
image from ballarddesigns.com

Last week I posted my Thanksgiving version:

And my friend Terry so cleverly thought of this Christmas version:
This time around I used a 1×8 pine board, it has a nice grain to it (better than plywood) and a chunky feel at 3/4″ thick.

A special thanks to Terry for letting me borrow her shed to take pictures!
Here’s how I made the giant wood tags:

1. Using a 1×8 board cut 2 pieces at 18″.
Then mark off the corner cuts and drill a 1″ hole:
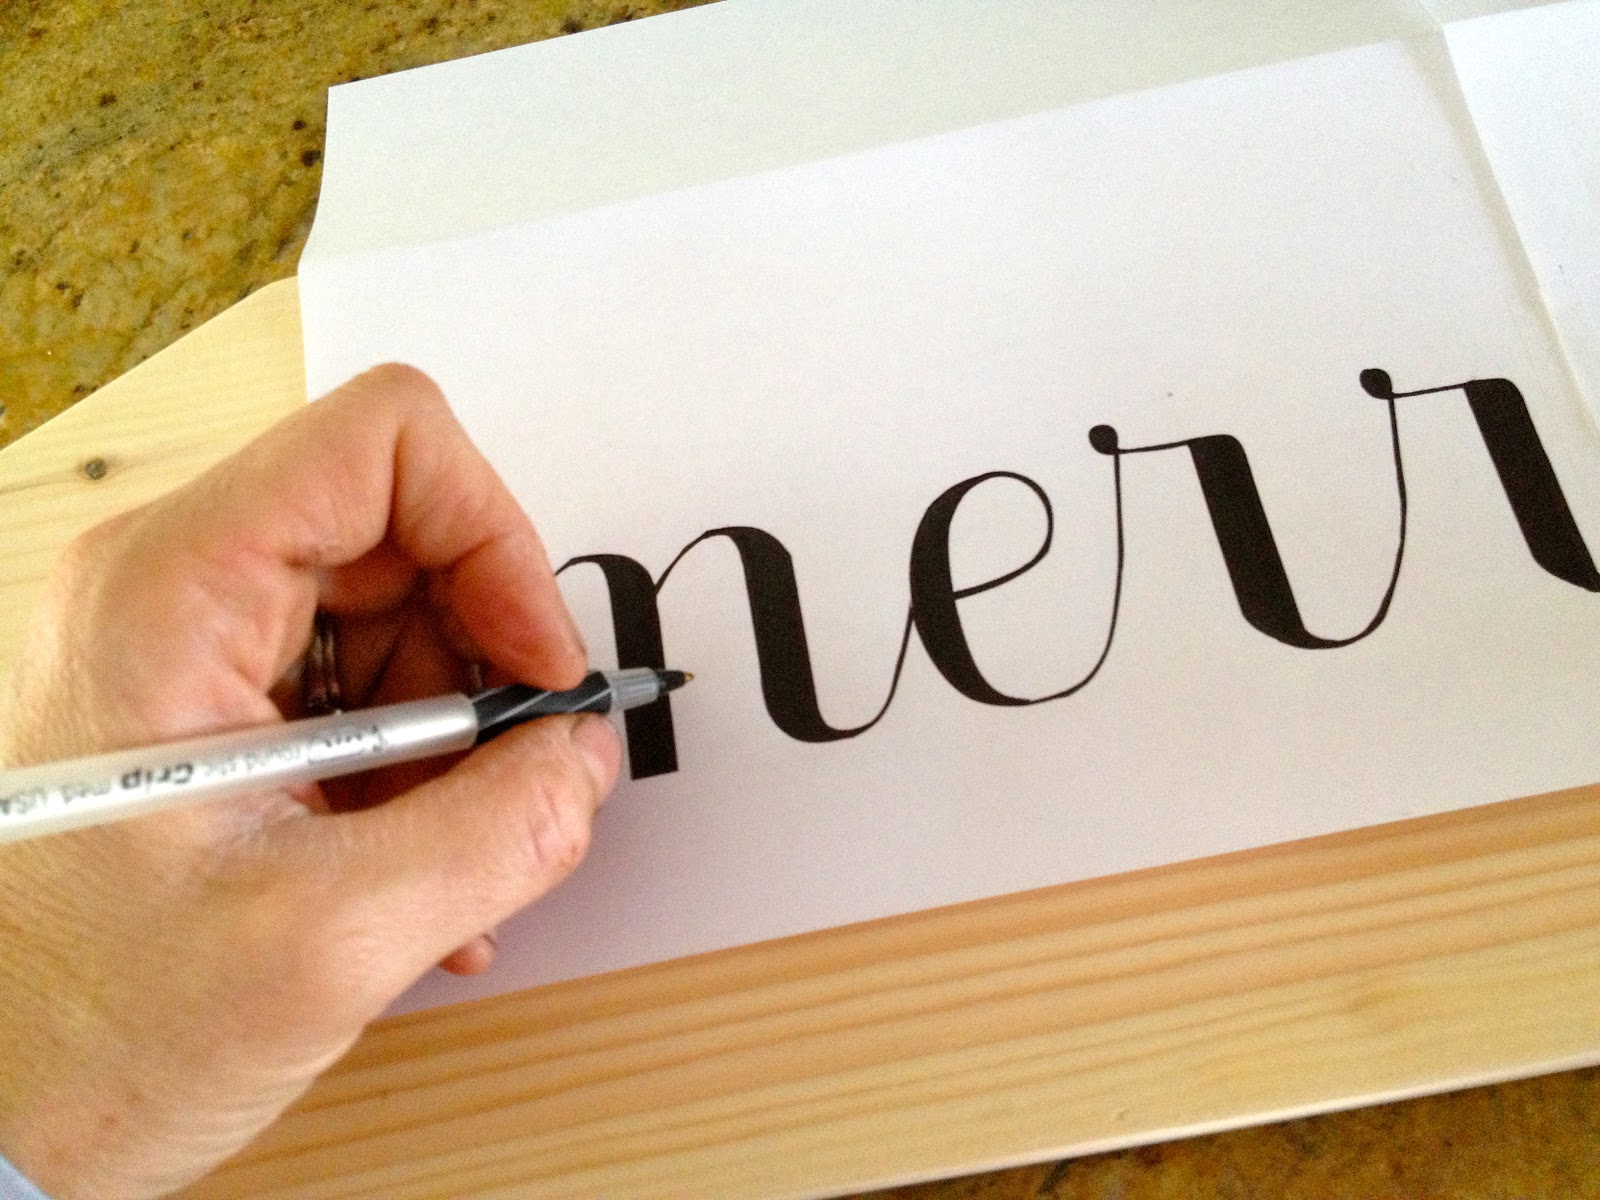
2. Print lettering (I used Ecolier font at 600 point).
Place print out on top of wood and trace letters with ballpoint pen:
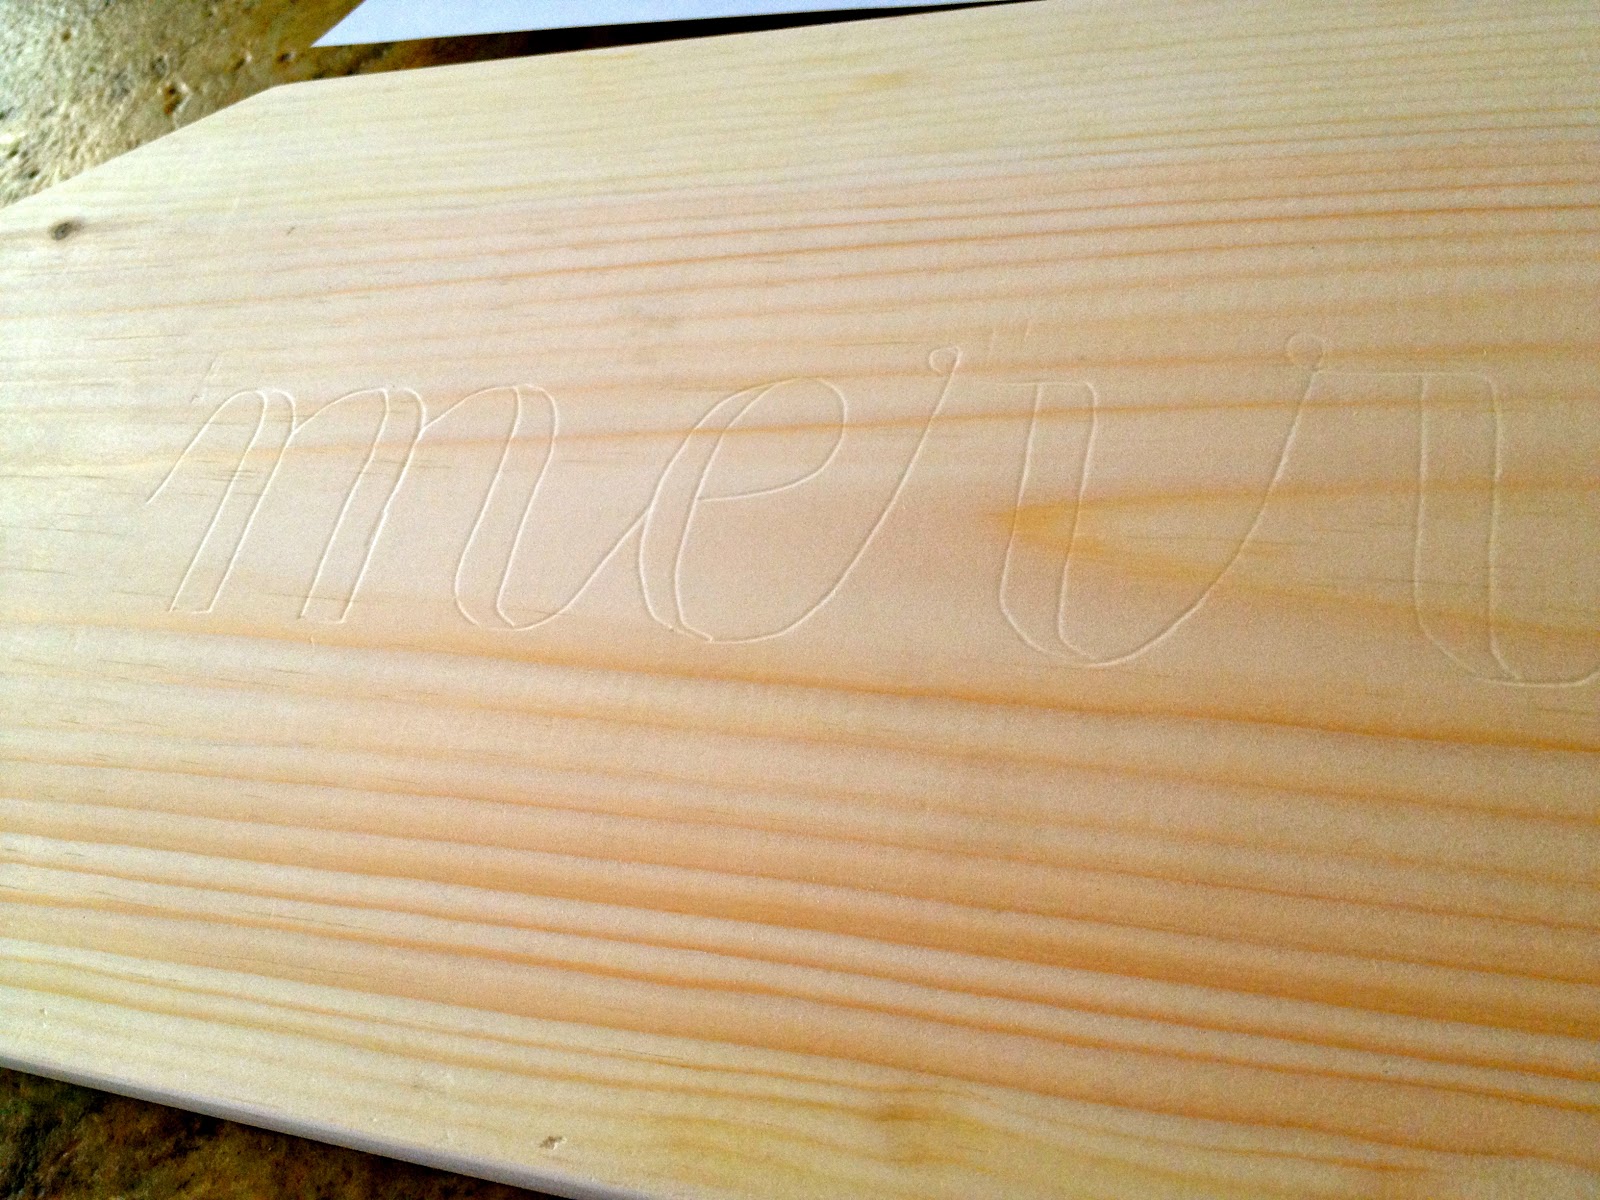
3. The pen leaves an indent in the soft pine:

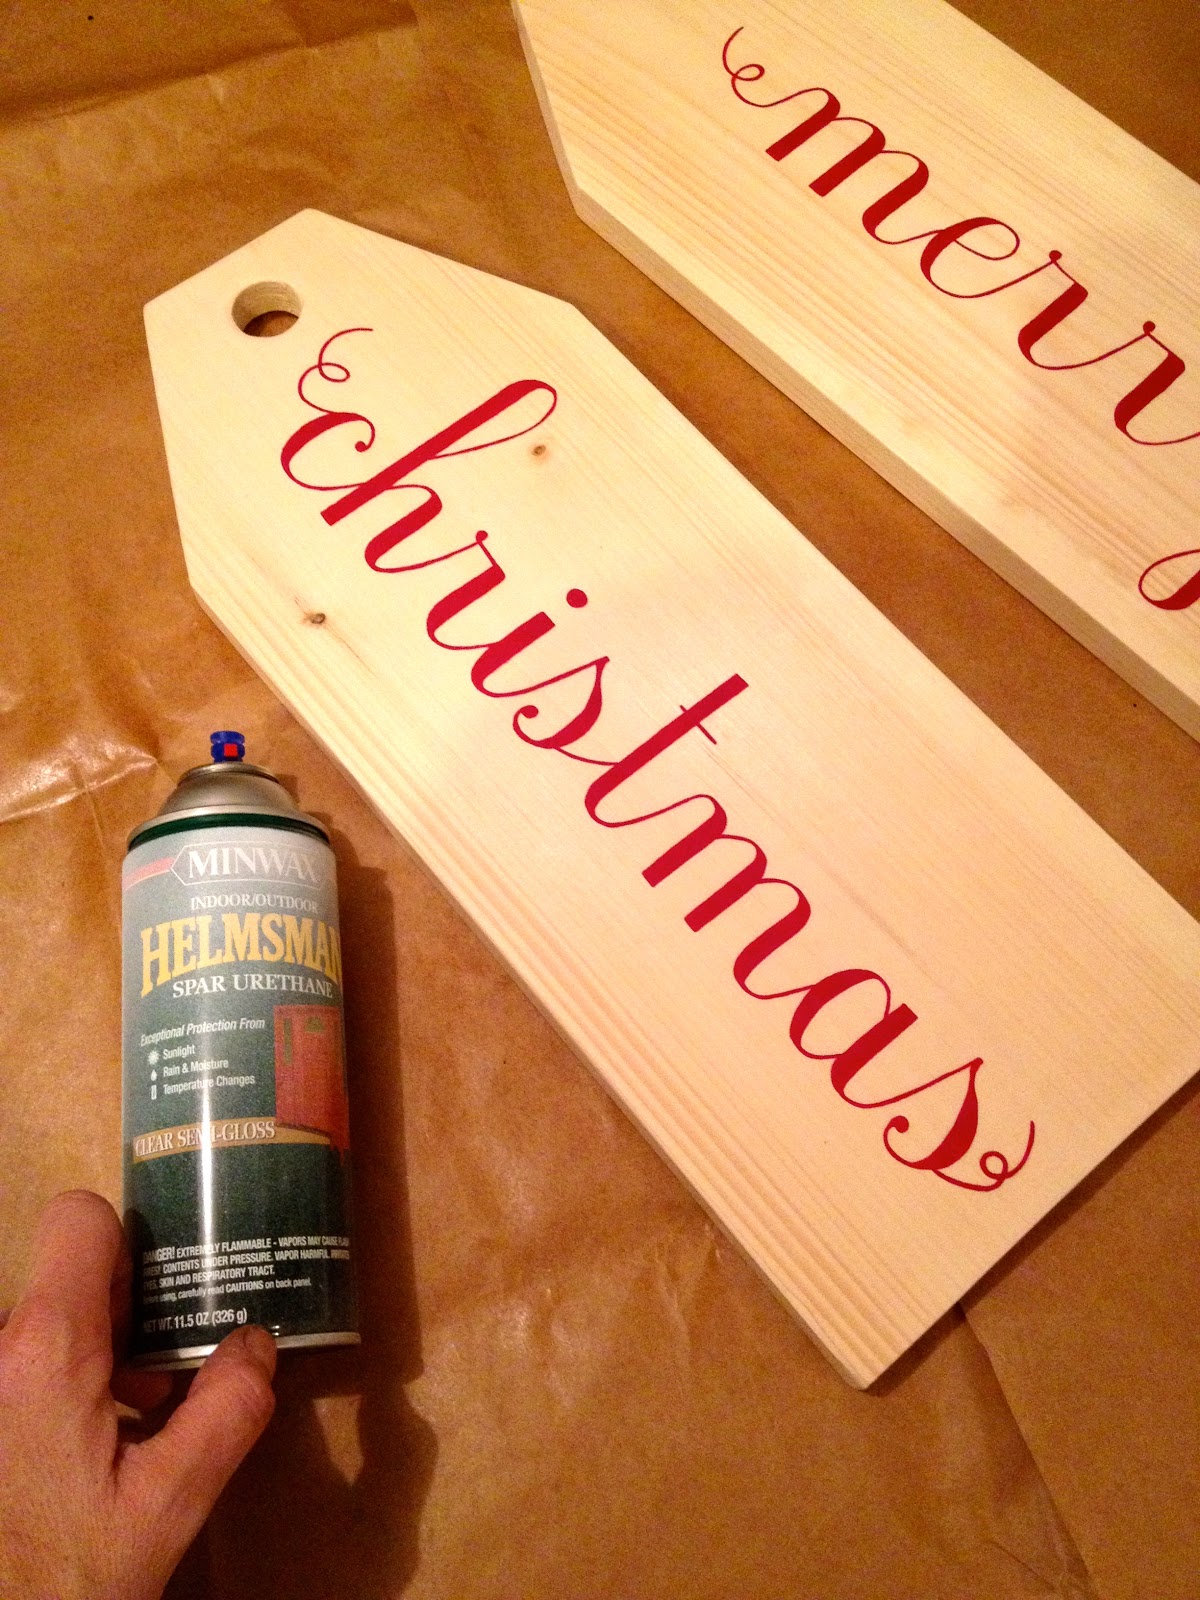
4. Paint on and inside the indent:

5. Seal with Minwax Helmsman exterior grade clear semi-gloss:

6. To keep ‘hanging position’ so tags don’t cross over each other predrill, glue and countersink two 1 1/4″ wood screws at overlap:

7. String 3/8″ manila rope through holes.
Then secure ropes together with clear monofilament which you can also use to hang tags.
I’m linking up to:
Christmas Crafts @ Shanty 2 Chic
Christmas Craft Party @ Nesting Place
SAS @ Funky Junk
Nifty Thrifty Sunday @ Nifty Thrifty Things
DIY Fall Festival @ The DIY Showoff
Tutorials & Tips Tuesday @ Home Stories A to Z
Strut Your Stuff @ Somewhat Simple
Share Awesomeness Thur @ The 36th Avenue
Pretty Things Thursday @ Scissors & Spatulas
Flaunt it Friday @ Chic on a Shoestring
Frugal Friday @ The Shabby Nest
SAS @ Just a Girl
Remodelaholics Anonymous @ Remodelaholic
inspiration board @ Carolyns Homework
Sunday Showcase Party @ Under the Table & Dreaming
Weekend Bloggy Reading @ Serenity Now

You may also like...

  • “S” is for Silent Night“S” is for Silent Night
  • DIY Giant Wood TagsDIY Giant Wood Tags
  • Painted Wood Leaves Fall WreathPainted Wood Leaves Fall Wreath
  • Touch of Spring 2017 Farmhouse TourTouch of Spring 2017 Farmhouse Tour
Share this post:

Filed Under: CHRISTMAS, CRAFTS, DIY, HOME DECOR, HOME DECOR, PAINT, SCRAP WOOD, SEASONAL12 Comments

Reader Interactions

Comments

  1. Amy says

    November 16, 2012 at 5:28 PM

    Amazing , love this going to ahve to amke this one. This would be a great gift for my sister for christmas too.

    Reply
  2. Jeannie-JB says

    November 17, 2012 at 10:45 PM

    You are sooo talented! Love all your projects, but this one is so amazing. I pinned it to two of my boards {you get credited as the source of course}. Just wanted you to know!

    Reply
  3. creativedominican says

    November 24, 2012 at 3:22 AM

    This is awesome! I love it, your so talented. I had just gotten a Merry Christmas vinyl from a craft show at church and I'm going to try and make something like this. I love it. I love your technique on tracing it, but I'm not sure I could paint it and have it come out this perfect.

    Reply
  4. Mel says

    November 26, 2012 at 3:02 AM

    Such a great idea. They are fantastic!

    Reply
  5. Rita May says

    November 29, 2012 at 2:14 AM

    Thanks for the great tutorial. I've pinned these and want to make them soon. I like your tips on the screws to hold them in position and your choice of font and size. looks like you've given me all I need to know.
    Rita

    Reply
  6. Lisa B. says

    December 4, 2012 at 1:36 PM

    Absolutely love these. I made two sets. Thank you so very much for sharing this with us. Merry Christmas.

    Reply
  7. Ashley C. says

    December 7, 2012 at 10:37 PM

    These are super cute! Super versatile for year-round decor too!

    Reply
  8. Pam Jackson says

    December 13, 2012 at 2:03 PM

    That is just too cute. Thanks for sharing.

    Reply
  9. Megan says

    July 16, 2013 at 1:45 AM

    Just wanted to let you know this craft was highlighted on the at play blog yesterday. http://atplayonline.com/2013/07/15/5-christmas-decor-crafts/

    Reply
  10. Melinda says

    November 7, 2017 at 8:44 AM

    I am trying so hard to make these. How were you able to print the font that large on a printer?

    Reply

Leave a Reply Cancel reply

Your email address will not be published. Required fields are marked *

Primary Sidebar

Hi! I’m Jaime

Jaime Costiglio

Hello!

Thank you for stopping by.
Join me for lots of DIY.

Read more

Get new posts via email

Handbuilt Holiday: Gift Project Plans

handbuilt holiday gift project plans

Collection of DIY gift project plans to build.

The Home Depot Tool Prospective

THD Prospective

Tools to consider for the DIYer.

Archives

The Home Depot Logo
Copyright © 2023 Jaime Costiglio · Custom site by Moonsteam Design

Privacy Policy