At long last I finally have a proper lumber rack to store all my lumber. It’s been ten years in the making and I’m kicking myself I didn’t do this sooner. If you’re in the market for lumber storage I am sharing my plans for this lumber rack down below.

A DIY tutorial to build a lumber rack including plans. Make this movable lumber storage rack to house full sheets and boards.
Organization in the shop is a funny thing because it’s not often thought about until you’re well into your craft. And then you’re so busy making all the things you hardly have time to stop and organize the shop. But I’m here to tell you it is worth every minute of lost shop time and will save you time in the future from having to dig through your pile.

Since every storage space is different I built this lumber rack to accommodate my needs:
- corner storage space
- store full sheets and boards only

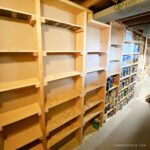
And I built this lumber storage using only one full sheet and 13 studs. I highly recommend assessing your storage needs and available space to configure your lumber rack to fit you best.
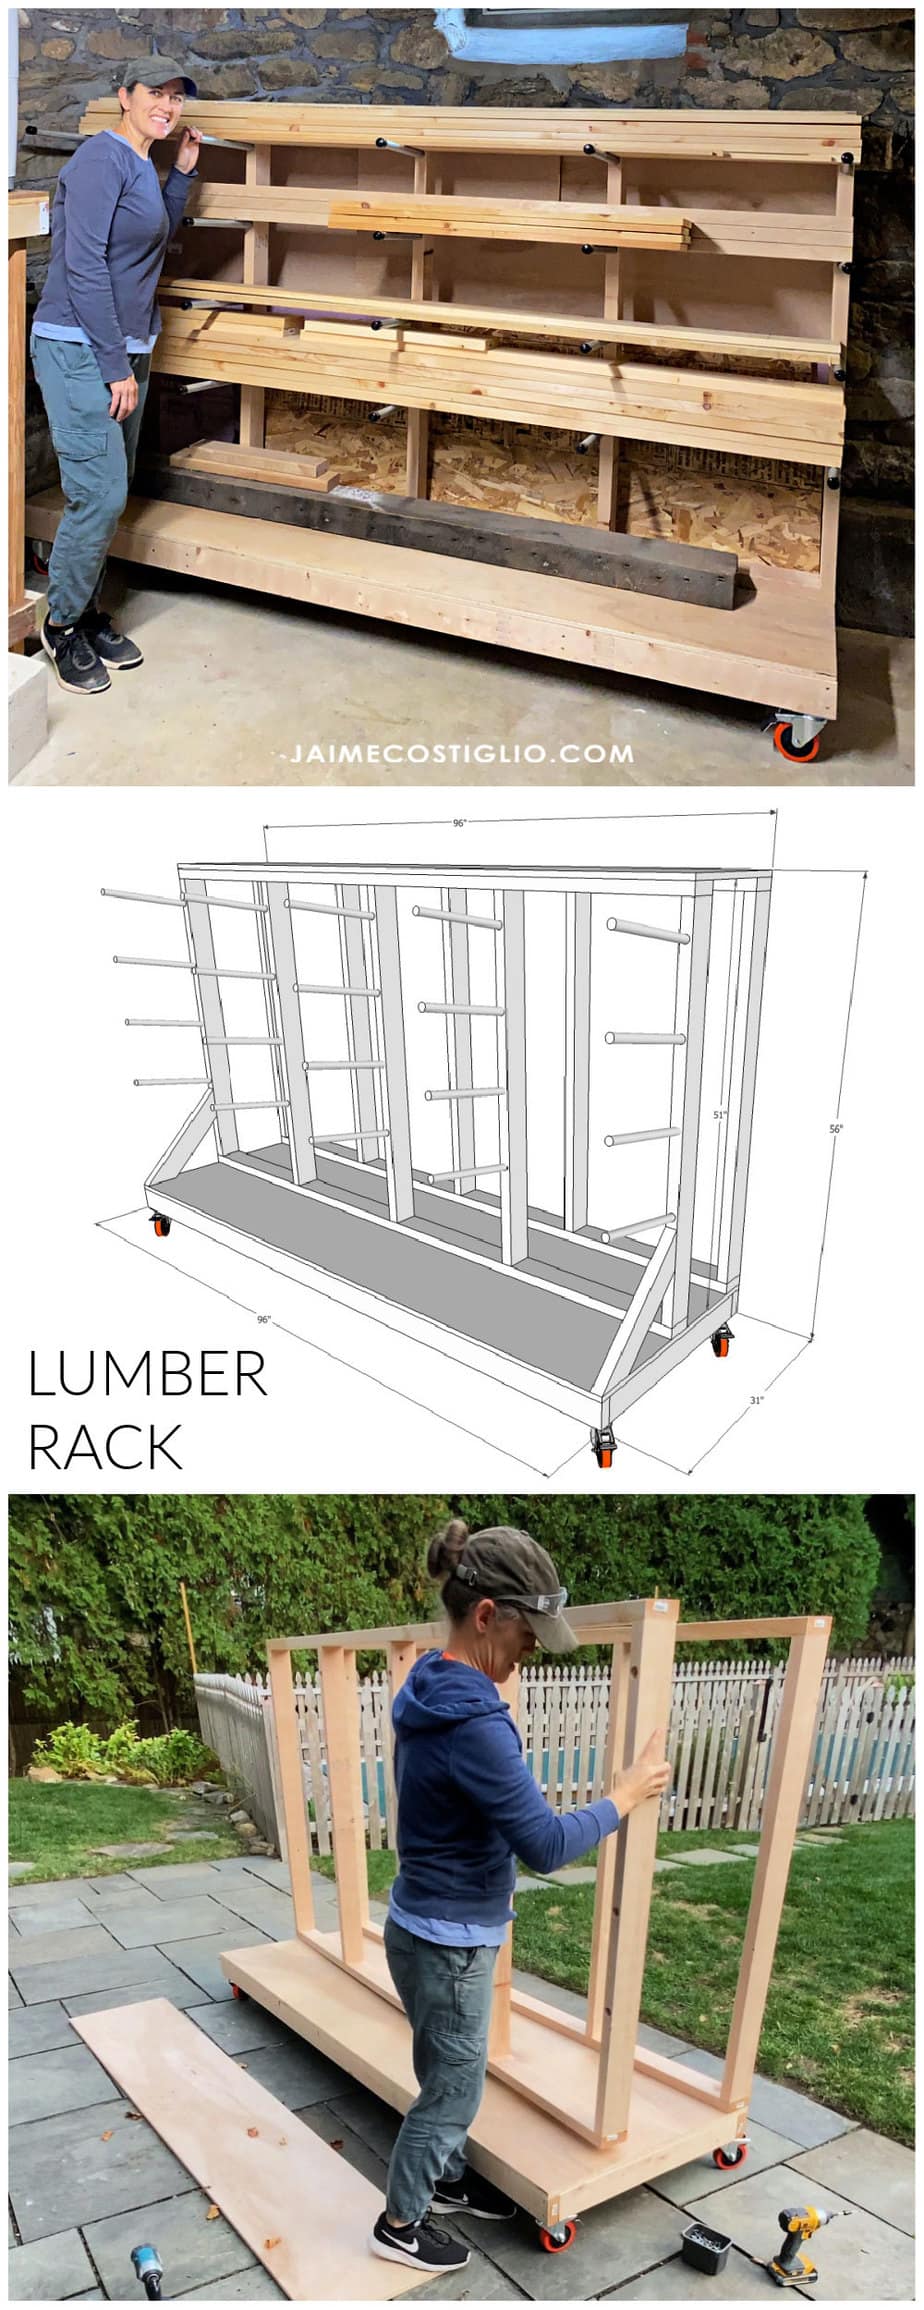
Lumber Storage:
- fits full sheets (4′ x 8′)
- four open shelves for up to 8′ boards and longer
- open solid shelf up top
- large shelf at base
- portable with locking wheels


I borrowed inspiration from two sources below. There are tons of lumber racks on the web so be sure to scour google for great ideas and possible configurations you may not have thought about.
Lumber Rack Inspiration:


Down below you will find a link to the plans as well as real life process photos and instructions. Be sure to read through this post entirely before beginning so you have a grasp of the process.


Click here for free printable PDF plans.
Supplies:
- 1 – 3/4” plywood sheet
- 13 – 2x4x8 studs
- 4 – 5” locking wheels
- 2 ½” wood screws
- 2” wood screws
- 1 5/8” wafer head screws
- 2 – ¾” conduit x 10’ long
- 20 – 7/8” rubber caps
- circular saw and straight edge or table saw
- drill
- measuring tape
- drill press & 1″ Forstner bit
- reciprocating saw & metal cutting blade

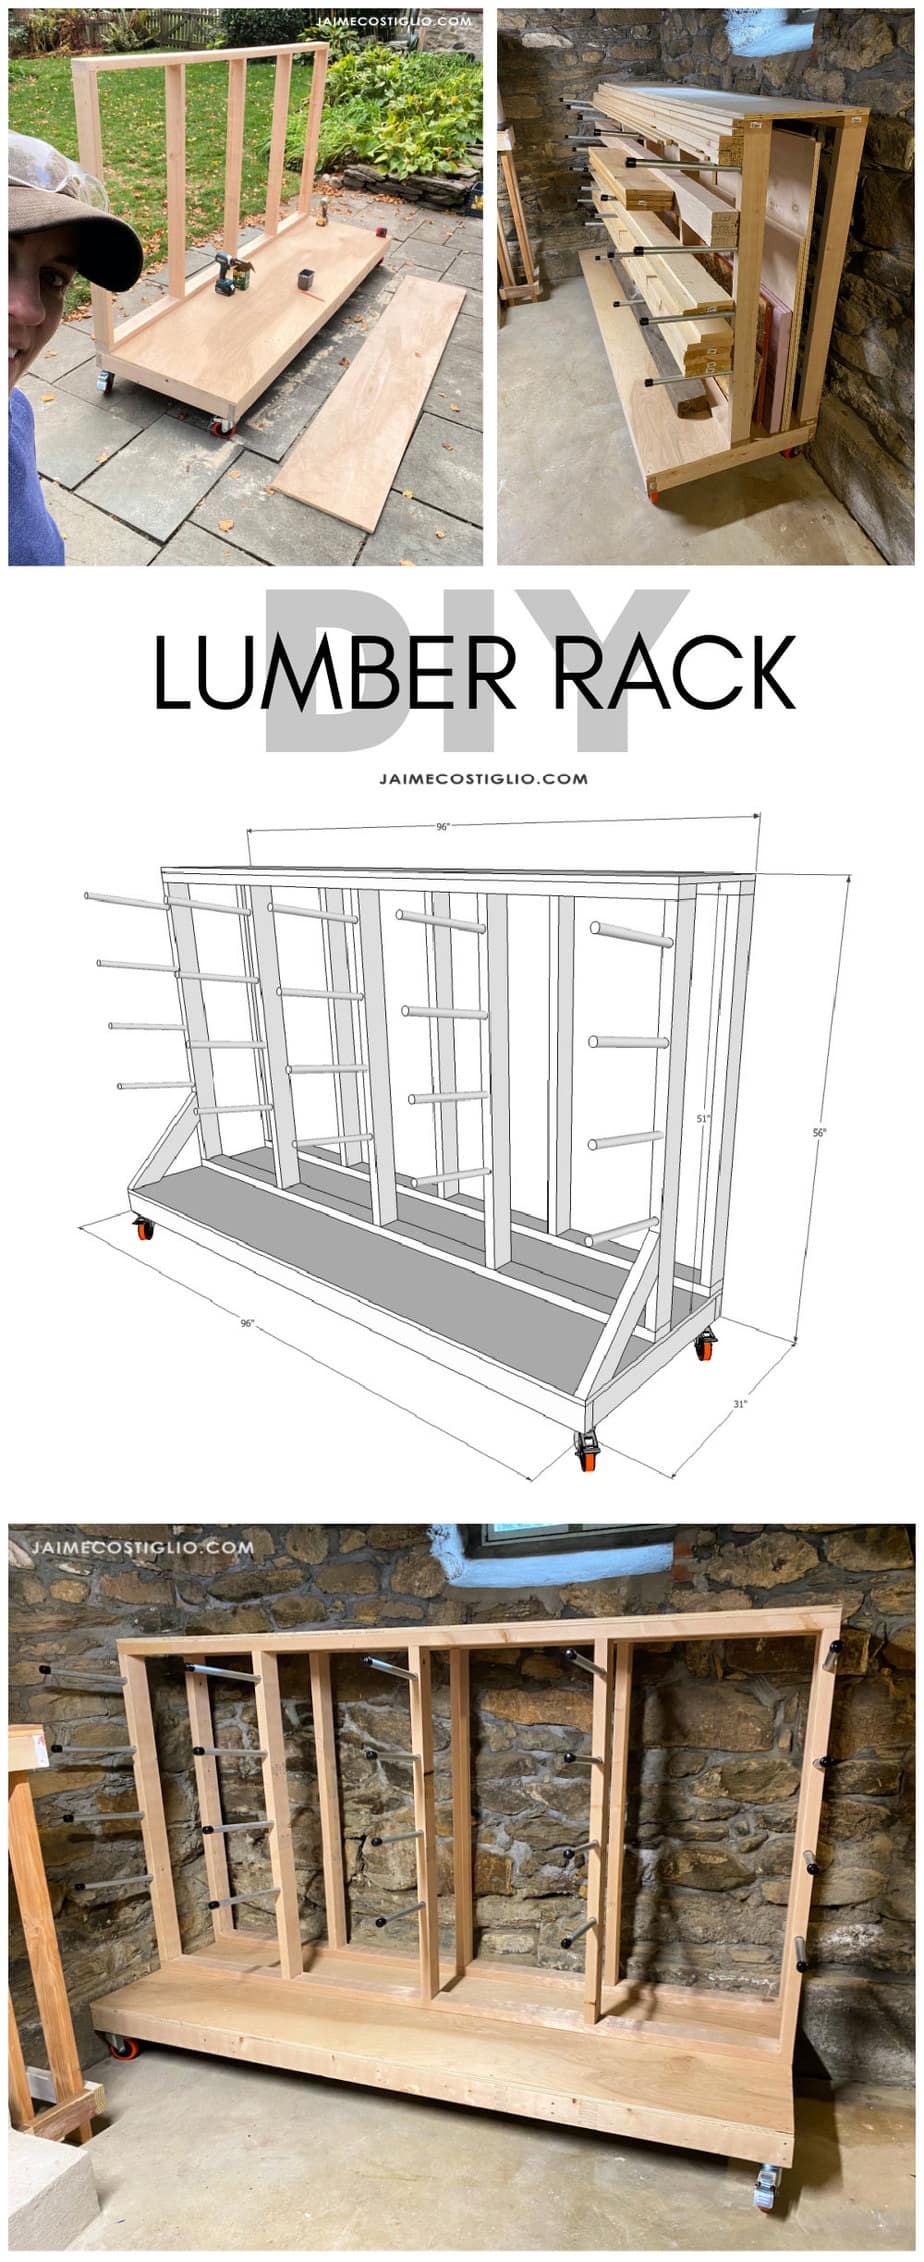
Base:
Begin by ripping the plywood sheet at 31″ wide then build the base frame.

And once you have the frame you can then attach the base cross supports.

Walls:
First construct the exterior wall as per the plans.

Set the exterior wall in position on the base and secure using 2 1/2″ countersunk wood screws.

Next measure your leftover plywood piece (should be just shy of 17″ wide). This leftover plywood piece will become the top shelf capping off the walls. Take that measurement and mark on the base where the interior wall will be positioned.

Then before you construct the interior wall you need to predrill holes for the conduit pipe supports. Mark each vertical stud at the exact center of each desired hole location. Refer to my plans for the measurements I used on these hole locations.

Predrill Holes for Conduit:
- use a drill press
- tilt table to 10 degrees for a beveled hole
- use a 1″ Forstner bit (for 3/4″ conduit)
- set drill press stop just shy of 2″ deep
- clamp board to table

Once the holes are predrilled then construct the interior wall just as you did the exterior wall. Place it into position on the base and secure.

Metal Supports:
The metal conduit comes in 10 foot long pieces so we need to cut it to fit the rack. I used a reciprocating saw, metal cutting blade and my bench vise to make quick work of cutting 20 metal support bars. I cut the conduit at 15″ lengths which worked out perfect as about 2″ slides into the predrilled hole.

Since I drilled a 1″ hole and the exterior diameter of the 3/4″ conduit is just over 7/8″ it can easily slide into position. You could drill a 7/8″ diameter hole if you want a really snug fit but I prefer to have a little give in the holes.

Lastly I added rubber caps to the exposed ends of the conduit. This keeps any lumber from sliding around and more importantly protects people from cutting themselves on the exposed metal edge.
Thanks for joining me for this lumber rack build project. Please leave any questions in the comments below and be sure to follow me on social media for sneak peeks, tools and project inspiration:
SHOP THIS PROJECT:


Wow. I really like it. Exactly what I want to make–both plywood and rack designs are just perfect. Thanks for the plan too.
Thank you. I love this rack because it has the best of both worlds (and I typically use more boards than plywood so tucking it in the back is best for me). Good luck!
How much weight will that conduit hold? I have some hardwood to store but can’t find any practical tips on weight limit/boards per conduit level. Do you ever find the conduit starts to bend?
Hi LC, I’m not sure of the weight limits but I stack 12 – 2x4x8 studs and no bending.
Overall, I liked this design, glad you shared. However, please note that from two 10′ lengths of pipe, you can only get 16 pieces that are 15″ long. If you want to get 20 pieces out of 20′ of pipe, you have to go down to 12″ lengths.
Thanks Matt, appreciate the catch on the pipe cuts. Sometimes my math is off 😉
I don’t have a drill press for the 1″diameter holes. Can I use a handheld drill and what type of bit would I use. Thanks for your time in advance.
Kim
Hi Kim, You would use the same 1″ Forster bit in your drill. You definitely want that 10 degree angle though so I would make a guide or jig to guide your drill at the 10 degree angle. This ensures the pipes are angled down towards the rack and in turn the lumber doesn’t slide forward but rather slants towards the rack. Hope that helps.
Hello Jamie. I want to thank you for posting this lumber rack plan. The design is the best among all the ones I have seen. I downloaded the plan six months ago and finally built my own this weekend. Everything turned out perfect. I posted the video here: https://youtu.be/LqdtCZtKNsY
You rock.
Thank you! Love your modifications making it even better. Do you mind if I share on IG with a link to your video?
Bom dia , jaime Costiglio!
Adorei seu projeto, muito bom, pratico e muito funcional.
Obrigado por compartilhar sua ideia.
Abraços.
Pedro Costa
Love the build. Very straightforward and easy to approach and/or modify for individual needs. I especially loved the pic of the stone wall and window behind it. I spent my junior high and high school years at my work bench, in the basement of my parents old farm house in Albion New York, with foundation walls made in the mid 1800’s it looked identical to yours. I learned to use a tablesaw and taught myself to carve spoons, cut mortise and tenon joints, steam bend snowshoes and generally fuel the flames of what makes me the design engineer I am today. Thanks for the flashback and trip down memory lane. Truly.
Thanks for posting these plans. They are easy to follow and very flexible. My wife and I needed a way to store picture framing moulding before cutting it to size. Since we don’t really store plywood, I cut 10 17-inch 2x4s to attach the back frame to the front frame. That adds two stout shelves to store any bigger lumber I need.
I also added 6-inch pieces of 2×4 to the cross supports of the base under the front frame. I used these to attach the front frame to the base.
The rubber caps come today to finish the job!
Thanks again.
Chris
Thank you Chris, love hearing from folks who’ve made use of the plans for their situation. Great modifications. So glad you have a storage solution for all the moulding.
~Jamie,
thanks a million for posting your concept, pictures and plans. this is a slick design and all of the information you shared makes the process easy to understand. I’m moving into a new shop and am stoked to do everything i wish i’d done last time, before moving all the gear inside. chaotic lumber all over drives me bonkers. I have trouble conceptualizing projects like this so i turned to the internet and started researching. your design suits me best. thanks again for sharing.
~michael
Hi Jaime, thank you so much for sharing this step-by-step plan and having the option to download as a PDF guide was super key before and during the build! Echoing the same sentiment from others here – it was hard to conceptualize how to approach a “free standing” rack with load-balancing but not with symmetrical sides, I was trying to imagine how it could work build-wise and load-balancing wise to have the backside to slide in plywood sheets, while having the front side for the lumber rack (we have more lumber than plywood sheets). So thrilled to finally find your design (I think after different search term configurations via Google, it was “free standing lumber rack DIY” and then images that thankfully led us your way). We have photos of the outcome – happy to send them if you want to add them to the comments somehow here. As we have it outside behind the barn in a covered area, we replaced the caster wheels with 4×4 beams as feet, made it a few inches deeper, and added supports in between the vertical posts.
This is a great design. I just built it today. I made some slight modifications, but overall stuck to the plans. Thank you for posting this. I do want to pass on a hard learned lesson…the casters have weight limits and I first used a set that was not up to the task. Lumber starts adding up weight like the holidays, and I blew out two of the casters I had mounted. I upgraded to a set that has a 2500 lb capacity, so I think these will work out.
Thank you again!!!