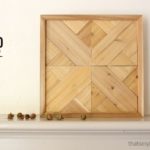
Friends I am a huge fan of using what you have on hand to make it work and today’s project is a prime example. We’re using 2×4 scrap wood to make an amazing wood feature wall. This is a very simple DIY project that may test your patience but it will be so worth it in the end!

A DIY tutorial to make a wood accent wall using scrap wood. The secret is out! This scrap wood wall is made from all 2×4 slices!
I absolutely love making something out of nothing. And while 2×4 scraps aren’t exactly nothing they do often get thrown in the cut off bin or burn pile. I realized I needed to make use of these scraps so I decided a feature wall would be a great solution. Hence I grouped up with a few of my fellow DIY bloggers for a scrap wood challenge and we are sharing our projects today.
- Katie @ Addicted to DIY – DIY Noodle Board
- Cristina @ Remodelando La Casa – Entry Coat Rack
- Sarah @ The Created Home – DIY Modern Doll House Furniture
- Mindi @ My Love 2 Create – DIY Tiered Serving Trays
- Sarah @ Ugly Duckling House – Scrap Wood Wall Art
- Sheri @ Hazel and Gold Designs – Colorful Scrap Wood Geometric Art
- Rachel @ Joyful Derivatives – DIY Wooden Dog Bed
- Angie @ House Becoming Home – Wood Soap Dish from Scraps
- Cara @ The Inspired Workshop – Scrap Wood Outdoor Planter

Slow and steady wins the race for this project. I’ve been adding 2×4 slices to this wall over the past 16 months in small batches. Whenever I had a scrap 2×4 I simply cut it up into thin slices and add them to my bucket. Once the bucket was full I attached them to the wall and slowly it began to take shape as a feature wall.
Optional Versions:
You could apply this method to a lot of different size lumber off cuts. How pretty would it look with a collage of all different dimensions?
- 2×6
- 4×4
- 2×2
- any thicker lumber would all work great as an end grain feature wall

In real life the texture and grain is so apparent, the photos do not do it justice.

To see it all in action check out my video tutorial here:
I’ll share down below exactly how I tackled this scrap wood wall project. Maybe you have just the spot for such a wall treatment? This would be so good in a small bathroom or foyer with a mirror on top. And the finish is completely up to you. I used watered down paint for this wall but stain or clear poly would be beautiful.

Supplies:
- 1×3 furring strips
- 1/4″ plywood sheet
- 2×4 scrap wood slices – 1/4″ to 1/2″ varying thicknesses
- 1 1/2″ spax wood screws
- drill & drill bits
- construction adhesive
- nail gun
- 1 1/4″ finish nails
- laser level
- sander
- white paint
- paint brush
- water based satin polyurethane

Step 1: Attach 1×3 furring strips to the wall preferably to the studs using 1 1/2″ spax screws.

Step 2: Cut 1/4″ plywood sheet to fit the wall space and attach the the furring strips using 1 1/2″ spax screws.

In Step 3: Collect your 2×4 scraps and make into 1/4″ – 1/2″ slices of varying thicknesses.

Step 4: Attach wood slices to wall using construction adhesive and 1 1/4″ finish nails. Use a laser level to keep your lines straight.

Keep adding more slices and start filling up the wall.


After all the slices are in place apply watered down white paint. At this point I was really unsure about this project hence the look on my face.

Lastly sand the wood slices to distress and then seal with a water based satin polyurethane.

Thanks for joining me for this scrap wood wall project. Please follow me on social media for sneak peeks and more project inspiration:
Instagram / Pinterest / Facebook / Youtube / Twitter
SHOP THIS PROJECT:


Jaime it’s gorgeous! I really love it but totally get that mid-project panic where you’re just not sure it’s going to work as envisioned. It absolutely did! Nice job!!!
Jaime, this is stunning!! I love all the texture the little pieces of wood add to the entire space. The art and the lights are cherry on top.
Thank you Cristina, yes the texture is everything and in person it’s even better.
THIS. IS. AMAZING. I love it, Jaime!! What a feat I bet it was creating it…but oh so worth it!
Thanks Cara, it was a small feat but I did it over a long period of time collecting in a bucket then attaching, collecting and attaching until finally I had enough!
Stunning Jaime!
It looks so good, Jaime! The look on your face is priceless when you were painting on the whitewash! It was the perfect touch, though!
Jaime this is amazing!! What an AWESOME way to make use of 2×4 scrap . . . which I always seem to have tons of. I love how big of an impact floor to ceiling tile has on a space….floor to ceiling 2×4 scrap has an equally amazing impact. NICE JOB!
Really enjoyed this post. I have been considering doing one of these walls in the room my hubby plans to use as a music studio. I will be returning to your pages often, to be sure. I was only browsing for Christmas ornaments. It is so exciting to find a woman doing so many things with power tools. Somewhere along the line I let my hubby take over all of that. Even if one does not want to do the work herself, it is important to know how it is supposed to be done. Anyway, thanks for such a wonderful blog and the clear instructions and good photographs. I will be back. Carol