
A special treat for you today, I’ve joined up with lots of other diy bloggers in the 2×4 challenge to create these fun play food treats! Gina at The Shabby Creek Cottage was kind enough to host this challenge, be sure to stop by her place for links to lots more 2×4 projects.

You know I love working with scrap wood so when Gina proposed this 2×4 challenge I went straight to my scrap bin looking for 2×4 pieces. Then I cut up my scraps into even smaller pieces and made all these cakes, ice creams and treats for some seriously cute play food!

The cakes are simply pieces of 2×4 cut on a 20 degree miter.

I even used a skinny little 2×4 piece for the stick on the lollipops. The treat stand is a diy project too, click here for the plans.


You might have seen the smore sneak peek I shared over on Instagram last week. My kids, who are 8, 9 and 11, have now requested lots more play food. I thought for sure they had outgrown the play food stage but apparently not because they are loving these treats!


Below are a few details on how to make 2×4 play food. Basically look through your scraps and cut down a 2×4 into narrow 1/2″ slices. Then I used a scroll saw to cut the slices in half making more squarish pieces. The cake slices are 20 degree miter cuts.

Cut all your pieces and sand well. Paint the pieces using acrylic craft paint.

Vary the cake and frosting colors then add decorative dots.

For the lollipop sticks trace the stick at center bottom then use a drill bit to remove the wood. Add wood glue and hammer in the stick.

The ice cream sandwiches are 2 – 1/2″ slices with a 1/4″ slice in between. Paint each slice before assembly.

Apply wood glue in between the slices then clamp together until dry. Spray with clear gloss poly for a shiny smooth finish.

My oldest daughter loves the Italian rainbow cookies so I had to make a few. These are 1/4″ slices that are cut in half to make squares. Paint each square prior to assembly and then glue and clamp. Once dry paint the outer chocolate layer and spray with clear gloss poly.

My favorite might be the smore. 3 – 1/4″ slices and 1 – 1/2″ slice make up the smore.
The sky is the limit with diy play food. I had so much fun painting and creating each little treat. So save your 2×4 scraps because you never know when you’ll want to whip up some play food!

For more 2×4 challenge project entries click on the thumbnails below:


Oh my word… this is the cutest thing I have EVER seen! I want a set… for me! haha
Seriously amazing!
Amazing! I have a bin of scraps I was planning to make blocks out of for my kids. Looks like they will get play food too.
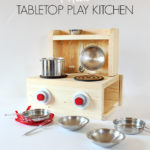
Adorable! I am making a play kitchen for my kids and they would LOVE this!
You just blew my mind with this project. Seriously I was not expecting this. Well done!
OMG, you are crazy creative! LOVE this project and how fun for the kids too! I can't wait to share this one on my FB page. XO – Wendi@h2OBungalow
Shut the front door! This is beyond cute! You could totally sell these!!!! LOVE
Ahhh!! Love! Super creative ad beyond cute. Pinning! Found you at That DIY Party linkup.
These are so sweet – much nice than the plastic alternatives. My girls are 6 and 8 years old and the still play with pretend food – they would love these!
They look soo cute, definitely saving this for future presents.
This is the cutest thing ever!!! I love these and kind of want some myself LOL.
These would be a great gift.
>> Christene @ Keys to Inspiration