Hallelujah! Isn’t that how we all feel when you finally complete a long awaited room makeover? I’m kicking myself for waiting two years to tackle this bathroom makeover but life happens. At any rate it’s done and my whole family is loving it!

A DIY bathroom makeover in our antique saltbox home. Add some simple farmhouse style projects to update this bathroom space.
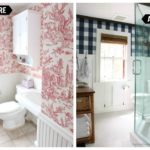
Let’s step back just a smidge a get a good look at the before and after.

A little history about this bathroom, we live in a 1740 saltbox farmhouse and this room is original to the home. Except I believe the original doorway was where the mirror is leading directly to the living room.
The previous owners made this space into a full bathroom in 2003. They did a beautiful job maintaining the antique character:
- installed an old vanity
- added a bowl sink
- used handmade Mexican subway tile in the shower
However this is an interior room which means there are no windows. So I knew immediately that red toile wallpaper had to go.

I do like toile but it was just too dark. So for this bathroom makeover I tore down the wallpaper and put up planks. I used plywood underlayment for the planking, primed and painted. And you must know nothing is level or square in our house so it was nearly impossible to get the planks to line up in the corners.
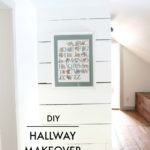
Bathroom Mirror:

The red toile wallpaper was overwhelming and so dark.

Hello white planked lovelies! I also switched out the oval mirror for a rectangular shape that I framed myself in juxtaposition to the circular sconces. You can see the tutorial on the mirror here.
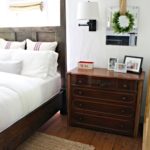
Wall Sconces:

The sconces add just a touch of modern plus I love the dark bronze with brushed brass accents.

The shower enclosure remains the same.
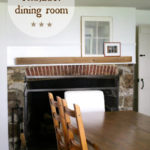
Bathroom Storage Cabinet:

Then just to the left of the shower is the toilet, which is also the same except looks fantastic now with the planked walls. For this bathroom makeover I added a wall cabinet made from an old window.

The window cabinet provides lots of storage and is just the perfect fit right above the toilet. I borrowed this idea from Liz Marie Blog (her husband Mr. LMB has the details @ Craftsman Drive here).
Down below in the before picture you can see that above the toilet was empty space (with lots of red wallpaper!).


More horizontal wall planks in this bathroom makeover please and thank you.

Door:

The door is the original door as well. You can tell the poly has yellowed a bit and I might sand that down someday and reseal but for now it’s not that obvious (only in photos because of the lighting).
Bathroom Makeover Process:

Step 1: Remove the wallpaper. There are tons of ways to go about this but because this is a bathroom the steam had already done it’s work over the years which made peeling the wallpaper off relatively easy. I prefer to soak the paper with a sponge and then use a plastic scraper to remove the paste layer underneath. Be sure to wash your walls many times to remove all of the paste.

Step 2: Rip 7/32″ underlayment boards into 5 1/2″ wide planks. I used 3 1/2 sheets because I didn’t want seams but if you’re open to the seam look you could use a lot fewer sheets. Set your Kreg rip cut at 5 1/2″ and start cutting.

Step 3: Prime the front and cut sides of the planks. I used Zinsser cover stain oil based primer because this is a bathroom. Sand smooth once dry.

Step 4: Mark the studs with vertical line on drywall. Cut and install planks using 1 1/4″ finish nails into the studs. I placed a nickel between planks for equal spacing. Fill all the nail holes, sand and paint with Benjamin Moore Aura white dove eggshell.
Lastly install the sconces, mirror and wall cabinet.
Thanks for joining me for this bathroom makeover project. Please follow me on social media for sneak peeks and more project inspiration:
Want to see another bathroom makeover in our old house? Check out my kids upstairs bathroom that has cedar planks on the walls!

Great!
I love the makeover!
Xoxo
Nina
Beautiful!
Absolutely stunning!!
This is so, so beautiful. I love it.
Wow. WOw. Wow.
That's all I can keep saying. I adore it all. The white planks. The mirror. The lights. (I think I am buying those lights for our bathroom.)
You did an amazing job.
What a gorgeous makeover, Jaime! That wallpaper was really a thing of the past. I love the plank walls!
Wow this is really gorgeous! The planked walls, and that vanity, the sconces, the subway tile…I mean my jaw is still on the table! Love it all! Pinning!
Fantastic job. It is so light and bright now. I love the planked wall.
Fantastic job. It is so light and bright now. I love the planked wall.
You really did a great job — absolutely love everything about your new bathroom!
I absolutely agree that in a windowless bathroom, heavy red wallpaper's a no-no and your white tiles look so clean and contemporary. Thanks for sharing such a high level of detail on this project. It just goes to show that you can keep the fixtures and fittings such as sink, shower and toilet and still achieve a totally different look.
Wilfred Andrews @ LB Plumbing and Heating