This post about refinishing pine floors is sponsored by The Home Depot. Oh pine wood you have a special place in my heart. If you’ve ever been in the lumber aisles in The Home Depot then you know there’s a huge section devoted to pine.

A DIY tutorial on refinishing pine floors. Embrace the natural pine wood, remove stain and polyurethane while refinishing your pine floors.
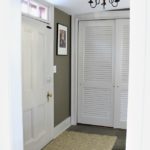
Well folks those same exact pine boards are what we have for flooring in our family room. They were here when we moved in nine years ago but stained dark with satin polyurethane. Here’s a gem of an old photo on move in day for reference:

And I have forever wanted to take them back to their natural state.
Doers Getting It Done
So that’s what I did and I’m here to share the process with you including all the tools and supplies you’ll need to get it done.

These floors were pretty dark but after sanding away the old polyurethane and stain I saw new life peeking through!

Tool Rental
In order to tackle these floors you’ll need a floor sander which can easily be rented through The Home Depot tool rental. They offer nearly every tool possible including floor sanders and buffers.
In other words, don’t shy away from a project just because you ‘don’t have that tool’. The Home Depot has you covered with a huge variety of tools to rent no matter what size project you decide to take on.
- Truck rentals to transport large items
- Rental centers nationwide makes renting tools easy
- Competitive prices with several rate options

Pine Floors
We happen to have original pine floors throughout a majority of the historical portion of our 1740 home. They show all the signs of years of wear and tear and I absolutely love the character and age.
My hope is with years to come these newer pine floors will take on a similar aged quality. Pine is a very, very soft wood so it easily dents but I think that’s also part of the charm.

Refinishing Wood Floors
In addition to simply refinishing the pine floors I had a few other goals in mind:
- Strip pine wood floors and seal with clear matte finish
- Remove existing short baseboards
- Remove existing shoe molding
- Install new baseboards to match up with hallway

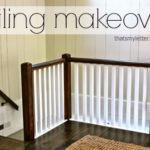
Baseboard Makeover
You can see in the photo above the original baseboards were short, much shorter than the baseboards in the hallway. It always bothered me that these short baseboards didn’t match the rest of the baseboards in our home, so I wanted to replace them. In addition, let’s talk about the shoe molding. Again, we don’t have shoe molding in most of our home so naturally I didn’t want it here either. Time for it to go.

The updated look is sleek with a touch of rustic farmhouse thanks to those knotty pine floors. Technically we do live in an old farmhouse so I’m not afraid to embrace the style. And notice the matching baseboards and no shoe molding. I’m in love!!

Old Versus New
This view from the hallway shows a peek of the original pine boards on the stair landing. See how they are much darker and have worn down over time?

Project Prep
Let’s get going on this refinishing project! Below is a list of supplies, some of which you may already have on hand. Did you know you can buy most supplies online at homedepot.com or through The Home Depot mobile app? And they have various pick up options:
- Buy online and pick up in store using pick up lockers
- Curbside pick up in select stores
Just add your items to the shopping cart, select your desired pick up option, wait for a pick up notification then head to the store. Your order will ready and waiting for you!
Supplies:
- Pry bar (or trim puller is best)
- Hammer
- Safety glasses
- Knee pads
- Circular saw
- Square
- Ear protection
- Multi tool with flush cut blade
- Replacement pine boards (1×12)
- Orbital sander (or floor sander)
- Shop vac + spare filters
- Dust stopper
- Sandpaper
- Nail set
- Dremel multi max
- Table saw (or router table)
- Router + slot cutting bit
- 16 gauge pneumatic nail gun
- 2 ½” – 16 gauge brad nails
- 2 ½” Square cut nails
- Wood glue
- Floor buffer (with red pads & white pads)
- Pallmann magic oil
- 18 gauge pneumatic nail gun
- 2” – 18 gauge brad nails
- 1×6 pine boards (baseboards)

Step 1: Use a pry bar or trim puller to remove the shoe molding and baseboards.

Step 2: Determine if you need to replace any boards. If yes set your circular saw depth to match your board thickness. Then use the framing square to draw a line exactly where you want to cut the boards. Plunge the circular saw down into the board and make the cut. To finish off the cut where the blade can’t reach use a multi-tool with a flush cut bit.

TIP – Determine how much replacement wood you will need and be sure to bring it inside to acclimate for a few days before attempting to install the boards into your floor.

Step 3: Use an orbital sander or floor sander to sand off the old finish starting with 60 grit, then 80 grit.

As you move along the floor be sure to set any nail pop with a nail set.


Step 4: Because the orbital sander is round it cannot get into the corners. Use a Dremel multi-max with the triangle sanding head to remove the stain and polyurethane in the corners.

Expansion Gap
In this area above I had a situation where the original baseboard was set inside the wood floors so I was left with a large 1.5” expansion gap at the wall. I knew my new baseboards were only ¾” thick so I decided to remove portions of those boards and install replacements with a proper 3/8” expansion gap.
Tongue & Groove

Step 5: For ther replacement boards I need to add a tongue and groove into the 1×12 pine boards. To make the tongue I used my table saw and set the blade height to 1/3 of the board thickness then made multiple passes on both sides to achieve the tongue.

Step 6: To make the groove I used a slot cutting router bit.

Replacement Boards

Step 7: Installing the replacement boards was a bit of measuring and making all the tongue and groove cuts but it was fairly quick.

Step 8: Once the boards are in position secured to the subfloor using 16 gauge 2 ½” brad nails. Then to complete the pine floor character use 2 ½” square cut nails.

Step 9: Before the final sanding you’ll want to fill any gaps and cracks. I used a mixture of sawdust and wood glue.
Then make the final sanding pass using 100 grit sandpaper.
Step 10: Vacuum the floors well especially in the seams. Then waterpop the wood with a sponge and water.

Step 11: Apply the sealer following the directions on the product label. I used Pallmann Magic Oil applied with a floor buffer.

Step 12: Prepare the new baseboards and paint the first coat before installation. Once the floor is cured then install the baseboards using 18 gauge 2” brad nails. Fill any nail holes with wood putty. Then sand smooth and paint the second coat.

Thanks for joining me for this refinishing project. Please leave any questions in the comments below and be sure to follow me on social media for sneak peeks, tools and project inspiration:
Instagram / Pinterest / Facebook / Youtube / Twitter
SHOP THIS PROJECT:


They turned out so nice! Great job. Home Depot is one of our favorite stores to shop. I tell my husband that I don’t want diamonds… just give me 2 x 4s.. Ha
Thank you Janet, definitely worth the time and energy and yes I too love shopping at Home Depot. I’m there at least once per week :).
What a wonderful tutorial this is! We have bought a little bungalow near the NJ shore. Against most everyones advice I held firm and chose random width white pine floors which I purchased at a wonderful lumber yard. My question – I would like to leave the floors as natural and matte as possible – I am unclear about what you final finish is on these floors. Thank you!!
Hi Stephanie, LOVE me some pine floors. Mine are finished with Pallmann magic oil 2K. Its clear, pretty matte but leaning towards satin but since it’s pine the boards have definitely yellowed or darkened with time. If you’re looking for a lighter / whiter finished look I don’t recommend the magic oil. Hope that’s helpful.
Did you do the whole floor with a palm sander???
Yes, yes I did 🙂
Did you do the saw dust/wood glue mixture between the boards as well, where they meet side by side?