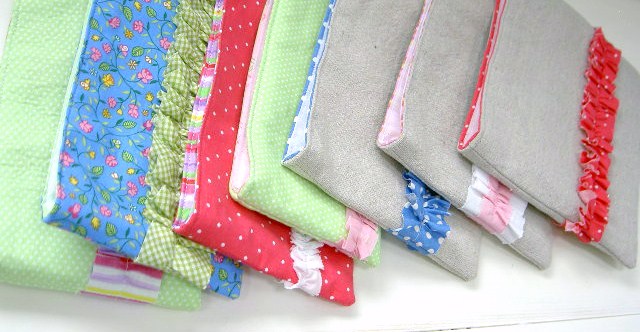
• Home
  • Blog
  • About
  • Contact
    • Disclosure
    • Privacy Policy
  • SHOP
  • Widget area for main menu

    • Email
    • Facebook
    • Instagram
    • Pinterest
    • Twitter
    • YouTube
  • Skip to primary navigation
  • Skip to main content
  • Skip to primary sidebar

Jaime Costiglio

build - paint - sew

  • BUILD
    • BEDS
    • BENCHES
    • DESKS
    • DRESSERS
    • GAMES & TOYS
    • SCRAP WOOD
    • SHELVES
    • STORAGE
    • TABLES
  • TOOLS
  • PAINT
    • CRAFTS
    • FURNITURE
    • HOME DECOR
  • SEW
    • GIFTS
    • HOME DECOR
    • POUCHES
  • HANDBUILT HOLIDAY
    • 2021
    • 2019
    • 2018
    • 2017
    • 2016
    • 2015
    • 2014
    • 2013
  • GIFTS
    • BABIES
    • KIDS
    • FOR HER
    • FOR HIM
    • TEACHERS
    • WEDDINGS
  • SEASONAL
    • 4TH OF JULY
    • FALL
    • HALLOWEEN
    • CHRISTMAS
    • SUMMER
    • SPRING
    • ST. PATRICK’S DAY
    • THANKSGIVING
    • VALENTINE’S DAY
    • WINTER
  • SALTBOX PROJECT
    • BATHROOMS
    • DINING ROOM
    • EXTERIOR
    • FAMILY ROOM
    • FOYER / MUDROOM
    • KIDS BEDROOMS
    • KITCHEN
    • LIVING ROOM
    • MASTER BEDROOM
    • PLAYROOM
  • SCROLL SAW

“R” is for Ruffles

April 28, 2011

Ruffled pouches.
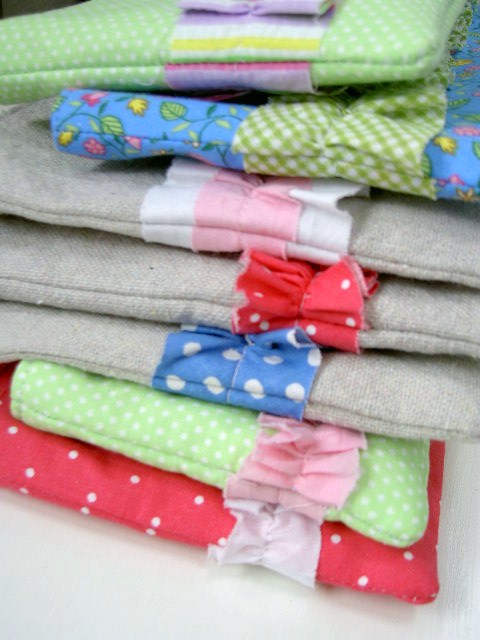
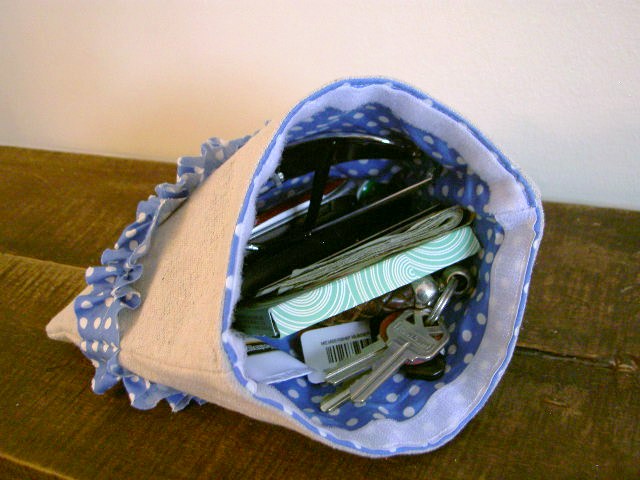
 Perfect for Mom, for the pool or beach, anywhere to keep all those small important things contained:

I was inspired by Maggie’s post here at Midwestern Sewing Girl.
She gives a great tutorial on how to make a ruffled clutch.
I loved Maggie’s idea because it doesn’t involve a zipper!
Who wants to sew in a zipper?

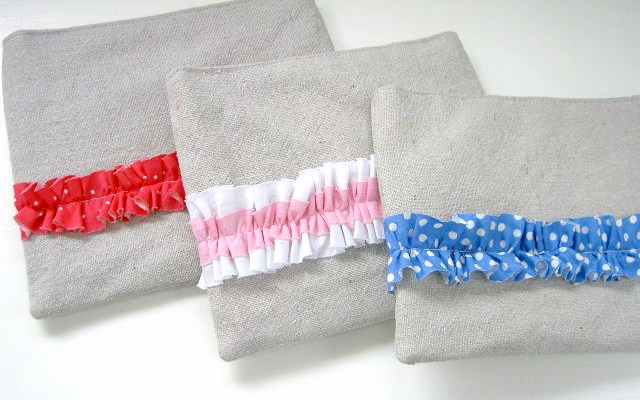
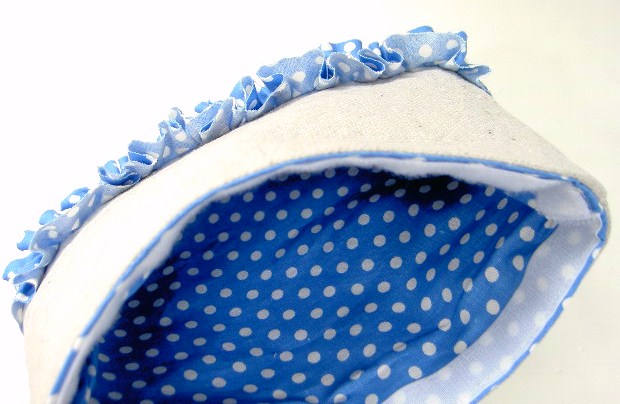
I used leftover pieces of drop cloth here, the finished size is about 8″l x 7″h.

Here’s how I made the pouches:
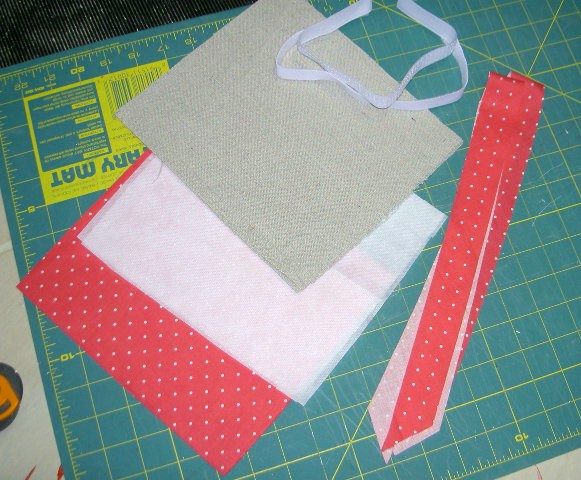
1. Cut fabric: 2 pieces for exterior, 2 interfacing, 2 lining – all same size (mine are about 9″ x 8″)
ruffle piece: 2 x your length  by 1 1/2″ wide (cut on bias)
velcro: equal to your length
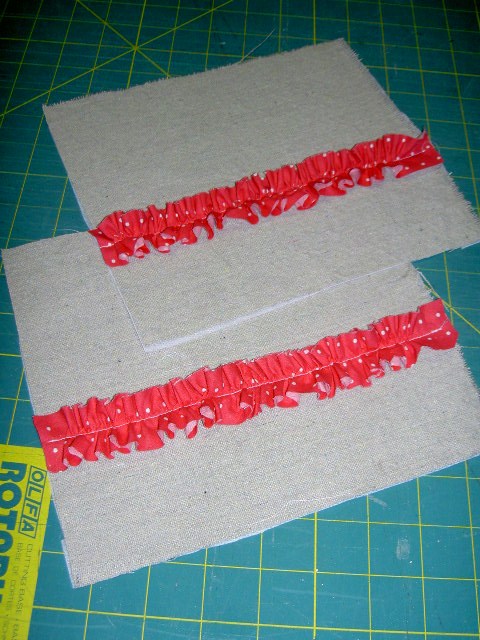
2. Iron on interfacing to wrong side of exterior fabric, sew on ruffle about 1/3 from bottom edge:
3. Sew velco onto right side of lining pieces:
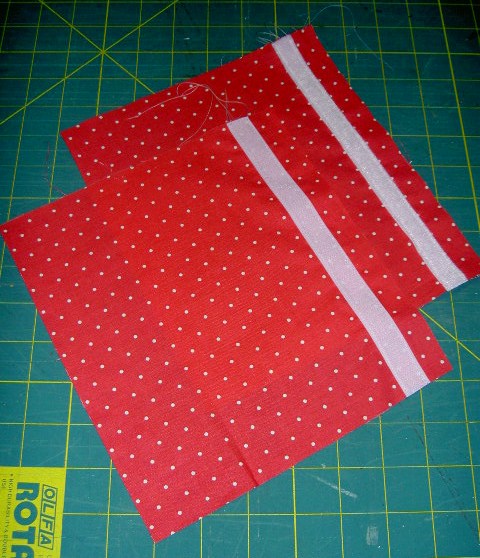
4. Sew lining pieces (right sides together) on sides and bottom edge leaving about 4″ open on bottom edge:
5. Sew exterior pieces (right sides together) on sides and bottom edge:
6. Snip corner seams to get nice points.
7. Turn exterior piece right side out and place into lining, line up side seams and pin around top edge:
8. Sew all around top edge.
9. Pull exterior piece out through open hole in bottom edge of lining piece:
10. Sew bottom edge of lining shut.
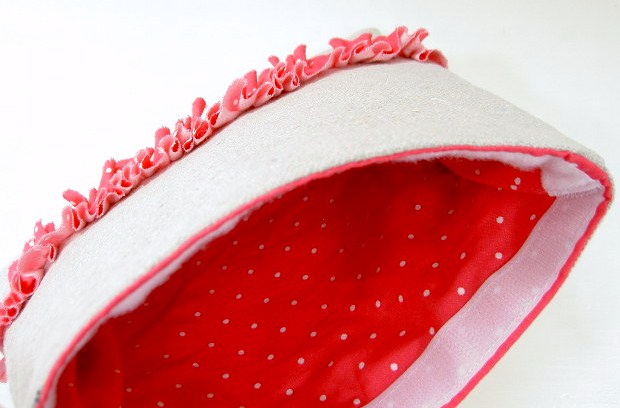
11. Ease lining into pouch, pressing top edge seam smooth.
12. Sew around top edge for finished look.
Thanks Maggie for a great idea.
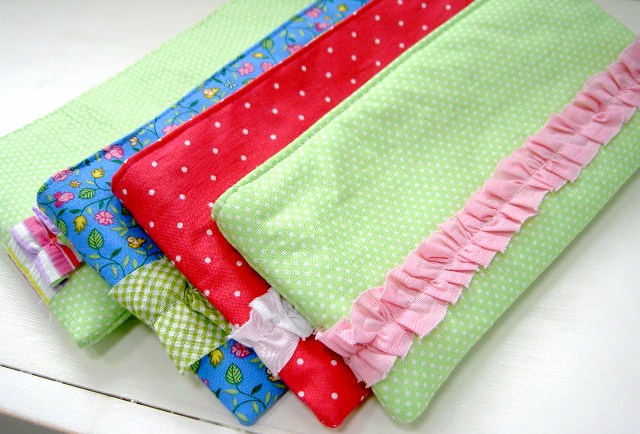
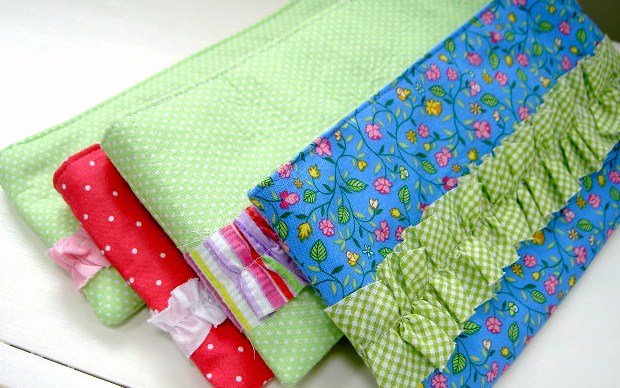
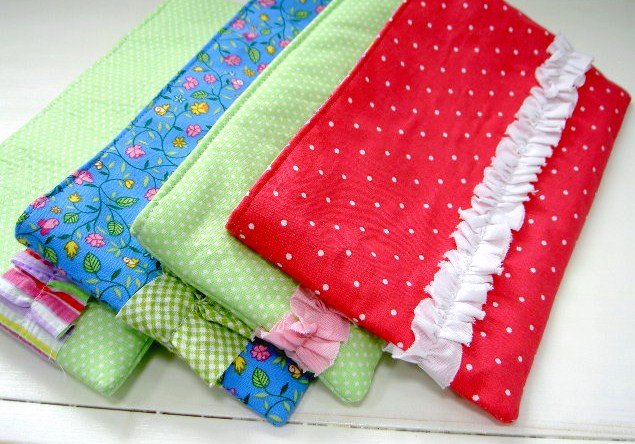
Over our Easter vacation I was able to make a few:
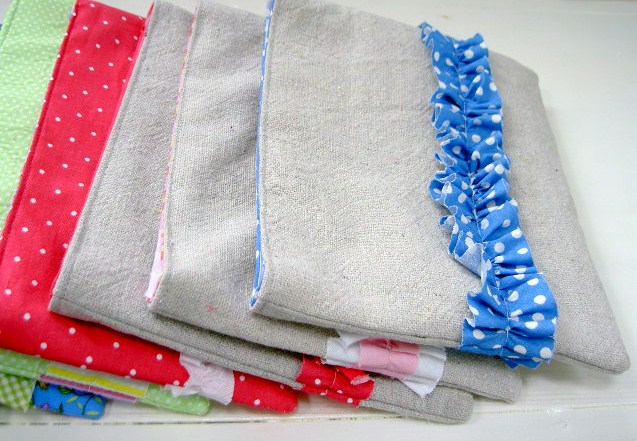
I raided my mom’s fabric stash and borrowed her machine to make these:

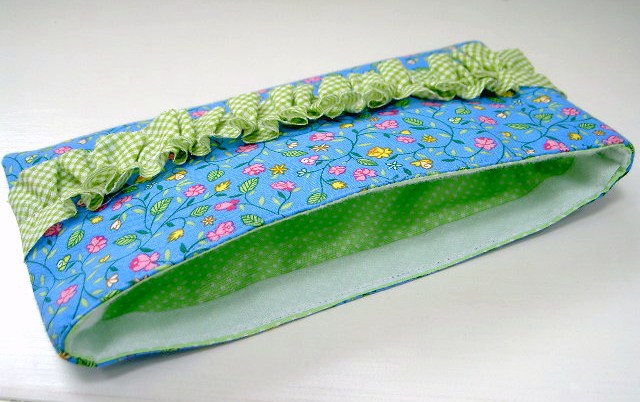
I used bias tape (ironed flat) to make the ruffle.

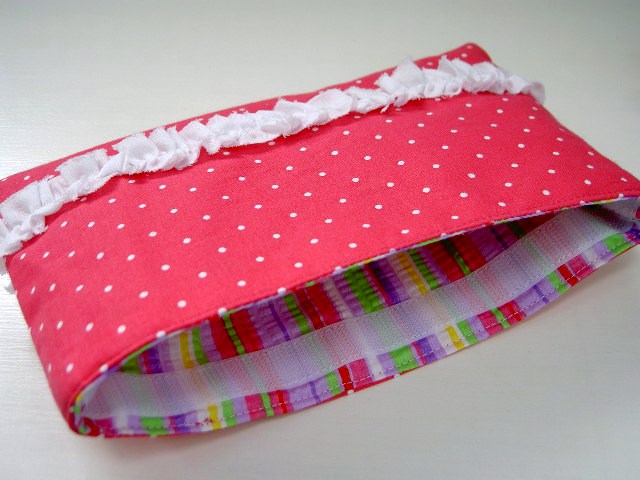
A quick, easy and very useful sewing project.
I’m linking up to:
Funky Junk's Saturday Nite Special   Visit thecsiproject.com  The DIY Show Off Thumbnail for 'Made By You Monday' Making Photobucket http://linda-coastalcharm.blogspot.com/Elements InteriorsTransformation ThursdaySYS Thurs  The Shabby Nest Chic on a Shoestring Decorating  Photobucket

You may also like...

  • DIY Moving AnnouncementsDIY Moving Announcements
  • DIY Armrest PincushionDIY Armrest Pincushion
  • How to Sew a Drawstring BackpackHow to Sew a Drawstring Backpack
  • DIY Windowseat Cushion CoverDIY Windowseat Cushion Cover
Share this post:

Filed Under: DIY, GIFTS, POUCHES, SEW, SEWING20 Comments

Reader Interactions

Comments

  1. Inspire Me Heather says

    April 28, 2011 at 8:16 PM

    Wow, you've been busy! Those look great!!

    Reply
  2. hilary @ the upcycle furniture co. says

    April 28, 2011 at 9:33 PM

    simply adorable!!!!

    Reply
  3. Holly says

    April 29, 2011 at 1:30 AM

    So cute! Using bias tape was brilliant! No cutting strips or hemming.

    Reply
  4. Stacy @ She's {kinda} Crafty says

    April 30, 2011 at 1:32 AM

    L.O.V.E. these. I just made a whole bunch of reusable snack bags to give out as favor bags at my daughter's party using coated food safe nylon as the lining and basically this same method. So easy and practical and fun!

    Reply
  5. Michelle says

    April 30, 2011 at 5:29 AM

    These are so cute! Love them!! I am visiting from TT&J and new follower!!!
    Michelle
    http://www.delicateconstruction.blogspot.com
    p.s. I am having a giveaway this weekend, you should come check it out!

    Reply
  6. someonesgottapay says

    April 30, 2011 at 7:35 PM

    So cute! Love the gray ones w/patterned ruffle.

    Reply
  7. Alicia @ littlesprinklesoffun says

    May 1, 2011 at 3:35 AM

    These are really cute!

    Reply
  8. Gwen @ Gwenny Penny says

    May 1, 2011 at 5:38 AM

    These are really sweet. I love the fabric combinations, especially the linen. Gorgeous!

    Reply
  9. Screaming Meme says

    May 2, 2011 at 12:52 PM

    I love the ruffles…:)

    Reply
  10. Karenkay says

    May 2, 2011 at 1:48 PM

    adorable pouches!!

    Reply
  11. Tina says

    May 2, 2011 at 8:19 PM

    oops sorry about that

    love these and LOVE the NO zipper feature.

    Great idea
    tina
    embellishments by tina

    Reply
  12. The Polka Dot Closet says

    May 5, 2011 at 2:03 AM

    I saw this tutorial and I am going to give it a whirl too, I love the idea of using bias tape for the ruffles, they are so cute and you are right the tutorial was wonderful. Great job, fun and cute! Visiting from Trans Thurday

    Carol

    Reply
  13. Chris says

    May 6, 2011 at 1:52 AM

    Well done! Not only are they cute, but you combined colors well.

    Reply
  14. FlyAwayHome says

    May 7, 2011 at 12:27 PM

    Must be true…great minds MUST think alike. We have almost the same tutorial! I love the addition of the ruffle. Cute!
    Come check my eco friendly bags out at
    http://flyawayhome-4am.blogspot.com/2011/01/going-green-tutorial.html

    Reply
  15. The Autocrat: Haley says

    May 8, 2011 at 3:29 PM

    Those are super stinkin' cute!

    Reply
  16. C'est Magnifique says

    May 10, 2011 at 3:44 AM

    Very cute and I love how you used velcro… I hate putting in zippers!

    Tania

    Reply
  17. freckled laundry says

    May 12, 2011 at 2:35 PM

    These are precious. They'd make cute favors for a little girl party too. I'm loving the velcro instead of a zipper. Thanks for linking!

    Reply
  18. Ricochet says

    July 18, 2011 at 10:46 PM

    Love these pouches! I'm working on a bias ruffle post and would love to use one of your pics and link it back to this tute! I'm new to blogging, so let me know if this isn't ok.
    Best,
    Rikka J.
    Ricochet and Away!
    http://www.ricochetandaway.blogspot.com
    [email protected]

    Reply
  19. Ricochet says

    August 24, 2011 at 5:44 AM

    I finally did make a post about bias ruffles and linked to this sweet tute! You can find it at http://ricochetandaway.blogspot.com/2011/08/bias-ruffles-godsend-for-ruffle-addicts.html

    Reply
  20. Happy in red says

    September 5, 2011 at 12:30 PM

    Love this tutorial!!
    Thanx!
    Esther.

    Reply

Leave a Reply Cancel reply

Your email address will not be published. Required fields are marked *

Primary Sidebar

Hi! I’m Jaime

Jaime Costiglio

Hello!

Thank you for stopping by.
Join me for lots of DIY.

Read more

Get new posts via email

Handbuilt Holiday: Gift Project Plans

handbuilt holiday gift project plans

Collection of DIY gift project plans to build.

The Home Depot Tool Prospective

THD Prospective

Tools to consider for the DIYer.

Archives

The Home Depot Logo
Copyright © 2023 Jaime Costiglio · Custom site by Moonsteam Design

Privacy Policy