• Home
  • Blog
  • About
  • Contact
    • Disclosure
    • Privacy Policy
  • SHOP
  • Widget area for main menu

    • Email
    • Facebook
    • Instagram
    • Pinterest
    • Twitter
    • YouTube
  • Skip to primary navigation
  • Skip to main content
  • Skip to primary sidebar

Jaime Costiglio

build - paint - sew

  • BUILD
    • BEDS
    • BENCHES
    • DESKS
    • DRESSERS
    • GAMES & TOYS
    • SCRAP WOOD
    • SHELVES
    • STORAGE
    • TABLES
  • TOOLS
  • PAINT
    • CRAFTS
    • FURNITURE
    • HOME DECOR
  • SEW
    • GIFTS
    • HOME DECOR
    • POUCHES
  • HANDBUILT HOLIDAY
    • 2021
    • 2019
    • 2018
    • 2017
    • 2016
    • 2015
    • 2014
    • 2013
  • GIFTS
    • BABIES
    • KIDS
    • FOR HER
    • FOR HIM
    • TEACHERS
    • WEDDINGS
  • SEASONAL
    • 4TH OF JULY
    • FALL
    • HALLOWEEN
    • CHRISTMAS
    • SUMMER
    • SPRING
    • ST. PATRICK’S DAY
    • THANKSGIVING
    • VALENTINE’S DAY
    • WINTER
  • SALTBOX PROJECT
    • BATHROOMS
    • DINING ROOM
    • EXTERIOR
    • FAMILY ROOM
    • FOYER / MUDROOM
    • KIDS BEDROOMS
    • KITCHEN
    • LIVING ROOM
    • MASTER BEDROOM
    • PLAYROOM
  • SCROLL SAW

DIY Vintage Quilt Makeover

February 5, 2015

vintage quilts girls bedroom
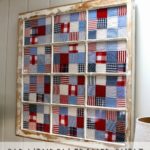
How I took a vintage quilt (that was never quilted) and made it into two proper quilts for my girls beds, if only their great great grandmother knew where her quilt was today!
vintage quilt top
I received this very thin handpieced quilt from my mother about 10 years ago.  It actually came from her father’s home and was made by his mother so now this vintage quilt will span 5 generations.
vintage quilt with new quilting
I cut the quilt in half to make two quilts, gave them a proper backing with batting and then quilted them to enhance the star pattern.  I sure hope my great grandmother is pleased with the transformation.

vintage fabric patterns
You can see the fabrics are clearly vintage, maybe 1920’s I’m guessing but so charming.  And the batting adds that bit of weight and warmth plus the quilting makes those yummy puckers.


vintage quilt on girls bed
One quilt for the end of each of my girls beds.
quilt puckers
vintage quilt girls bed


vintage quilt girls bed


vintage quilt puckers
vintage quilt backing
Originally the backing was solid pink with a 3″ wide binding.  Also there was very minimal quilting and absolutely no batting.
vintage quilt new binding
I simply added a new solid white backing with batting in between and quilted all the layers.
vintage quilt makeoer
How to makeover a vintage quilt:


vintage quilt binding
Step 1: Trim the existing binding to minimal 1 3/4″ wide.  In this case I cut the binding in half, save the cut portion because you will need it to rebind the cut side of the new edges.
Step 2: Cut the quilt in half.


vintage quilt binding
Step 3: Attach the cut pieces of binding to the cut edge of the quilt.


vintage quilt sandwich
Step 4: Make your quilt sandwich: backing, batting, quilt top.  Pin everything together.
quilting a vintage quilt
Step 5: Quilt as desired through all 3 layers and around the edge.


vintage quilt quilting
Step 6: Trim edges (but not the binding) to 1/4″.


quilt binding finish work
Step 7: Press and fold raw edge of binding over twice and pin to back just past seam.  Then stitch in the ditch from the front side to finish binding.
antique girls shared bedroom
Wash and dry.  And now my girls have a tiny bit of history from 5 generations ago watching over them as they sleep.

You may also like...

  • DIY Self Lined Roman ShadesDIY Self Lined Roman Shades
  • Master Bedroom MakeoverMaster Bedroom Makeover
  • “S” is for Striped Euro Shams“S” is for Striped Euro Shams
  • Old Window Repurposed as a FrameOld Window Repurposed as a Frame
Share this post:

Filed Under: DIY, HOME DECOR, HOME DECOR, SEW, SEWING11 Comments

Reader Interactions

Comments

  1. Annet says

    February 5, 2015 at 2:59 PM

    My first thought was you cut a quilt? but boy, that was totally worth it! Well done, they look beautiful and will last much longer being properly quilted.

    Reply
  2. Amy Baesler says

    February 5, 2015 at 3:20 PM

    Gorgeous quilts! I'm sure she'd be proud, I love the more puffy look now.

    Reply
  3. Escargopotte bordados says

    February 5, 2015 at 4:27 PM

    very nice quilting ! you are so creative

    Reply
  4. Brooke says

    February 5, 2015 at 5:44 PM

    They're so lovely! I think you did a fine job preserving the sentimentality while making them more functional

    Reply
  5. Mindy says

    February 6, 2015 at 6:36 AM

    Gorgeous, and so special.

    Reply
  6. DaiseyJayne.com says

    February 6, 2015 at 12:00 PM

    You did an amazing job, they look beautiful!!

    Reply
  7. DİKTİM DİKTİM GİYDİM says

    February 7, 2015 at 2:22 PM

    Merhaba,çok güzel olmuş,çok beğendim,Sevgilerr

    Reply
  8. Kim @ NewlyWoodwards says

    February 8, 2015 at 11:12 PM

    Oh, Jaime, I'm just smitten with these. So sweet that you were able to complete them and use them so many years later.

    I have a box of quilt blocks from Ryan's gram that I need to do something with. I'm a little intimidated because most are small hexagons.

    Reply
  9. Cami says

    February 9, 2015 at 1:57 PM

    Gorgeous quilt! Adds just the right touch to that room! Way to use it up!

    Reply
  10. Tracey says

    December 9, 2020 at 9:36 AM

    Simply beautiful, and you’ve given me an idea of what to do with one of the quilts that I inherited from my Grandmother. One of the quilts has Holly Hobby looking dolls appliquéd on it. I need to figure out a way to to make that quilt a tiny bit more modern. It was quilted in the 70’’s.

    Reply
    • Jaime says

      December 10, 2020 at 7:48 AM

      Hi Tracey, So glad you can use this idea. I LOVED Holly Hobby as a child so this is right up my alley.

      Reply

Leave a Reply Cancel reply

Your email address will not be published. Required fields are marked *

Primary Sidebar

Hi! I’m Jaime

Jaime Costiglio

Hello!

Thank you for stopping by.
Join me for lots of DIY.

Read more

Get new posts via email

Handbuilt Holiday: Gift Project Plans

handbuilt holiday gift project plans

Collection of DIY gift project plans to build.

The Home Depot Tool Prospective

THD Prospective

Tools to consider for the DIYer.

Archives

The Home Depot Logo
Copyright © 2023 Jaime Costiglio · Custom site by Moonsteam Design

Privacy Policy