Need a large space to gather for a meal? Let’s build a simple sawhorse dining table that can accommodate all your guests. And when you’re done celebrating you can use the sawhorses for all kinds of DIY projects. This sawhorse table seats 18 people with ease and even better is the quick set up and take down.

A DIY tutorial to build a sawhorse dining table. Make these simple sawhorses to serve as bases for a large portable dining table.
I built this sawhorse table to serve as a dining table for an outdoor party but this surface could be used for so many purposes:
- large desk
- craft area
- garage counter space
- homeschool work space
- workshop surface

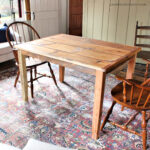
Dining Table
Super simple 16 foot table wherever you need it and completely reusable for so many different functions.


Sawhorse Base
Assembly is a breeze using the sawhorse brackets. And once have two sawhorses completed you simply add the plywood top surface and you’re ready to use your new sawhorse table! You can even select your leg length to accommodate a shorter or taller table depending on your needs. For our purposes I made the table 30” tall which is standard dining table height.

Tip #1:
For this sawhorse dining table project is to bevel the bottom end of the sawhorse legs. See in the photo above how the legs rest flat on the ground? That makes for a sturdy, secure sawhorse. A compound miter saw can make a beveled cut but you can also use a circular saw.


Tip #2:
Use self-tapping wafer head screws to secure the brackets to the studs. The curved wafer head leaves a nice finished look on the sawhorse brackets and bonus because it’s self-tapping so there’s no need to pre-drill!

Space Saving
Another bonus is these sawhorses are stackable which saves space in your garage or workshop. Then you can pull them out and set up whenever you need the extra work surface.
Or remove the top cross piece and store them flat within the stud cavities:

Portable Dining Table


Ready to get building a sawhorse dining table? Please read through all instructions below before beginning and always follow all tool safety guidelines.
Supplies:
- sawhorse brackets
- (2) 2 x 4 x 8’ studs
- miter saw
- pencil
- measuring tape
- drill
- 1 ¼” #8 wafer head screws
- 4’ x 8’ full sheet ¾” plywood

Cut List: (for one sawhorse)
- 4 – 2 x 4 @ 27” long, one end 15 degree bevel
- 1 – 2 x 4 @ 40” long
Step by Step Instructions:

Step 1: Cut the legs at 27” long. Be sure to cut one end with a 15 degree bevel. The beveled end allows the legs to sit flush on the ground and makes for a sturdier sawhorse.

Attach Legs

Step 2: Insert the legs into the sawhorse bracket. Be sure to keep the long edge towards the outside.

Step 3: Secure the legs to the bracket using a drill and 1 ¼” wafer head screws. These screws are self-tapping so no need to pre-drill.
TIP! Place a piece of scrap wood into the top portion of the bracket while securing the legs.

Step 4: To assemble the sawhorse insert the long horizontal top piece into the slot in the bracket. Then repeat for the other bracket on the other end of the horizontal board. Once both brackets are in position then secure using the same 1 ¼” wafer head screws through the hole in the bracket and into the stud.

Table Set Up
Step 5: Position the sawhorse bases 16” from the end of each plywood sheet. This will give the plywood tabletop enough support while keeping the ends free for guests to sit comfortably.

Step 6: Place the plywood sheets on top of the sawhorses and adjust as needed. Lastly, secure the plywood to the sawhorse bases using the 1 ¼” screws down through the tabletop and into the horizontal stud.

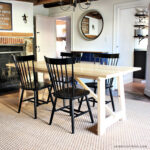
Once your dining table is set up dress it up however you like. I used this sawhorse table for an outdoor Fall birthday celebration complete with a bit of DIY. You can find the tutorial for the wood lanterns here.


Next time you need a large table surface be sure to consider making a sawhorse dining table. The sawhorse bases are easily to build and you’ll have versatile table that has endless uses!
Thanks for joining me for this sawhorse dining table project. Please leave any questions in the comments below and be sure to follow me on social media for sneak peeks, tools and project inspiration:
Instagram / Pinterest / Facebook / Youtube / Twitter
SHOP THIS PROJECT:


Love this. Did you find the top was bendy when people rested on it? Like was it bouncy or sturdy?
Thanks so much!
Thanks Jeni, there was no noticeable bend. If you want a really firm (no bend) I’d use 3/4″ MDF, it’s super heavy though but solid as a rock.
Hi Jaime, it looks like the link is no longer active for the plywood. I’m looking to make a sturdy 4’x8′ sawhorse table for a craft show (Should be able to hold a decent amount of weight). Maybe the 3/4′ MDF is the way to go – do you think this one would work: https://www.homedepot.com/p/3-4-in-x-4-ft-x-8-ft-MDF-Panel-D11612490970000/304325742#overlay
Thank you!
Hi Alyssa, any 3/4″ full sheet of plywood would work. The MDF is super heavy so not really a great solution for portability but yes it can hold a ton of weight. I’d stick with the plywood if possible. Good luck!