Today I’ll show you how to make giant marquee letters because it’s easier than you think!

A DIY tutorial to build giant marquee letters. Make a statement with large marquee letters using my tutorial here.
I recently made three giant marquee letters for our school spring auction and I have the steps down below to show you how to do it yourself. And if you’re looking for marquee numbers that tutorial is here.

I apologize for the casual photos in this post however I was super busy installing and assembling all of the decor for the event so the photos were last on my list but I still think the tutorial is valuable so here we go.
Marquee Letters
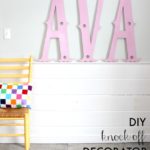
These giant marquee letters are 4 feet tall by 3 feet wide each. And I mounted them to a 2×6 frame behind the bandstand so they could be seen above the band members. I did use this post from Evan & Katelyn as my starting point. I suggest you read their tutorial as well to get the full idea.
And if you’re looking for a smaller version Jen at House of Wood has smaller marquee letters here.
These marquee letters were part of our school spring auction and my friend Cheryl captured a few candid shots during the set up:

Party Decorations
- giant marquee letters
- giant rainbow pot of gold is here
- directional signs with Irish towns
Right before the band set up I caught this pic of the letters before I left to get changed for the night:

Big Impact
You can see how big the letters are compared to the people. They make a huge impact for three simple marquee letters. It’s a big bold statement piece of decor that fills a giant room for very little effort.
To make the marquee letters freestanding I added a base and frame:


Below are the steps to make giant marquee letters. Please read through entirely before beginning to plan your project accordingly.
Marquee Letters Supplies:
- 1/2″ plywood sheet (each letter is 4′ x 3′)
- jig saw
- drill
- 1/2″ fortsner bit
- clear outdoor string lights (25 bulbs per string)
- pencil
- ruler
- latex paint
- 6″ aluminum flashing
- gloves
- staple gun & staples
- tin snips

Step 1: Draw the letter shape onto 1/2″ plywood and cut out using a jig saw. My lettering is 9″ thick and then I drew a center line.

Step 2: Mark the light bulb placement making even marks for 25 holes. Drill a 1/2″ hole for each bulb. (I used a 1/2″ fortsner bit, check your bulb housing for size.)

Paint
Step 3: Paint the front side using latex or acrylic paint.

Flashing Trim
Step 4: Using gloves unravel a portion of the aluminum flashing.

Step 5: Staple the flashing to the plywood edge. Be sure to center the flashing on the plywood and use a putty knife to bend the flashing at the corners.

Step 6: Insert the bulb housing from the back and staple the excess cord to the back of the letter which also holds the housing in place. Then replace the bulbs from the front side.
To make the letters freestanding I added a simple frame. Use a 2×8 for the base and 1×4 for the sides and top. Everything is screwed together using 2 1/2″ spax screws and then the letter is secured to the frame from the back using corner braces in multiple spots:


Plug in and enjoy!

I hope you enjoyed this tutorial and find it useful. Please share and tag me in your posts if you make the giant marquee letters.
SHOP THIS POST:

If you’re looking for alternative marquee projects check out this framed marquee last name sign:

Or how about a large number marquee sign for that special birthday?


You are amazing! Huge statement piece with very minimal cost. My kind of project.
Aloha,
Charlee
Thanks Charlee. Hard to say no when school comes asking.
Enjoyed reading and watching your creation wow I know the school loves you .. fantastic job
Thanks Ruth