Every kid needs a portable lego tray to move those precious lego builds off the table when its time for dinner.

A DIY tutorial to build a portable lego tray. This revised version of the original lego tray has more options and makes a great gift.
I was shocked and surprised at the response to my first portable Lego tray. Thank you to everyone who shared the idea, I’m truly flattered. Naturally I’m always looking for ways to improve my projects and so this revised version of the lego tray is just that much better.
Lego Baseplate Layout
After receiving many requests from friends and strangers looking to purchase the lego tray I revised the build slightly to make a better product. With all the baseplate options available there are so many layout choices but I narrowed it down to these three:


PORTABLE LEGO TRAYS

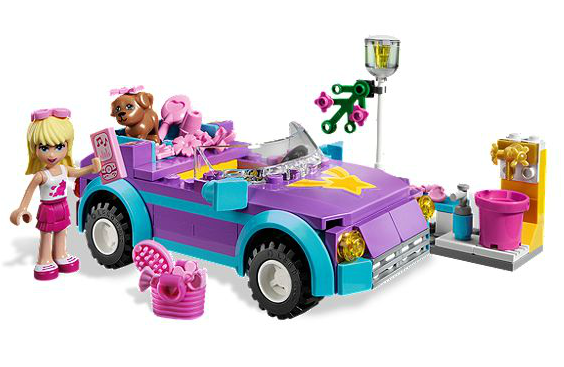
Lego Friends Baseplates
I also contacted the Lego company to request the baseplates be made in colors to coordinate with the Lego Friends collection – maybe yellow, pink, purple, bright blue would work well with any of the Friends sets:
Below is a portion of the response I received from JoAnn at LEGO Direct Consumer Services. Maybe someday they might have new baseplate colors, maybe?

Update: As of 12/10/22 they don’t have baseplates in fun bright colors. 🙁
SUPPLIES:
- lego baseplates
- 1/2″ plywood (15″ x 19″)
- 1x2x6 pine board
- pocket hole jig
- 1″ pocket hole screws
- wood glue
- 1 1/4″ finish nails
- (2) handles
- construction adhesive

STEP 1: DECIDE ON YOUR BASEPLATE CONFIGURATION AND TRIM THE PLATES TO FIT. YOU CAN USE A MITER SAW JUST GO SLOW BUT A UTILITY KNIFE WORKS TOO.


STEP 2: TRIM THE 1/2″ PLYWOOD TO FIT YOUR BASEPLATES. THEN CUT (2) 1×2 SIDES EQUAL TO THE SHORT SIDES OF PLYWOOD. AND CUT (2) 1×2 SIDES EQUAL TO THE LONG SIDE OF PLYWOOD PLUS 1.5″.

STEP 3: ASSEMBLE THE TRAY USING 1″ POCKET HOLE SCREWS AND WOOD GLUE TO ATTACH THE SIDES. SECURE THE CORNERS WITH FINISH NAILS.


STEP 5: APPLY ADHESIVE TO BACK OF LEGO BASEPLATES THEN PRESS ONTO PLYWOOD BASE. AVOID GETTING ADHESIVE CLOSE TO EDGES.

STEP 6: USE PAINT CANS TO WEIGH DOWN THE BASEPLATES WHILE THE ADHESIVE DRIES.


All wrapped up and ready to give as a gift.

A great DIY project that any Lego enthusiast would love.
SHOP THIS PROJECT:


I love it! Thanks for the great tutorial!
It's cool that they wrote you back, but you need to get a patent on that design NOW! Because they'll probably come out with Lego trays just in time for Christmas. You might as well make some money on your idea.
I *need* to make this for my son's birthday next month! Thanks for the great tutorial.
this is fantastic, what an awesome gift to someone 🙂
Yup. I still love it. I'd love to get something like this with a pillow on the bottom so my boys could use it for road trips! You really are an inspiration!
I LOVE this!
Why don't you just spray paint the base the color you want it? 🙂
Love this! We have our Kitchen Fun & Crafty link party up and would love for you to share this!
http://kitchenfunwithmy3sons.blogspot.com/2012/06/kitchen-fun-and-crafty-friday-link.html?m=1
This is brilliant! I need to make one for each of my kids I think. Thanks so much for sharing the tutorial!
Thank you, Jamie! We made your Lego trays and I posted pictures of our experience. They are a hit!
http://ourcrazyboys.com/i-pinned-it-i-made-it-portable-lego-tray/
That is just what my kids need! Love your idea! All of us play with LEGOS in our house. Even my 16 yr old daughter. It's our family time and we love it. Thanks so much for sharing your idea!
This is awesome! Just yesterday I was in need of a portable Lego solution as the 10 month old tried to eat the 4 year old's Legos! Eeeeek!! Thank you! Pinning and making!!
This is so awesome! I actually have a tray that is not getting used that would be perfect for this! Visit me a http://www.six-cents.com.
That is such a cool letter from LEGO. I love these trays – Sawyer loves his LEGOS. So do I. I am one of three daughters but we always got sets of LEGOS for Christmas from my Dad.
My daughter is a huge Lego girl. W have the Friends sets and are now acquiring the Creator sets. This tray is exactly what she needs! Thank you so much for sharing 🙂
My daughter is a huge Lego girl. W have the Friends sets and are now acquiring the Creator sets. This tray is exactly what she needs! Thank you so much for sharing 🙂
What a simple and awesome idea, I'm going to make this for a Lego gift basket for a school. I think I will stain the wood and add felt to the bottom.
i love this! where do you buy lego base plates?
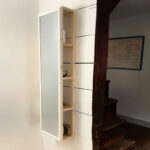
I love this idea!! I wanted to make this for my daughter but didn't have the time to construct the tray part. So, I bought the lego plate and searched for something I can easily put it in. I ended up finding a scrapbook frame. I took out the glass and left the back part. I glued the lego plate where the picture would go. It has worked out great because it's deep enough the lego pieces do not fall off. Just wanted to add a quick version.
This is an awesome idea! Definitely adding it to the build list.
I think Lego used to make the 1/4 sized and 1/2 size platforms/baseplates in yellow (we have some "vintage" ones in our collection), if you look on eBay or at
local garage sales you might find some. 🙂
I can't think of a way to do it that would be efficient, but it would be possible to use green and blue to make a roughly heart-shaped lake, which would suit the LEGO Friends town well. My first thought was just to have three blue squares in a rough "L" shape on a field of green–if your builder is willing to apply some imagination, that might be adequate.
For those considering staining the sides, I'd recommend cutting the corners at 45 degree angles, rather than butting them at 90 degrees as shown. Stain tends to look somewhat darker on end grain, which is more porous and soaks up more of it. Not the sort of thing most kids would care about, of course, but it would give a slightly more consistent look.
What is the best way to cut the lego baseplates?
These are great, can I order them from you? I don’t have the time of skill to do myself.
Thanks Chloe, while I do take special orders I’m not making the lego trays at this time.