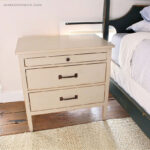
My girls needed larger night tables for their shared bedroom. So I designed these DIY nightstands with a pull out ledge to fit the space between their beds.

A DIY tutorial to build a nightstand with a pull-out ledge, drawer and open shelf below. Make your own nightstands using my plans.
These are fully functional nightstands with a pull-out large ledge, generous drawer and open lower shelf for storage.

This bedroom is a bit tricky because of the low windows and ceiling eaves. This is the best spot for their beds so naturally their nightstands must go here too.

Nightstand Details
The pull-out ledge is a bonus feature that I thought my girls would appreciate. In fact they like to pull the whole shelf out and use the hard surface for writing while in bed. You could easily attach a small rope at the back edge of the ledge then attach the other end to the back of the carcass for safety in order to keep the ledge from pulling all the way out.
It’s also worth noting I cut the pull out ledge against the grain which causes the ledge to bow ever so slightly. I did this on purpose to allow for some give when you go to pull out the ledge. Also DO NOT PAINT the underside of the ledge so the plywood can run freely against the shelf.

* This post contains affiliate links below, by clicking on an affiliate link and making a purchase I may receive a tiny commission. This small commission helps me keep this site full of free content so I thank you for your support. *
Storage Drawer
The drawer is enormous and deep and I actually might regret that because my girls will just fill it up with junk. But at least I won’t have to see the junk! I highly recommend the slow close drawer glides, they can definitely handle the weight of a drawer full of odds and ends.

I love the open bottom shelf which allows the light from the floor windows to come through and it’s the perfect spot for a basket. The maximum basket size is 25″w x 20″l x 10″h, I found the basket above at Homegoods and it fits just right.

Bedroom Decor
This is definitely a heavy, solid nightstand as it’s built with an entire sheet of 3/4″ plywood. The wall sconces are IKEA Arstid wall sconce spray painted Rust-Oleum berry pink gloss
 . There really isn’t much space for lamps with the ceiling eaves plus the sconces are better for nighttime reading which my girls love.

Below are step by step instructions to build a nightstand with a pull-out ledge. Always follow all safety precautions when using power tools and read through all the steps prior to beginning.

Supplies:
- 1 – sheet ¾” plywood
- 1 – ¼” plywood handy panel
- 3 – 2x2x8 boards
- 1 – 1x2x6 pine board
- 1x8x8 pine board
- 1 – 1x10x6 pine board
- 6’ – 1 3/8” x ¼” flat molding
- 1 – set 18″ soft close drawer glides
- 1 1/4″ pocket hole screws
- 2 1/2″ pocket hole screws
- 1 1/4″ wood screws
- 3/4″ wood screws
- 1 ¼” & ¾” finish nails
- wood glue

In Step 5: Attach the side trim to the exterior sides using wood glue and then secure from interior with countersunk 1 ¼” wood screws.

Step 12: Make drawer front. Cut trim to fit and attach using wood glue and ¾” finish nails.


Finish and Hardware
Sand well and finish as desired. I used oil based primer plus two coats of semi-gloss white.

I installed a knob on the pull out tray by super gluing the screw that came in the packing into the knob. Then I cut off the screw head, predrilled a hole in the ledge and screwed the knob in place. The drawer hardware pulls are from Restoration Hardware, 4″ Aubrey pulls in polished chrome.

This grainy pic above shows the beadboard side detail best but you could easily use plywood instead, I just had the beadboard scraps on hand so I used them.
Enjoy!
SHOP THIS PROJECT:


Beautiful, Jaime! Love the pull out ledge!
You are ahhhhhmazing! This design is brilliant! They look so good! Well done! I hope you have a great day!
Smiles!
Terry
Wow!!! These are fantastic! I'm in a tiny home and always looking for furniture that can do double duty…these fit the bill! Thanks for the plans!
Wow Jamie these are stunning!! I have a question about finishing… Did you use edge banding around the top before you painted? Or did you fill with wood filler? It looks so flawless in your picture at step 15 before you painted.
@HoppingAlong yes there is edge banding applied to all visible plywood cut edges. It's a lot of edge banding (3 rolls!) but worth it.
The pull-out shelves are my favorite parts! Such a great added touch.
Wow Jaime! These are just beautiful! The pics and plans are awesome too. Thanks for sharing! I found you on Pinterest.
Thanks Camille, my girls love having them bedside their beds. So functional and pretty too.
AMAZING! How much did the project cost?
Thanks Nelly, I don’t have exact numbers on the cost since lumber varies greatly depending on where you are located.
Thanks for such detailed and amazing pdf plans. I’ve recently gotten into wood making and I really enjoy it. By far you have the best detailed plans that really help!
Thanks Katrina, it’s the most fun building and making all the furniture.