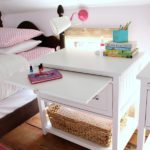
True to the spirit of DIY I’m at it again building things I have envisioned in my mind but don’t really exist in the retail space. Enter my DIY primitive nightstands complete with a simple door, plenty of storage space inside and a movable shelf.

A DIY tutorial to build a primitive style nightstand. Make this nightstand with a door and plenty of enclosed storage using my plans here.
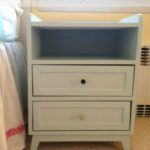
First off let me say I’m not a huge fan of the finish on these nightstands but I’m sharing them with you anyways because it’s the plans that matter. I would have LOVED to paint them a deep red but my girls were highly against that idea. So I figured I will honor their request and some day way down the road I can repaint them.

And if you’re new around here we live in a 1740 saltbox farmhouse and I would be more than happy to fill our home with primitive furniture. Slow and steady. Today it’s nightstands for my girls bedroom and I’m loving the rustic, worn look (despite not being my choice of paint color). Awhile back I built this fun tall cupboard in a similar primitive style.

Primitive Details:
- rustic, rough lumber
- planked panels
- inset door
- wood knob
- wooden turning lock

Rustic Nightstands
To achieve this beautiful rustic look I used all rough pine boards and joined them into panels using pocket holes. I realize this is a very specific look and not for everybody so I made the plans using standard 3/4″ plywood. But if you like the rustic texture and character then I say go for it!

My girls shared bedroom recently got a little makeover with freshly painted walls, new beds and bedding, new rug and now these nightstands to complete the space. They are now teenagers and wanted to update their space for a more grown up and cozy bedroom.


Down below I’m sharing the plans to build this primitive nightstand as well as details on the process. Be sure to read through this post entirely before beginning and take into consideration your lumber selection before making any cuts.

Nightstands with Storage
- enclosed space to hide everything
- simple panel door with full wrap hinges
- movable shelf

You can see I used a thicker 2x piece for the nightstand top. To be honest I had some leftovers sitting in my shop and they just worked out great for tops. I like the weight of the thicker top, it feels like a nice cap to the carcass but standard 3/4″ top would be fine too.


Click here for PDF printable version of the primitive nightstand plans.
Supplies:
- miter saw
- jig saw
- measuring tape
- pencil
- drill
- pocket hole jig
- nail gun
- wood glue
- one set full wrap hinges
- chalk paint in blue
- chalk paint in white
- clear wax

STEP 1: To begin you need to cut the legs out of the side pieces using a jig saw. To get the curved pattern I used a round glue bottle.

Once the carcass is complete then you can start cutting the face frame and top pieces.

In Step 6 you attach the top to the carcass cross supports using wood glue and 1 1/4″ countersunk screws.

Lastly cut the door pieces and attach them to the face frame using full wrap hinges.

To finish I used chalk paint starting with the blue color then white. To keep it really rustic I sanded off a lot of the paint especially in areas where the nightstand would be worn.


Thanks for joining me for this primitive nightstand project. Please leave any questions in the comments below and be sure to follow me on social media for sneak peeks, tools and project inspiration:
SHOP THIS PROJECT:


Exquisite job! Terrific! Obviously I love these. Wish I still had my shop……… I know your girls are thrilled.
Thanks Linda, they were so fun to make. I’m itching to change the paint color already (to something I like better) but I’ll wait and let my girls keep it how they want for now. 🙂