
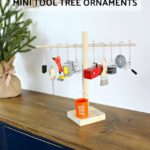
Everyone needs a toolbox, it’s one of those necessities in life. Even cuter would be a mini toolbox ornament! As part of the tool tree ornaments series I’m sharing how to make these simple toolbox ornaments.

Happy to have you joining me for Christmas in July, it’s never too early to start thinking about holiday decorations and gifts.
If you have that certain someone in your life that might appreciate tools of all sorts be sure to follow along in my mini tool tree ornament tutorials.

*This post contains affiliate links.
Supplies:
- 3/4″ square dowel – cut @ 2 1/2″ long
- Rustoleum gloss apple red spray paint
- saw
- eye strap
- 1/2″ wood screws
- dark red permanent marker
- Fimo metallic silver clay
- wire
- super glue gel
- bakers twine

Step 1: Cut 3/4″ square dowel at 2 1/2″ long. Spray paint using Rustoleum apple red gloss.

Step 2: Predrill 2 holes at center top for eye strap and attach using 1/2″ wood screws. To create toolbox lid draw a line at an angle on each side and across the front top 1/3 using a dark red permanent marker.

Step 3: Make the latches using Fimo metallic silver clay. Add a small wire U shape into the clay before baking. Bake as directed on packaging. Once dry use super glue to attach to toolbox front.
Tie twine around eye strap for hanger.

Super cute as stand alone ornaments or make the whole collection of mini tools:

All the tutorials will be posted in due time, be sure to follow along.
SHOP THIS PROJECT:

 mini saw blade |
 mini paint brush |
 mini extension cord |
 mini tape measure |
 mini spray paint |

Adorable!
Thanks Beth, I had so much fun creating all the minis. The pressure is on for this year!
Squeee! Reminds me fondly of a hardware store mini dollhouse I had as a child. Thanks for the memories. I’m sure to make bunches for the tree and as favors. Thanks.
Thank you Mary, glad to hear about your fun memories. They were just a blast to make and I love all the itty bitty details. Happy crafting.
I have zero skills to make this myself, but would love to buy them from you! Is that a possibility?