
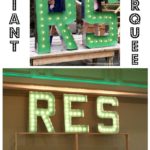
Grab your jigsaw and some plywood because you can definitely DIY these giant decorator letters. They make a huge statement for very minimal cost (and a fun birthday gift for my daughter’s friend too!).

Inspired by Pottery Barn Kids Decorator Letters:

Their letters cost $79 each, that’s crazy talk too me! (To do the math 4 letters would be $316 – are you kidding?) I used 1/2″ plywood scraps to make my version but all you need for one letter is a 1/2″ plywood handy panel (2′ x 4′) which runs about $15. You might even be able to fit two letters on one panel if you’re lucky. Also you could use 1/2″ MDF which is cheaper and makes those curvy cuts super smooth.

The size and font is what makes these letters so whimsical, I used IFC Rail Road Font from here. Search for western and circus themed fonts for similar looks, I settled on this one above but there are lots of free font options on the internet.

It’s all in the details. Go slow with the jigsaw and make sure you have a fresh sharp blade. I definitely recommend MDF for beginners since it’s much more forgiving on the curves.


I leaned the giant decorator letters on the ledge here because they are a gift but they do have sawtooth hangers on the back at top for hanging on the wall.

These letters are 30″tall and just for scale I pulled back so you can see how big they are versus the staircase. Wouldn’t they make great party decor with a fun word and painted to match the theme?
How to make knock off decorator letters:
Step 1: Print desired letter. I used IFC Rail Road Font.

Step 2: Cut a piece of kraft paper 15″w x 30″h. Fold into halves and quarters both lengthwise and crosswise to make a grid. Also make a grid on your printout (either by folding or with a ruler). The grid allows you to enlarge the letter by transferring the lines onto the kraft paper in the correct box.

Step 3: Cut letter from kraft paper and tape onto 1/2″ plywood. Trace around kraft paper.

Step 4: Using a jigsaw cut out letter from plywood. Clamp the plywood to your work surface. I used the Rockwell Jawhorse here which is like a giant clamp with tons of pressure that’s super easy to operate and maneuver the plywood for different cutting positions.

Step 5: Make circular decorative holes using a 1 1/4″ spade bit.

Step 6: Sand edges smooth and paint. Let dry and sand again to distress edges slightly then seal with clear polyurethane.

Step 7: Attach sawtooth hanger to back (use glue under nails to be sure sawtooth doesn’t pull out).


These are awesome! And I am seriously admiring your tool work! I am pinning this to save.
Hi! I would like to build 6 foot tall letters for my wedding with this font style. Do you have any pointers? I am also struggling to get building plans or a printout of the letters that big? Can you recommend any sources?
Thanks!!!
Hi Liandra, I use Rapid Resizer to get my images and graphics to the size I need. I know you can go super large then download the PDF file and print from your printer. You have to tape the sheets together. Or you can send the image to Staples and have them print it, I’m not sure of their size / paper limits though. Good luck!