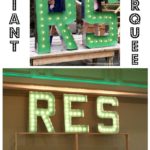
I’ve come to the conclusion that anything with lights is better. Hands down lights make all the difference and this DIY marquee sign with lights is a prime example. I’m here to share the tutorial on how I made this marquee sign with lights.

A DIY tutorial to make a marquee style wood sign with lights. A back lit marquee sign with a frame makes awesome wall decor or party decoration.
This lit sign is completely customizable to fit your lettering font and size. I made this for a friend’s 40th birthday party, which unfortunately we ended up not being able to go due to a snowstorm, but we delivered it later none the less. This marquee sign is fun for any party, event or even as regular home decor. Hang this sign in family room or kids playroom for a bit of quirky wall decoration.
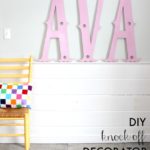
The handpainted wood sign is backed with outdoor globe lights. Their round shape lends perfectly to the marquee nature of this sign.

I love the warm glow of the globe lights when they are on but the sign is still great even with the lights off.


Below are the step by step instructions to make a marquee sign with lights. Read through the entire tutorial before beginning.
Supplies:
- 1×8 pine board (wording)
- 1×2 pine board (word support base)
- 1×12 pine board (backing)
- 1×4 pine board (frame)
- string of globe lights
- computer & printer
- ballpoint pen
- measuring tape
- black acrylic paint & paint brush
- copper paint
- power tools (miter saw, sander, nailer, drill & bits)
- 1 1/4″ finish nails
- Kreg pocket hole jig
- 1 1/4″ pocket hole screws
- 1 1/4″ wood screws
- staple gun
- french cleat

Step 1: Print out lettering. I used Circus font (font source here) at 500 point which fits great on a 1×8 board. Tape all the printed letters together to determine the length of your board. Cut the board to the correct length and then paint the board your desired background color.

Step 2: Once the printouts are in position begin tracing each letter using a ballpoint pen with heavy pressure which leaves an indent in the wood.

In Step 3: Paint on and inside the indent using black acrylic paint.

Step 4: After the paint is dry sand lightly to distress the lettering and backer, this makes the sign look a little bit aged.

Step 5: Add highlights using copper paint. If desired you could seal the lettering using clear polyurethane. Put this piece to the side for now.
Marquee Sign Backer:

Step 6: To make the backing start with a frame from 1×2’s that is 1 1/2″ smaller on all sides than your 1×8 lettering board. The 1 1/2″ is enough space for the string lights housing (see Step 9 below for a visual). Center the 1×2 frame on the back of the 1×12 base and trace all around, this creates a guide for attaching later.

Step 7: Predrill countersunk holes into traced rectangle on back side of 1×12 backing piece (note the front side is stained).

Step 8: Moving back to the lettering board – attach the word support frame to the back of the lettering using pocket holes. Alternatively you could attach the 1×2 frame support from the front side using countersunk screws prior to painting.
Marquee Style Globe Lights:

Step 9: Now determine spacing of lights based on your string set and sign length. Begin stapling to back of the lettering board. Start at the center of one long side to insure equal spacing and be sure to staple down any excess cordage so it stays hidden behind the sign.

This set of globe string lights has little clips on the housing so I tucked the excess cord under each clip.

Step 10: Using a jigsaw cut 2 notches for the plug ends to run into the center empty space of the frame support. Staple down the female end and any extra lights as you don’t need this part. Keep the male plug end loose.

Step 11: Drill a hole into the 1×12 base for plug to pull through (see Step 12 below). Pull plug through the hole and then center the lettering board onto the backing and clamp together.

Step 12: Using the predrilled countersink holes attach the frame support to the base using 1 1/4″ screws.

Step 13: Lastly cut 1×4’s to make the frame. I painted the frame pieces before attaching them to the sign then used wood glue and 1 1/4″ finish nails to attach the frame to the backer. Attach a scrap piece of wood at center back top then attach a french cleat to hang.
I hope you enjoyed this marquee sign tutorial. Be sure to follow me on social media where I share project sneak peeks and new posts:
SHOP THIS PROJECT:


Love this sign! The lettering, the lights and the color you used on the frame…Awesome! What a nice gift!
This is so fun!!! Love all the details and those lights just take it up a notch.
Such a fun sign! Love it!
Jaime,
You did such a super job on this diy marquee lighted sign! The way you did the lights is brilliant. I would never have thought of that.
I love the finished project.
pinning!
gail
This looks like a wonderful piece of art! So nice!!
Like the lighted Sullivan sign. Do you make to sell?
Thanks Dave. I do make items to sell however because of the size and weight of this sign it would have to be local delivery or pick up. If you’re near Westchester County, NY I’m definitely happy to send a proposal.
The sign is great and so are your instructions. Hoping to make this for our end of the year school festival. Can you please tell me what size globe lights you used, G30? Thank you for any help!!
Hi Christine, thanks for your nice comments. It’s been awhile since I made that sign but I believe they are G40 lights similar to these http://homedepot.sjv.io/vxOkO Good luck with your festival, I’d love to see your finished project!
Thank you! I will post, if it turns out.
I am wondering if you could tell me where you downloaded this font from. I have downloaded it 3 times now from different sites and non of them work. I love it and would love to use it on this project.
Thank you for your help
Hi Lisa, The Circus font is from here: https://www.dafont.com/circus.font Once you download you need to ‘install’ the font onto your computer. Good luck!