• Home
  • Blog
  • About
  • Contact
    • Disclosure
    • Privacy Policy
  • SHOP
  • Widget area for main menu

    • Email
    • Facebook
    • Instagram
    • Pinterest
    • Twitter
    • YouTube
  • Skip to primary navigation
  • Skip to main content
  • Skip to primary sidebar

Jaime Costiglio

build - paint - sew

  • BUILD
    • BEDS
    • BENCHES
    • DESKS
    • DRESSERS
    • GAMES & TOYS
    • SCRAP WOOD
    • SHELVES
    • STORAGE
    • TABLES
  • TOOLS
  • PAINT
    • CRAFTS
    • FURNITURE
    • HOME DECOR
  • SEW
    • GIFTS
    • HOME DECOR
    • POUCHES
  • HANDBUILT HOLIDAY
    • 2021
    • 2019
    • 2018
    • 2017
    • 2016
    • 2015
    • 2014
    • 2013
  • GIFTS
    • BABIES
    • KIDS
    • FOR HER
    • FOR HIM
    • TEACHERS
    • WEDDINGS
  • SEASONAL
    • 4TH OF JULY
    • FALL
    • HALLOWEEN
    • CHRISTMAS
    • SUMMER
    • SPRING
    • ST. PATRICK’S DAY
    • THANKSGIVING
    • VALENTINE’S DAY
    • WINTER
  • SALTBOX PROJECT
    • BATHROOMS
    • DINING ROOM
    • EXTERIOR
    • FAMILY ROOM
    • FOYER / MUDROOM
    • KIDS BEDROOMS
    • KITCHEN
    • LIVING ROOM
    • MASTER BEDROOM
    • PLAYROOM
  • SCROLL SAW

DIY Personalized Beanbag Toss

July 12, 2013

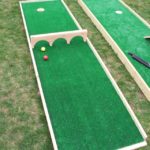
A classic backyard game that everyone loves – the beanbag toss.  It’s a great game for all ages and a staple at family gatherings and parties.  Let’s personalize that beanbag toss game with a monogram and personalized beanbags.diy personalized beanbag toss game

A DIY tutorial to make personalized beanbags for your beanbag toss game. Use outdoor canvas fabric to sew easy beanbags with personalization.

We’re making personalized beanbags with outdoor canvas fabric to complete your bean bag toss game.

monogrammed beanbag toss game board
Add that touch of personalization to make it your own or make a special gift for a friend.  I painted a single letter for the last name on these cornhole boards and then whipped up a few simple beanbags with a single monogram.
personalized beanbags with single letter monogram
kid throwing beanbag into game board
I can’t take credit for building the cornhole boards, my contractor’s carpenter, Rafael, built them for this project.  But you can find lots of easy tutorials to build beanbag toss boards yourself like this one from Sew Woodsy and Beth’s from Homes Stories A to Z.
personalized beanbag toss game
Below I’m sharing how to paint the cornhole boards and how to sew personalized beanbags.  For another beanbag toss idea consider this baseball theme wall mounted version that’s great for indoor use.

Supplies:

  • beanbag toss game
  • exterior black paint
  • exterior white paint
  • paint roller
  • paint brushes
  • outdoor canvas fabric (black, red, striped)
  • loose popcorn kernels
  • quilting ruler
  • rotary cutter
  • self healing mat
  • sewing machine
  • iron
  • double sided fusible interfacing
  • straight pins
  • needle and thread
beanbag toss game board

Step 1: Paint the wood cornhole boards with two coats of Rustoleum indoor/outdoor black paint.

newspaper pattern for personalizing beanbag toss game
Step 2: Use newspaper or kraft paper to make a pattern for the letter.  I just did this free hand but you could also get a large printout from an office supply store.  Trace around the outside of the template.
painting beanbag toss game board
Step 3:  Paint inside the lines with gloss white enamel, it will take about 3 coats.
clear quilting ruler and rotary cutting tool

Beanbag  Letters:

Step 1: For the bean bags I used Beth’s tutorial here as a guide for size.  Cut two 7″ squares for each beanbag.  Use a self healing mat, quilting ruler and rotary cutter to make it easy.
tracing letter pattern onto black canvas letters for beanbag fronts
Step 2: For the letters, print out a letter of desired size and cut out.  Then use the paper template as your pattern and trace onto black canvas.  Cut out the letters.
attach letters using double sided fusible interfacing
Step 3:  I secured the letters to the canvas square using double sided fusible iron on interfacing in small pieces.  While this will hold the letter in place it’s not a permanent hold.  I highly recommend sewing the letters as well to keep them secure.
zip zag stitch around letters

Step 4:  Use a zig zag stitch around the edges of the letter to secure.

front and back pieces

Sewing the Beanbag:

Step 1: Place one canvas square with a letter and one blank square right sides together and sew around the edge.  Be sure to leave an opening at the bottom to insert popcorn filling.
straight stitch around perimeter leaving an opening
fill beanbags with popcorn kernels
Step 2: Fill the beanbags with 2 cups of popcorn kernels.
pin opening shut to whip stitch closed

Step 3: Use straight pins to hold the opening shut while your sew a whip stitch across to seal the beanbag shut.

Thanks for joining me for this beanbag project.  Please leave any questions in the comments below and be sure to follow me on social media for sneak peeks, tools and project inspiration:

Instagram / Pinterest / Facebook / Youtube / Twitter

SHOP THIS PROJECT:

You may also like...

  • “C” is for Canvas Tote“C” is for Canvas Tote
  • DIY Star NapkinsDIY Star Napkins
  • DIY Mini Putt Course & Ryobi Tool GiveawayDIY Mini Putt Course & Ryobi Tool Giveaway
  • DIY Outdoor Build ProjectsDIY Outdoor Build Projects
Share this post:

Filed Under: CRAFTS, CRAFTS, DIY, GAMES & TOYS, HOME DECOR, PAINT, SEW, SEWING4 Comments

Reader Interactions

Comments

  1. Cassie @ Primitive & Proper says

    July 12, 2013 at 11:26 AM

    so fun! i love how pretty they are, too!

    Reply
  2. Cristina Garay says

    July 12, 2013 at 2:13 PM

    Soo cute! Who wouldn't want to play with such pretty set?!

    Reply
  3. DaiseyJayne.com says

    July 14, 2013 at 5:20 PM

    Too cute and fun, great way to get the kids (and adults) outside to play!

    Reply
  4. Ruth Soukup says

    July 20, 2013 at 12:19 AM

    Oh Jamie, this is such a neat idea!! I could absolutely see this being a big hit at parties!

    My readers would love this idea! I’d love it if you linked this up over at Living Well Spending Less for Thrifty Thursday this week! http://www.livingwellspendingless.com/category/thrifty-thursday/

    Reply

Leave a Reply Cancel reply

Your email address will not be published. Required fields are marked *

Primary Sidebar

Hi! I’m Jaime

Jaime Costiglio

Hello!

Thank you for stopping by.
Join me for lots of DIY.

Read more

Get new posts via email

Handbuilt Holiday: Gift Project Plans

handbuilt holiday gift project plans

Collection of DIY gift project plans to build.

The Home Depot Tool Prospective

THD Prospective

Tools to consider for the DIYer.

Archives

The Home Depot Logo
Copyright © 2023 Jaime Costiglio · Custom site by Moonsteam Design

Privacy Policy