• Home
  • Blog
  • About
  • Contact
    • Disclosure
    • Privacy Policy
  • SHOP
  • Widget area for main menu

    • Email
    • Facebook
    • Instagram
    • Pinterest
    • Twitter
    • YouTube
  • Skip to primary navigation
  • Skip to main content
  • Skip to primary sidebar

Jaime Costiglio

build - paint - sew

  • BUILD
    • BEDS
    • BENCHES
    • DESKS
    • DRESSERS
    • GAMES & TOYS
    • SCRAP WOOD
    • SHELVES
    • STORAGE
    • TABLES
  • TOOLS
  • PAINT
    • CRAFTS
    • FURNITURE
    • HOME DECOR
  • SEW
    • GIFTS
    • HOME DECOR
    • POUCHES
  • HANDBUILT HOLIDAY
    • 2021
    • 2019
    • 2018
    • 2017
    • 2016
    • 2015
    • 2014
    • 2013
  • GIFTS
    • BABIES
    • KIDS
    • FOR HER
    • FOR HIM
    • TEACHERS
    • WEDDINGS
  • SEASONAL
    • 4TH OF JULY
    • FALL
    • HALLOWEEN
    • CHRISTMAS
    • SUMMER
    • SPRING
    • ST. PATRICK’S DAY
    • THANKSGIVING
    • VALENTINE’S DAY
    • WINTER
  • SALTBOX PROJECT
    • BATHROOMS
    • DINING ROOM
    • EXTERIOR
    • FAMILY ROOM
    • FOYER / MUDROOM
    • KIDS BEDROOMS
    • KITCHEN
    • LIVING ROOM
    • MASTER BEDROOM
    • PLAYROOM
  • SCROLL SAW

DIY Windowseat Bench

February 20, 2011

I built a windowseat bench with storage for the kids room.

diy windowseat bench

diy windowseat bench
Added a cushion and pillows for comfort in hopes of enticing my kids to sit and read.
diy windowseat bench
And bonus added storage bins down below because you cannot let that space go to waste!
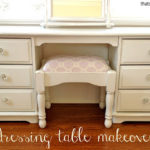
Before this space had been occupied by a desk:
cape dormer built in desk
My young kids never used the desk so I moved it to the master bedroom, you can see that makeover here.
And now the much improved space:
cape dormer windowseat bench
I made the bench, similar to the entry bench here, from Ana White’s plans for the easy cube bench.
I modified the size drastically.
My bench measures 37.5″w x 25.5″d x 18″h.
cape dormer windowseat bench
It’s made from 3/4″ plywood framed with 1x2s painted semi gloss white.
I also made the pillows and cushion which is three layers of foam mattress topper inserted into the fabric.
I used 3/8″ rope for the piping on the cushion:
(Only because that’s what I had and I needed a beefier piping than the 1/4″ standard.)
diy piping using nylon rope

diy piping using nylon rope
It’s not perfect or professional but it works:
diy windowseat bench with storage
And my girls like it:
diy windowseat bench with storage
One last side by side:
dormer with built in desk  diy windowseat bench with storage
Much better use of space for small kids.

You may also like...

  • DIY Vintage Quilt MakeoverDIY Vintage Quilt Makeover
  • Dresser Makeover with Leather PullsDresser Makeover with Leather Pulls
  • DIY Self Lined Roman ShadesDIY Self Lined Roman Shades
  • Refinished Kids Dressing TableRefinished Kids Dressing Table
Share this post:

Filed Under: BENCHES, BUILD, DIY, FURNITURE, HOME DECOR, HOME DECOR, ORGANIZATION, SEW, SEWING23 Comments

Reader Interactions

Comments

  1. Ellie says

    February 21, 2011 at 2:28 AM

    I love the little bench! What a good idea to switch the two spaces.

    Reply
  2. Katy says

    February 21, 2011 at 5:31 AM

    i love that, it's perfect! I like the colors you used too. Thanks for your comment on my pallet wall, it was a little more work than I would have liked, but thankfully the hard part is over. 🙂

    Reply
  3. B.Large says

    February 21, 2011 at 5:37 AM

    Thanks for sharing on DIY'ER!
    What a smart idea!I have always wanted a window seat! How special for the girls to make memories there reading their favorite books!
    I'm a new follower and would love you to be mine!
    I've got some great things on there and coming out!
    http://brandlarge.blogspot.com/
    Much love and many more blessings!
    B.Large

    Reply
  4. Mel says

    February 21, 2011 at 2:58 PM

    Genius idea for the trim!

    I've always dreamed of having a reading nook. Your girls are so lucky to have such a talented mum.

    Reply
  5. Rene says

    February 21, 2011 at 5:55 PM

    This looks great Jaine! You are so busy – how do you do it all?

    -Rene

    Reply
  6. Cristie says

    February 23, 2011 at 3:32 AM

    Very fun! Love the fabric and the baskets are great.

    Reply
  7. Robin says

    February 23, 2011 at 12:08 PM

    Oh Honey! That's the best use of space I've ever seen…a dream for an avid reader who wants to give that gift to her children/grandchildren…
    I'm tweeting this so other people will drop in!
    Wonderful!
    xoxo
    Robin
    All Things Heart and Home

    Reply
  8. Randi says

    February 24, 2011 at 12:58 PM

    That is really cute … I've always loved a window seat.

    Reply
  9. Humble Homemaker says

    February 24, 2011 at 1:03 PM

    cute! 🙂 It came out really well. Such a sweet spot for your kids. you have a really sweet blog. I am your newest follower! 🙂 Feel free to hook up any of your projects at me weekend review link party which opens tommorow. Have a great day!
    Humble Homemaking

    Reply
  10. 1 Funky Woman says

    February 25, 2011 at 5:36 AM

    What a great little reading nook for your kiddos. It looks like it was meant to be there!

    Following from Miss Mustard Seed

    Megan

    Reply
  11. the cape on the corner says

    February 25, 2011 at 2:47 PM

    perfect little space to encourage reading! love it!

    Reply
  12. Jennifer says

    February 25, 2011 at 7:17 PM

    How lovely. Love your fabric choices and combinations. It looks so fresh!

    Reply
  13. Phredfamily says

    February 26, 2011 at 12:26 AM

    It looks perfect AND professional!
    Kate @
    welcomedtempest.blogspot.com

    Reply
  14. Simone @ Doberman's by the Sea says

    February 26, 2011 at 12:41 AM

    Awesome. You are a good mom.

    Reply
  15. [email protected] says

    February 26, 2011 at 2:24 PM

    That is perfect!! I wish I had a space for a window seat!

    Reply
  16. Busy as a Bee in Paris says

    March 1, 2011 at 12:18 PM

    very cozy and cute! great work! just visiting from a to z

    Reply
  17. A Vintage Vine says

    March 1, 2011 at 2:10 PM

    Thanks for this…I have a bench seat upstairs and I want to make a cushion…now I can just follow what you did!

    Reply
  18. Mariaelena says

    March 8, 2011 at 10:51 AM

    what a perfect little storage bench…thanks for sharing. I just became a follower. I live in Dutchess Cty, NY….please visit my rather new blog….
    Mariaelena

    Reply
  19. Erin says

    March 23, 2011 at 2:16 PM

    I love it! I need to make a bench like that for my boys' room.

    Reply
  20. Jess says

    April 7, 2011 at 2:54 PM

    Love the bench! Adorable! You make some great stuff! 🙂

    Reply
  21. prsd4tim2 says

    September 5, 2013 at 12:54 PM

    I love your makeovers… I'm new to your blog and love the before and after pics, but I would be interested to see your construction process as well – use of power tools (those always scare me!), construction methods, tips for the great paint jobs you do, etc. While I'm all about the fabric side, I'm still leery of wood and screws.

    Thanks for sharing.

    Reply
  22. DaiseyJayne.com says

    December 25, 2013 at 1:34 PM

    I have always wanted a reading nook like that, you did a beautiful job!

    Reply
  23. Kat says

    January 13, 2014 at 4:37 AM

    I'm working on a very similar project – what bins did you use to fit the space? I'm wondering whether I'll need to get laundry bins if I want them to extend back all 24" of my project.

    Reply

Leave a Reply Cancel reply

Your email address will not be published. Required fields are marked *

Primary Sidebar

Hi! I’m Jaime

Jaime Costiglio

Hello!

Thank you for stopping by.
Join me for lots of DIY.

Read more

Get new posts via email

Handbuilt Holiday: Gift Project Plans

handbuilt holiday gift project plans

Collection of DIY gift project plans to build.

The Home Depot Tool Prospective

THD Prospective

Tools to consider for the DIYer.

Archives

The Home Depot Logo
Copyright © 2022 Jaime Costiglio · Custom site by Moonsteam Design

Privacy Policy