
Easy to sew self lined roman shades that look good from both the interior and the exterior.

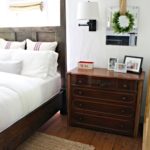
I wanted a relaxed fitted fabric window treatment for our master bedroom.
Roman shades are the answer.

But I also wanted the shades to look finished from the exterior too, self lined is the way to go.

The view from the window side is finished and matches the interior.
The shades are hardly ever down during the daylight hours but even when they are pulled up I didn’t want to see a white lining fabric with white cords.


I’ll show you how to make self lined roman shades down below, it’s easier than you think.


How to sew self lined roman shades:
* Directions are for interior mount. The same steps would apply for exterior mount just add the additional width and mount using L brackets.
1. Choose your fabric wisely, double check the transparency. When it’s dark outside put two layers together, turn the lights on in the room, hold the layers up to the window and look through window from the outside to be sure you cannot see any body parts. If you can see through then you might consider adding a lining (flatlined to one side on interior before step 1).
2. Cut fabric width of window plus 1″ and length of window x2 plus 20″.
3. Fold fabric in half lengthwise. Sew 1/2″ seam allowance up the side seams:

4. Clip corners at fold end, turn shade right side out.
Using flat wood moulding or plastic piece (leftover from shutter installation), cut to fit:

5. Shove flat plastic piece down into bottom of shade and pin in place:

6. Sew into place using zipper foot for a snug fit:

7. **Working on the back side (exterior facing) from here forward.**
Mark shade at 8″ and 9″ from bottom.
(To determine rod placement take total shade height (45″) and divide by 5 to get 9″.)

8. Pinch two marked lines together and pin:

This will create a 1″ opening for your wooden dowel.

9. Sew rod hole following marked line (generous 1/2″ seam allowance):


10. Press rod pocket down from front side:

11. Repeat process (steps 7-10) for next rod pocket:

12. Make 4 pockets total (for 45″ shade).
Using a ruler mark top of rod pocket 4″ from outer edge – both sides:

13. Purchase clear washers or use clear tubing cut into 1/8″ thick circles:

14. Hand sew clear washers onto shade at marked spot just above rod pocket:

15. Cut 1/4″ wood dowel to fit width of shade and slide into rod pockets:

16. Measure height of shade to match window, draw a line on the front side of the shade:

17. Cut 1×2 pine wood 1/4″ shorter than width of window. Make 3 predrilled countersink holes and attach 2 screw eyes 4″ from outer edges:

18 . Line up marked line of shade height with front top edge of 1×2 and staple shade onto mounting board:

19. I dyed my braided cording in tea to match the fabric:

20. Thread cording through clear washers and up through eye hooks:


21. Tie knots in cord at first washer then seal with hot glue:

22. Screw mounting board into window moulding (I used 2″ wood screws.)
23. Attach cord cleat to moulding:

24. Paint cleat to match moulding:


That is a great idea, Jaime. It's really important to also consider how the shades will look from the outside. Most people only choose a certain style for the shades just because they look good from the inside, without knowing that it looks scary from the outside. Haha! That is definitely a better choice right here. Thanks for the tutorial, by the way. 😀
Taylor Allen @ Sunburst Shutters Arizona
This is such a great idea!! My favorite diy of this type I’ve seen yet. Thanks a bunch for sharing 🙂