• Home
  • Blog
  • About
  • Contact
    • Disclosure
    • Privacy Policy
  • SHOP
  • Widget area for main menu

    • Email
    • Facebook
    • Instagram
    • Pinterest
    • Twitter
    • YouTube
  • Skip to primary navigation
  • Skip to main content
  • Skip to primary sidebar

Jaime Costiglio

build - paint - sew

  • BUILD
    • BEDS
    • BENCHES
    • DESKS
    • DRESSERS
    • GAMES & TOYS
    • SCRAP WOOD
    • SHELVES
    • STORAGE
    • TABLES
  • TOOLS
  • PAINT
    • CRAFTS
    • FURNITURE
    • HOME DECOR
  • SEW
    • GIFTS
    • HOME DECOR
    • POUCHES
  • HANDBUILT HOLIDAY
    • 2021
    • 2019
    • 2018
    • 2017
    • 2016
    • 2015
    • 2014
    • 2013
  • GIFTS
    • BABIES
    • KIDS
    • FOR HER
    • FOR HIM
    • TEACHERS
    • WEDDINGS
  • SEASONAL
    • 4TH OF JULY
    • FALL
    • HALLOWEEN
    • CHRISTMAS
    • SUMMER
    • SPRING
    • ST. PATRICK’S DAY
    • THANKSGIVING
    • VALENTINE’S DAY
    • WINTER
  • SALTBOX PROJECT
    • BATHROOMS
    • DINING ROOM
    • EXTERIOR
    • FAMILY ROOM
    • FOYER / MUDROOM
    • KIDS BEDROOMS
    • KITCHEN
    • LIVING ROOM
    • MASTER BEDROOM
    • PLAYROOM
  • SCROLL SAW

DIY Twisted Fabric Wreath

March 24, 2011

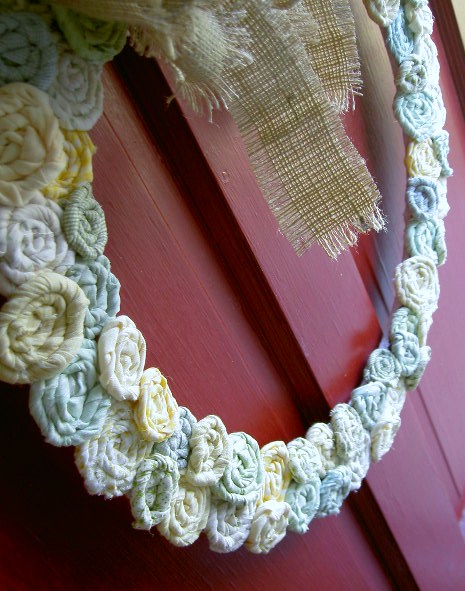
A twisted fabric flower wreath for Spring.

Nearly every crafty blogger has done the twisted fabric flowers.  There are a bazillion tutorials out there, here, here and here are just a few.
I started with light green and yellow springy fabrics:
Made about 75 flowers and used an MDF wreath form I already had:
Simply hot glued the flowers onto the form and added the burlap bow:
A fresh no cost Spring wreath.

You may also like...

  • DIY Bunny Place CardsDIY Bunny Place Cards
  • DIY Plastic Easter Egg WreathDIY Plastic Easter Egg Wreath
  • “W” is for Winter Wreath“W” is for Winter Wreath
  • DIY Turf WreathDIY Turf Wreath
Share this post:

Filed Under: CRAFTS, DIY, HOME DECOR, SEASONAL, SPRING, SUMMER21 Comments

Reader Interactions

Comments

  1. A Vintage Vine says

    March 24, 2011 at 2:20 PM

    Jaime…I had not seen this type of wreath!!! Looks wonderful, maybe I was under a rock. Great job!

    Reply
  2. Jane @ Jane's Junk and Treasures says

    March 24, 2011 at 2:48 PM

    I love that!!
    Great colors!!
    I love the way the flowers look!!

    Reply
  3. Trisha @ The Sweet Survival says

    March 24, 2011 at 6:54 PM

    I LOVE the fabrics you chose! Super springy and fun!

    Reply
  4. Teresa says

    March 25, 2011 at 1:52 AM

    Now THAT is cute! I have not seen a twisted wreath before. Very springy and happy!

    Reply
  5. Anna says

    March 25, 2011 at 2:23 AM

    this is so darling :o)

    Reply
  6. Valerie says

    March 25, 2011 at 4:08 AM

    That is sooo cute! 🙂 I have been wanting to try the fabric flowers like that! Thanks for sharing!

    Reply
  7. Karina Wetzel says

    March 25, 2011 at 4:35 AM

    I love this!! too cute 🙂

    You should come post it on my party:

    http://karinaschallenge.blogspot.com/2011/03/wednesday-challenge-link-up-party-500.html

    Reply
  8. Terry says

    March 25, 2011 at 12:30 PM

    I'm here from Chic on a Shoestring and I think this is so pretty. So spring-like.

    Reply
  9. Brandy J. says

    March 25, 2011 at 1:34 PM

    This is super cute. I made something very similar out of crepe paper and I love it! I'm your newest follower! Great blog!!

    Reply
  10. Kristie says

    March 25, 2011 at 2:03 PM

    Jaime, what a great use for twisted fabric flowers! They are such fun to make but you can only use so many on layouts;)
    Thanks so much for linking back to my tutoral~

    Reply
  11. Jami says

    March 26, 2011 at 2:48 AM

    This is too cute! Love the colors.

    Reply
  12. southernscraps says

    March 26, 2011 at 5:18 PM

    So pretty! Love the colors!

    Reply
  13. kim c says

    March 26, 2011 at 8:10 PM

    this is my fave out of the tater tots feature today. great tutorial too. thanks for sharing.

    Reply
  14. Candice says

    March 26, 2011 at 10:02 PM

    Very cute! I love those litle rolled fabric flowers!

    Reply
  15. Karen says

    March 27, 2011 at 3:27 PM

    The wreath is so pretty! I love the light springy colors:) saw you on Naptime Craft Blog!
    http://www.karismaheartsavannah.blogspot.com

    Reply
  16. MoMomma says

    March 28, 2011 at 1:53 PM

    Very cute! I love your red door also.

    Reply
  17. Amanda K @ Every Crafty Endeavor says

    March 28, 2011 at 6:24 PM

    I saw you on TT&J and just wanted to stop by and say hello and tell you your wreath is really very cute! I love all the rosettes! Darling!!

    I am having an "every crafty blog" linky party and would love for you to come and join!

    Reply
  18. [email protected] Stories of A to Z says

    March 29, 2011 at 11:17 PM

    Such cute rosettes for a cute wreath! Thanks for linking up!

    Reply
  19. [email protected] Dream Canvas says

    April 1, 2011 at 6:00 AM

    Wow, this looks lovely. Hope to see you at My Dream Canvas.

    Reply
  20. this blessed nest says

    April 3, 2011 at 12:16 AM

    wow.

    i know alot of time went into making this!

    it's just darling.

    thanks again for linking up!

    kellie

    Reply
  21. Rach H says

    April 7, 2011 at 9:21 PM

    That's so awesome! Good work!
    I have a question- how did you post the little link party buttons at the bottom of your post to be so little? I love it, and would love to learn how to do that.

    Thanks!
    Rachel at http://www.familyeverafter.blogspot.com

    Reply

Leave a Reply Cancel reply

Your email address will not be published. Required fields are marked *

Primary Sidebar

Hi! I’m Jaime

Jaime Costiglio

Hello!

Thank you for stopping by.
Join me for lots of DIY.

Read more

Get new posts via email

Handbuilt Holiday: Gift Project Plans

handbuilt holiday gift project plans

Collection of DIY gift project plans to build.

The Home Depot Tool Prospective

THD Prospective

Tools to consider for the DIYer.

Archives

The Home Depot Logo
Copyright © 2023 Jaime Costiglio · Custom site by Moonsteam Design

Privacy Policy