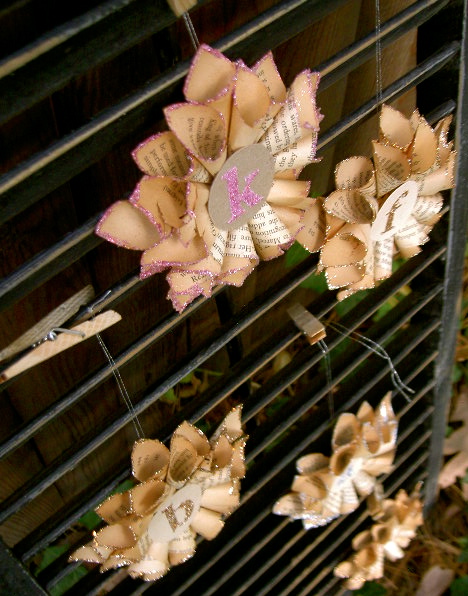
Craft: tiny paper star ornaments

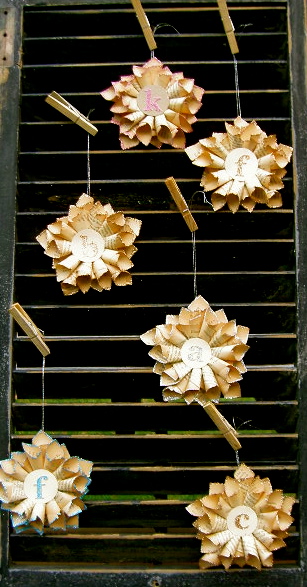
Personalized with a single letter in the center:
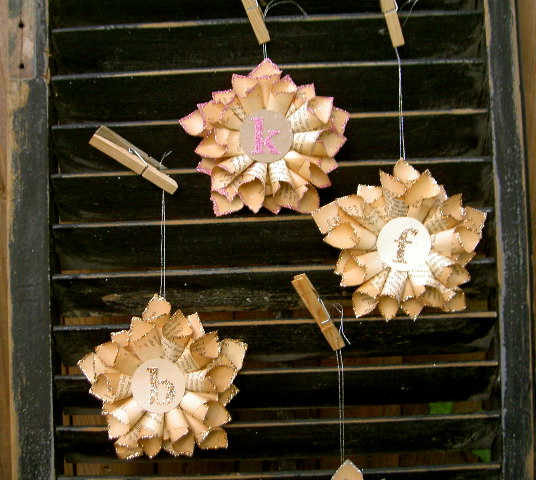
These will be teacher gifts for Christmas this year.
A miniature version of this larger paper star wreath:
(This star measures 15″ point to point.)

The ornaments are a fraction of the size, measuring 5″ point to point:

Here’s how I made the tiny stars:
1. Prepare the paper rolls.
Using old paperback books tear the pages into small rectangles.
(These rectangles measure about 2.5″ x 2″)
Roll the rectangle into a cone and hot glue:

2. Each ornament uses 20 paper rolls, make a lot of rolls:

3. For the base cut out stars from heavy cardstock / chipboard or thin cardboard.
(This is a 3″ star, free pattern here.)

4. Make the hanger using a needle and silver thread:

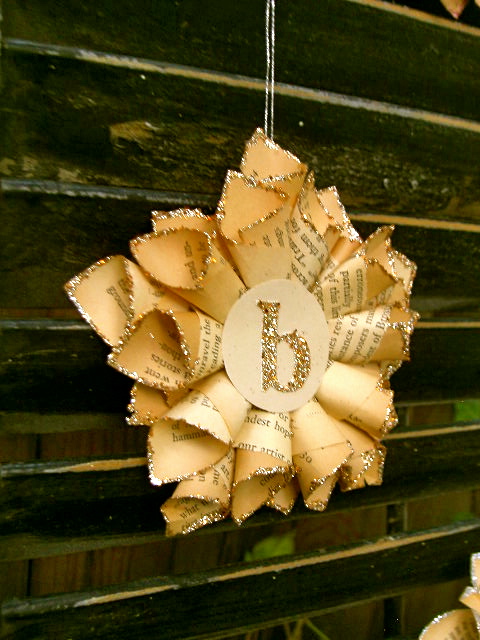
5. Start by gluing the rolls on the points of the star:

6. Then add rolls to the cervices and finally fill in between:

7. To add glitter to the edges brush on white glue:

8. Shake glitter over edges (do this over a piece of paper to collect excess glitter for reuse).

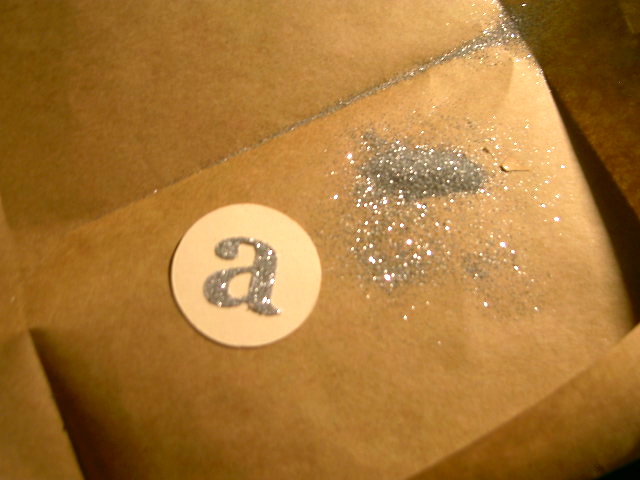
9. For center monogram cut 2″ circle from cardstock, adhere letter sticker in center:

10. Brush white glue onto letter:

11. Shake glitter to cover letter.
Let it rest and dry a bit before proceeding.

12. Shake off excess glitter:
13. Hot glue letter into center of star:

A fast, fun ornament that will make a great gift.
And I bet you probably already have the supplies to make this one.

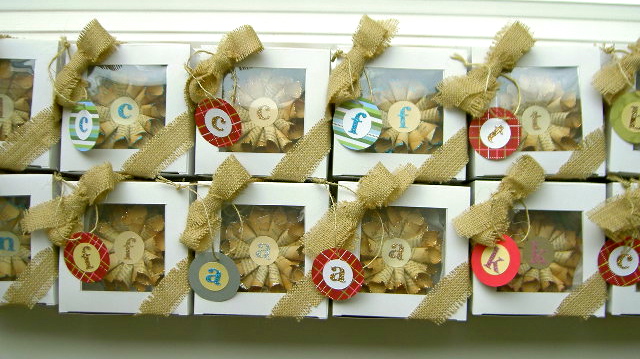
Here they are all wrapped up ready for gift giving:
(To see how to make the window boxes click here.)
I’m linking up to:
Whatcha Got Weekend @ Lolly Jane
SAS @ Funky Junk
Weekend Wrap Up @ Tatertots & Jello
Sundae Scoop @ I Heart Naptime
Sister Sunday @ Sisters of the Wild West
Sunday Showcase Party @ Under the Table & Dreaming
Just Something I Whipped Up @ The Girl Creative
DIY Fall Festival @ The DIY Showoff
Made by You Mondays @ Skip to My Lou
Making the World Cuter @ Making the World Cuter
Nifty Thrifty @ Coastal Charm
Tuesday Treasures @ My Uncommon Slice of Suburbia
Tutorials & Tips Tuesday @ Home Stories A to Z
Good Life @ A Beach Cottage
Delightfully Inspiring @ Delightful Order
Transformation Thursday @ The Shabby Creek Cottage
Strut Your Stuff @ Somewhat Simple
Share Awesomeness Thur @ The 36th Avenue
Flaunt it Friday @ Chic on a Shoestring
Tickled Pink @ 504 Main
Frugal Friday @ The Shabby Nest
SAS @ Just a Girl
Feathered Nest @ French Country Cottage
Remodelaholics Anonymous @ Remodelaholic


jaime, these are adorable!!!! LOVE them!
Too cute! where on earth do you get the patience?! I love em!
Oh, I had to pin these too! I need more TIME!
too cute! my daughter and i will be making some of these today for sure!
These are adorable! Thanks for sharing the DIY!
Jeanine
Aw, how sweet!
Those are just too stinking cute!! I love the glitter around the edges.
Prelijepo!!!!!
LOVE these, so cute!!
Just pinned these! What a perfect stocking stuffer or gift topper! If you have a moment, I'd love for you to share with my readers: http://www.momontimeout.com/2011/11/taking-timeout-thursday-no-4.html#more
These are super cute!
I think these ornaments are so fantastic! I love the glitter, the old, and the bold letter.
We are hosting a Home for the Holidays linky party and would love for you to share your pretty ornaments! Please join us!
http://www.uncommondesignsonline.com/2011/11/home-for-holidays-link-party_08.html
These are so adorable! I love that you added the glitter:) What a cute little project!
OMG These are so cute! I would be burning my hands big time with these little guys! I made a large wreath and had to keep a bowl of ice water nearby to dip in my fingers! 🙂
This is beautiful! I'm looking forward to doing this over the holiday! I love your blog and crafts!
*new follower
loveandtangles.blogpsot.com
This is Super adorable and cute.. LOVELY and so festive for a tree this Christmas.. I would LOVE if you could please stop in and share it at my Pin'Inspirational party today pweeease.. TY so much :)) Wishing you a wonderful start to your weekend..http://theartsygirlconnection.blogspot.com/2011/11/pininspirational-thursdays-linky-party_09.html
These are really beautiful and I really love the personalized letter in the middle.
They are all gorgeous Jamie.
I'd love for you to come join in my Simply Christmas link party at http://shabbyartboutique.blogspot.com
LOVE these…so going to have to try!
Thank you for sharing,
Shannon
http://www.akadesign.ca
I was looking for a new DIY ornament this year, thank you!
xoxo
Kathleen
so clever and crafty! I will definitely have my crafty friends and I make this at our next weekly craft night!
Thanks for great inspiration as always!
Hugs,
Natalie
These are adorable! I tried making these after I say the big star, but couldn't get my little paper to role into a cone, maybe I'll try again, I really love these! I'm visiting from Funky Junks SNL craft section, I'm #49
These are so nice! Thanks for the tutorial!
love these cuties!
I am going to have to try this since I use a LOT of stars on my Christmas tree. These are definitely the best I've seen!! Would love for you to share these at our Sunday's Best party. http://www.oasisaccents.com/sundays-best-link-party/
Excellent tutorial. Your stars are so whimsical! And, the way you displayed them is very clever. I pinned these.
Love these Jaime! I am tempted to do my whole tree in them this years! So pretty.
You must be covered in glitter! I love these 🙂 I want to make these, another craft added to the list.
Ahhh i love tis!!!
Thanks so much for sharing your tutorial! I never thought about making tiny ones!! What a great idea!! Love it!!
Thanks for the tutorial! I think I'll add these to the ornaments I'm going to make this year. These are beautiful!
Thank you so much for both tutorials – box and ornament – just might have to give them a try! oxox, tracie
Thanks for the wonderful tutorial and great gift Idea!
I have made the larger wreath forms of these and I have to say that they are my favorite DYI decor to date. I am so excited you posted these because I had never thought about taking that same idea and making an ornament for my tree this year! I am sooo going to do it!
Thanks so much 🙂
These are so cute! You did a fabulous job! I would love if you would share with Blog Stalking Thursday Link Party. http://thecraftyblogstalker.blogspot.com/2011/11/blog-stalking-thursday-16.html
Love this. I pinned these for future reference.
So cute! I pinned this too. Might just need to try my own. Thanks for the detailed information!!
Karah @ thespacebetweenblog
These are darling, darling, darling!!
I love these! Thanks for the tute!!
*hugs*deb
These are gorgeous!!! I saw this on pinterest and think I need to make some!!! I will link back to your blog post if I do!
http://www.scrappinmystressaway.blogspot.com
These are so stinkin cute! And the packaging is adorable, too. Wish I was on the receiving end! 🙂
Thanks for sharing.(Pinning these!)
These are so cute! I can't wait to get started. I'm trying to get a jump on the holidays this year so I was so happy to find these!
I would love it if you would share this at my new 12 Days of Christmas in July linky party. You can link up here:
http://theprudentpantryblog.blogspot.com/2012/07/twelve-days-of-christmas-in-july-linky.html
I can’t wait to get organized for a peaceful and frugal holiday season!
Hi there! Just wanted to let you know how much I love this ornament and so I made one! I shared it on my blog this morning and I linked your tutorial as my inspiration!!! Thank you for a great idea!
http://simplysouthernsandee.blogspot.com/2012/11/welcome-to-odbd-november-release-blog.html
Can I just tell you how much I adore these ornaments? I LOVE them. I pinned this last year and I am hoping to find time to make some this year. If am lucky!!!
I was wondering — I have a linky party going. We're kicking off the season with inspiration from year's past. I thought you might want to join in the fun! Let me know!
~Angela~
Ohh, now these are right up my alley! I know what my next project will be 😉
Fotini
You are amazing!!!!
I just now, due to Pinterest, found your Blog! I have tons of old books ( a lot in Spanish!) so now I know why I keep telling my husband "Don't throw them away!!! I know I can find a way to be creative with them!!!"
So now on going to make stars!
I hope you made it through 'Sandy' ok, but I saw the 'Breezy Point' signs so that makes me worried about you! I will hope you & yours are good!
Merry Christmas & know that we out West are Hoping & Praying for ALL of you out there!
Hi Jaime! Thank you for this wonderful tutorial. We created these awesome star ornaments for our family tree this year.
http://wifelysteps.com/2012/12/08/have-yourself-a-bookish-little-christmas-tree/
Come visit! We did the monograms, and we also placed images at the center of each star. <3 Thanks for sharing your creativity with us!
Much thanks all the way from Manila.
Thank you for the great tutorial. I made for of these (so far!)for friends at Christmas. They are adorable!
Sue
Yes, I can spell "made four"!!
Pinned it so I can quickly find you.
Thanks again.
Saw this on pinterest and I love it! Totally going to make these! Thank you for the inspiration! 🙂