The ultimate in repurposing is taking something otherwise unusable and making it into something functional. Today I’m sharing how to take a scrap piece of stockade fence and build a DIY outdoor planter. As a result we have an awesome repurposed project.

A DIY tutorial to build an outdoor planter using a scrap fence piece. Repurpose that excess stockade fence into an outdoor planter.
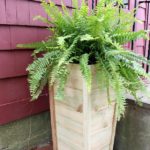
I built this outdoor planter from a scrap piece of stockade fencing, some pallet boards and two pine boards for a total cost of $3.

A huge thank you to Ana White as usual for her free plans. I used her cedar planter plans as a guide to build this outdoor planter.
So this stockade fencing piece had been sitting in our garage since the day we moved in and I finally put it to good use.


I love how this outdoor planter holds our Fall mums which coordinate with the new orange front door. It’s the perfect piece that provides multiple benefits:
- saves the stockade fence from the landfill
- creates a functional planter
- adds color to the front sidewalk
And down below I’m sharing how I built this outdoor planter using the stockade fence piece.


Supplies:
- stockade fence piece (alternatively you could use 1×3 boards)
- pallet wood scraps (alternatively you could use 1×4 boards)
- 2 – 2×2 exterior baluster sticks
- 1 – 1x2x8 pine board (*TIP: I suggest using cedar boards for exterior use.)
- exterior 1 1/4″ pocket hole screws
- 1 1/4″ exterior wood screws
- 2″ finish nails
- miter saw
- drill
- pocket hole jig
- nail gun
- wood glue

Step 1: Cut the stockade fence to five boards wide with the final size of 19″ l x 15″w. You need four pieces. Then attach the pallet trim to the fence panels from the interior using exterior 1 1/4″ countersunk wood screws.

Step 2: Cut 4 legs at 22″l. Attach the side panels to the legs using 1 1/4″ exterior pocket hole screws. Then add the top 1×2 trim. Cut the corners at a 45 degree miter and attach using wood glue and 2″ finish nails.

Step 3: Depending on your flower pot depth you may want to add bottom support pieces to the interior of your planter. I used a few left over pieces from the fence back inside the planter. Attach the bottom supports about 8″ down into your planter using pocket holes.

Step 4: To age the pine board I applied a mixture of vinegar and steel wool. This instantly adds an aged grey look to the new boards. Lastly add your flowers into the planter and enjoy!

SHOP THIS PROJECT:

And be sure to share and follow me on social media for more project inspiration:
Instagram / Pinterest / Facebook / Youtube / Twitter


I love your planter and your beautiful painted orange front door.
Dee
Love it! I was looking for new planters for my front entrance, looking at your nice planters gives me inspiration for building my own. Thanks!
Hi-just wanted you to know I featured you on my Saturday favs-have a great weekend! Claire
The planter turned out great! I love Ana White don't you?! Your door color looks amazing with the planter too! Thanks for joining our Countdown to Fall Party!
~Kim @ Sand & Sisal
I love the two tone effect of the planter. We actually just took apart some old fencing similar to yours but I was thinking I'd use mine for an air conditioner fence/hider.
How do you make the vinegar/steel wool mixture
thank you for sharing….and wonderful page