Who’s ready to beef up their outdoor space with a tall fence picket planter? Today I’m sharing this $10 tall planter as part of the Great Outdoors Challenge organized by my friend Katie at Addicted 2 DIY.

A DIY tutorial to build a tall planter using inexpensive fence pickets. Make a tall tapered planter for your outdoor space with these free plans.

We’ve done a few of these group challenges in the past. I have participated in the One Board Challenge, the Re-Purpose It Challenge, and the Organize Build Challenge. Today is all about the great outdoors where we were challenged to spruce up our outdoor space using wood, concrete, metal, etc. Seven DIY bloggers are participating and sharing their amazing projects:
- Addicted 2 DIY
- The Ugly Duckling House
- Pneumatic Addict
- Jaime Costiglio (you’re here!)
- My Repurposed Life
- My Love 2 Create
- Her Tool Belt

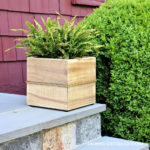
We have this awkward space next to the back door steps that was just calling out for a planter. I wanted something tall enough to rise above the steps and not block the pathway but provide a nice filler for that corner. So I designed this tall fence picket planter made from 3 fence pickets and 4 square balusters for a whooping total of $10.

This planter sits up 2″ off the ground for breathing room and good drainage. It’s the perfect amount of natural wood and greenery against the red shingled siding and concrete steps.

Below are step by step instructions to build this tall fence picket planter. As usual always read through all steps before beginning and be sure to follow all safety precautions when operating power tools.

Supplies:
- 3 – 1×6 dog-eared fence pickets
- 4 – 2x2x3 pressure treated balusters
- 1 ¼” pocket hole screws (exterior)
- scrap wood for cleats
Cut List:
- 4 – 2×2 @ 29 5/8”, both ends
parallel miter cut 5 degrees (legs) - 10 – 1×6 @ 10” (straight sides)
- 2 – 1×6 @ 12 3/8”, both end miter
cut 5 degrees NOT PARALLEL (sides – top piece) - 2 – 1×6 @ 11 1/2”, both end miter
cut 5 degrees NOT PARALLEL (sides – top piece) - 2 – 1×6 @ 10 1/2”, both end miter
cut 5 degrees NOT PARALLEL (sides – top piece) - 2 – 1×6 @ 9 5/8”, both end miter
cut 5 degrees NOT PARALLEL (sides – top piece) - 2 – 1×6 @ 8 5/8”, both end miter
cut 5 degrees NOT PARALLEL (sides – top piece) - 4 – scrap wood 1×6 @ 7” (cleats)

Step 1: Make straight sides. Attach (5) 1×6 @10” pieces to legs flush to interior, keep long edge of leg to exterior. Use wood glue and exterior grade 1 ¼” pocket hole screws.
Make 2


Step 2: Attach angled side pieces to straight sides using wood glue and exterior grade 1 ¼” pocket hole screws. HINT: A right angled drill works wonders for this tight space.

Step 3: Attach other set of angled side pieces to form box using wood glue and exterior grade 1 ¼” pocket hole screws. Your tall fence picket planter is complete!

Step 4: Optional – depending on your plant container size. I choose to add cleats to the interior to hold the plant container snug and keep it from sliding down.


Love this Jaime! Adding them to my list.
Stop. These projects are making my impossibly long to do list longer. Ha!
Jaime,
I love yout tall planter…. and you can't beat the price.
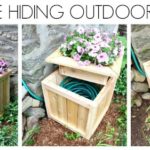
You got me thinking "what could I hide in all that empty space? gardening tools, a pocket hose, something else….
great tutorial, pinning of course!
gail
It turned out beautiful Jaime! You are right, it fits perfectly into that space! What a great price, too!
This is beautiful Jaime, and for $10!! You can't beat that price! I love how tall it is too!
I can't believe they only cost $10! I love the fact they they are pretty narrow so they can fit almost any space. Great work!
Oh, I just love this!!! for $10!!!?!??!!??!? This would cost a fortune to buy this tall of a planter at a retail store! And I love the unfinished wood look, but you could also paint or stain, or that AWESOME colored wood stain that you used on your dresser the other day would look great too, so you could still see the wood grain!!! Hmmmmm, so many great ideas! THANK YOU for sharing the awesome plan, and for the GREAT inspiration, as always!!
$10 is not the real cost. The pocket screws are a bit pricey; about 3-4 bucks for 50 screws. The pocket hole jig is about 20-30 bucks. The wood, however is nice n cheap though. I’m building two with spare 2x4s and 2x2s. Those are the legs. I am using spare picket fences boards as well. I’m counterboring my screws and and filling them with dowel rods to shave off and look like it’s built with no screws. I’m just waiting on 2 2x4s to finish up the legs. Then it’s side board cuttin time. Jaime’s look great. But I’m outta pocket screws and didn’t want to drop any more cash when I have screws and dowel rods on hand. Happy crafting y’all.
At Home Depot :
2x2x36 ‘s were $.92 each. Need 4.
6’ cedar planks were $2.75 each. Need 3.
100 pack of 1.25” bluekote pocket hole screws were $5.99. Need 80.
$17.92 in supplies is still not bad for what you get.
It’s the 80 pocket holes I had to drill that was the highlight of the build.
She’s happy. I’m happy.
Thanks Bob, this project was originally completed in 2016 so prices have definitely gone up especially lumber. Appreciate your sharing the current numbers. And super glad she’s happy! 🙂
Love the style of your planter Jaime, it's perfect! I kinda love that green look on the cedar, is that how your boards came? Great job!
I am a little confused by the comment to keep long ends to exterior when assembling the sides. Because the miter cuts are parallel there is no “long side” – I have assembled and now disassembled because they aren’t correct. Help?!
Hi Jamie, The legs are cut with a 5 degree miter. I assume you’re referring to Step 1. While true there is no ‘longer side’ you want the angle heading down as you attach the side pieces on the interior.
Thanks Jaime. I got it figured out and made 3 this weekend!
Great news! So glad you made the planters.
Would this still all work the same with all sides angled, so its a tapered square or rectangle, or would it be a totally different project?
Hi Rita, Yes I believe it would work great with all sides angled.
Morning. Anyone figure out what size planter will fit in these? I am building these for a X-Mas gift and was curious what you guys have used. Would be awesome to order some plastic planter pots. Thanks again