• Home
  • Blog
  • About
  • Contact
    • Disclosure
    • Privacy Policy
  • SHOP
  • Widget area for main menu

    • Email
    • Facebook
    • Instagram
    • Pinterest
    • Twitter
    • YouTube
  • Skip to primary navigation
  • Skip to main content
  • Skip to primary sidebar

Jaime Costiglio

build - paint - sew

  • BUILD
    • BEDS
    • BENCHES
    • DESKS
    • DRESSERS
    • GAMES & TOYS
    • SCRAP WOOD
    • SHELVES
    • STORAGE
    • TABLES
  • TOOLS
  • PAINT
    • CRAFTS
    • FURNITURE
    • HOME DECOR
  • SEW
    • GIFTS
    • HOME DECOR
    • POUCHES
  • HANDBUILT HOLIDAY
    • 2021
    • 2019
    • 2018
    • 2017
    • 2016
    • 2015
    • 2014
    • 2013
  • GIFTS
    • BABIES
    • KIDS
    • FOR HER
    • FOR HIM
    • TEACHERS
    • WEDDINGS
  • SEASONAL
    • 4TH OF JULY
    • FALL
    • HALLOWEEN
    • CHRISTMAS
    • SUMMER
    • SPRING
    • ST. PATRICK’S DAY
    • THANKSGIVING
    • VALENTINE’S DAY
    • WINTER
  • SALTBOX PROJECT
    • BATHROOMS
    • DINING ROOM
    • EXTERIOR
    • FAMILY ROOM
    • FOYER / MUDROOM
    • KIDS BEDROOMS
    • KITCHEN
    • LIVING ROOM
    • MASTER BEDROOM
    • PLAYROOM
  • SCROLL SAW

“P” is for Pinwheel

June 12, 2011

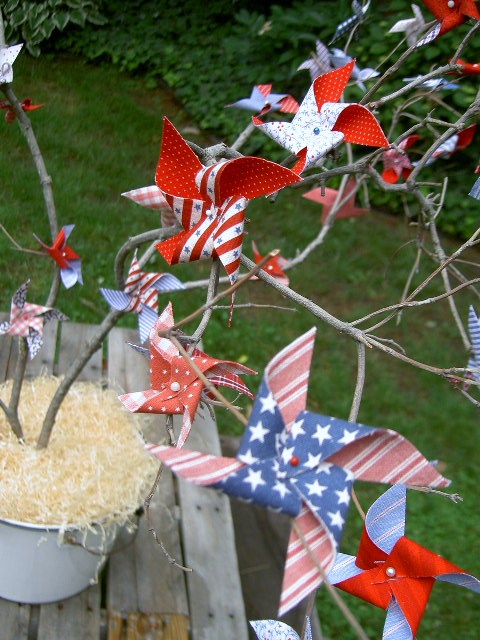
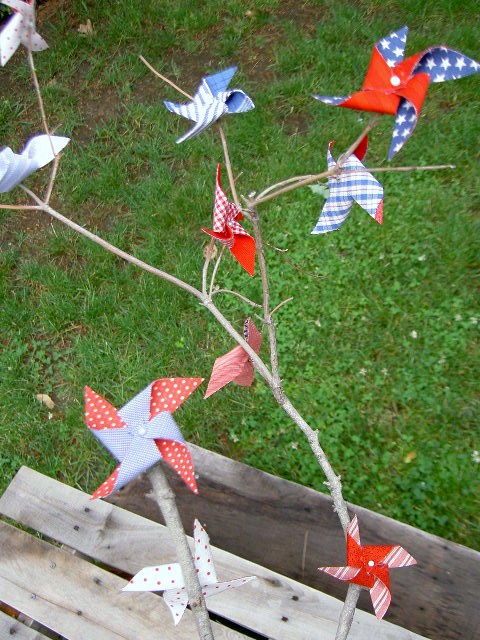
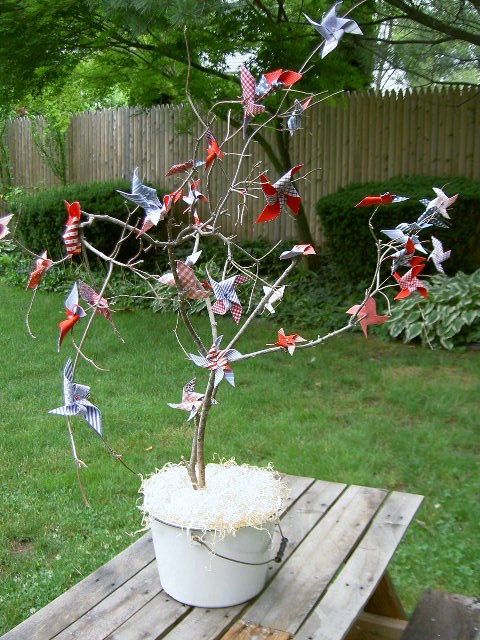
July 4th pinwheel tree.


Red, white and blue gets me every time.

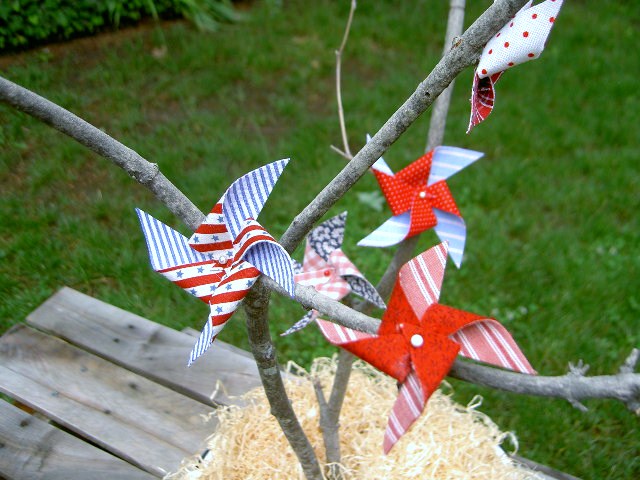
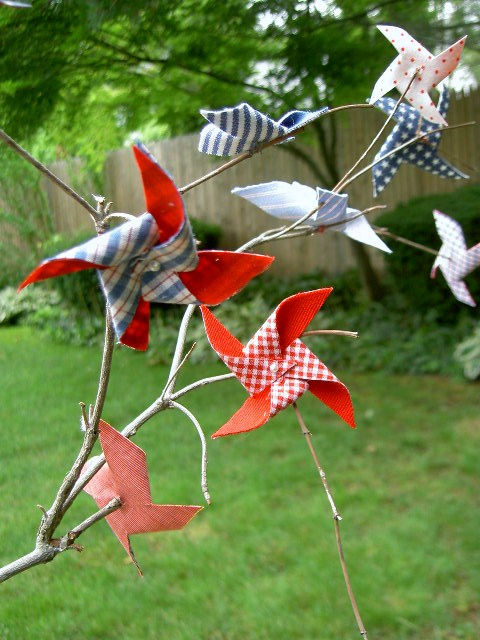
I made 50 fabric pinwheels and attached them to a large branch.


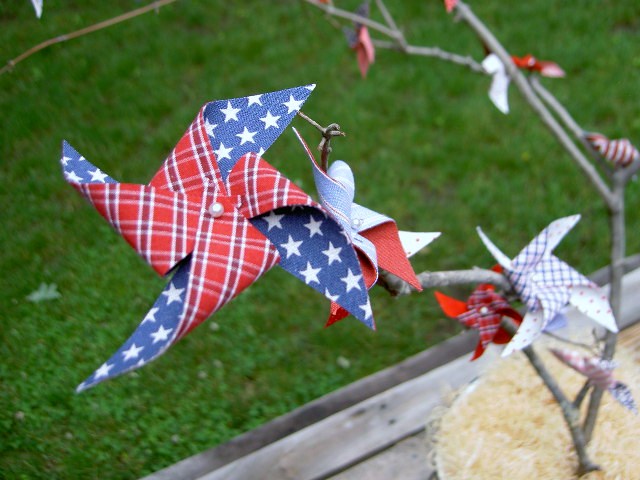
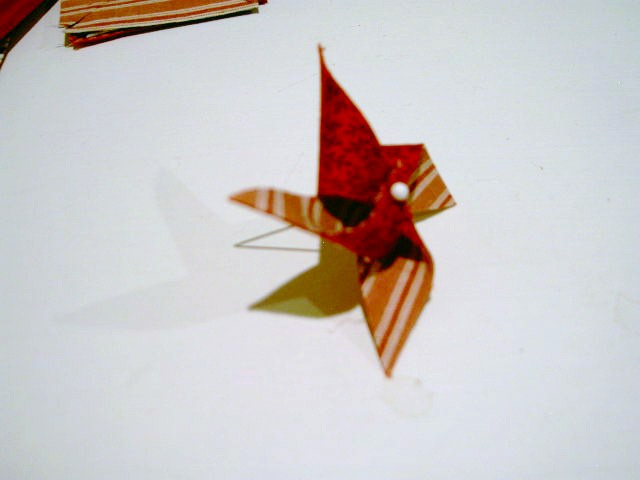
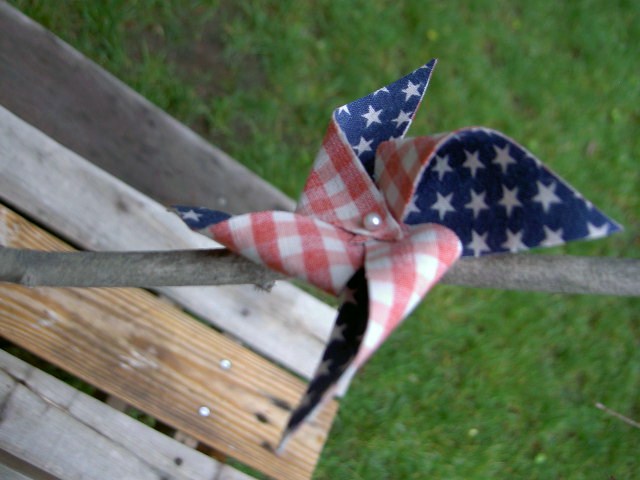
I used glass ball headed straight pins to hold the pinwheel together in the center:


Here’s how I did it:

1. Using scraps of red, white and blue fabrics I made about 50 pinwheels using this method.

2. I made 3″, 2 1/2″ and 2″ squares for this tree.

3. After the fabric squares were ready I used a glass ball headed straight pin and stabbed through the four corners then down the middle to form the pinwheel:
* Before you stab down the middle dab some hot glue on your pin to keep it all in place.


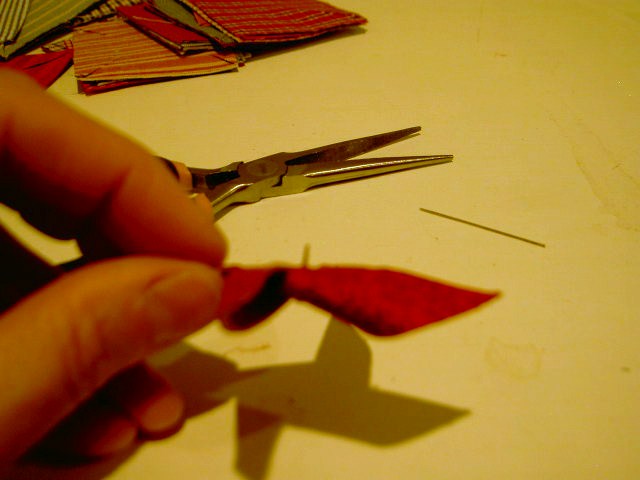
4. Keeping about 1/8″ of the pin shaft I bent off the remainder with pliers.

5. Apply hot glue and stab tiny pin shaft into branch:

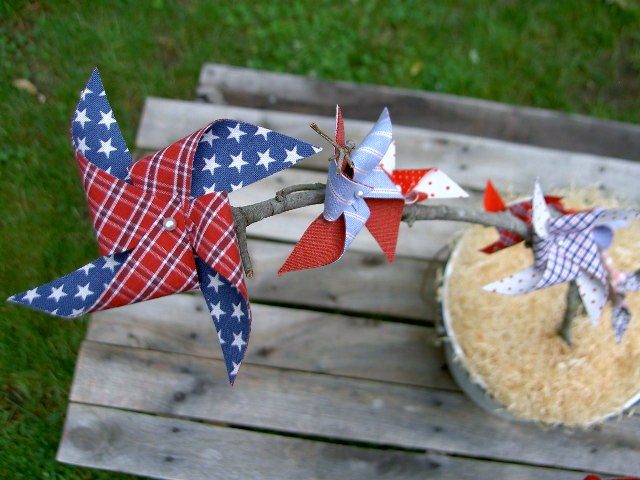
Unfortunately my pinwheels don’t actually spin but I like them just as they are.


You may also like...

  • Cross Stitch Monogram Ornament PlacecardCross Stitch Monogram Ornament Placecard
  • Wood & Leather Bed Free PlansWood & Leather Bed Free Plans
  • DIY Bunny Place CardsDIY Bunny Place Cards
  • DIY USA Map Wall HangingDIY USA Map Wall Hanging
Share this post:

Filed Under: 4TH OF JULY, CRAFTS, HOME DECOR, SEASONAL26 Comments

Reader Interactions

Comments

  1. Carolyn says

    June 12, 2011 at 5:15 PM

    This is so totally cute!! I might try this as well, but figure out a way to make them spin–its been pretty windy here so it might work! Love it love it!

    Reply
  2. Heidi says

    June 12, 2011 at 6:15 PM

    This is too cute and festive!

    Reply
  3. Lesley Litrento says

    June 12, 2011 at 7:55 PM

    Love this…..so creative. Thanks for the 'how to' as well!

    Reply
  4. The Outlaw Mom says

    June 13, 2011 at 6:23 AM

    Just discovering pinwheels and love yours! Thanks for the tutorial 🙂

    Reply
  5. elizabeth says

    June 13, 2011 at 2:44 PM

    That tree is darling!!!

    Reply
  6. [email protected] Road says

    June 13, 2011 at 3:10 PM

    How fun is that? It's really cute, Jamie!

    Reply
  7. Bekki says

    June 13, 2011 at 3:57 PM

    What a cute tree! I did one for Valentine's with various hearts, but I love the pinwheel idea. Now if I only had the time…

    Reply
  8. [email protected] says

    June 13, 2011 at 4:10 PM

    I love how you have dispayed the pinwheels! lovely centerpiece.

    I am having personalized beach bag + hat set giveaway on my blog. Ends 6/14. check it out!
    http://houseonashwelllane.blogspot.com/2011/06/giveaway-personalized-beach-bag-and-hat.html

    Reply
  9. Okio B Designs says

    June 14, 2011 at 12:21 AM

    Jaime – you amaze me. I was in love with the berry sign and now this. Adorable!

    Jeanine

    Reply
  10. [email protected] says

    June 14, 2011 at 1:03 PM

    I love the pinwheel tree…thanks for sharing the tutorial!!!

    Reply
  11. Pamela says

    June 15, 2011 at 12:37 AM

    Such a cute idea! You have me thinking abt making some larger ones and hanging them from our porch ceiling. My boys would love it!

    Reply
  12. Sarah says

    June 15, 2011 at 2:48 AM

    Cute idea! ~ sarah

    Reply
  13. The Beetle Shack says

    June 15, 2011 at 10:55 AM

    this is stunning!

    Reply
  14. Jann Olson says

    June 15, 2011 at 10:28 PM

    I've heard of a bottle tree, but never a pinwheel tree. Very cute. It would be so fun for the fourth of July! We do an outdoor breakfast. Hmmm, maybe I'll have everyone make a pinwheel.
    Visiting from Wow us Weds.

    Reply
  15. Jennifer says

    June 16, 2011 at 1:32 AM

    This is darling Jaime! I bet when there is a breeze it is fun!
    Jen

    Reply
  16. Julie says

    June 16, 2011 at 2:19 AM

    Super cute & unique!

    Reply
  17. Tanya @ Greetings From the Asylum says

    June 16, 2011 at 4:07 AM

    I love the contrast between the insides and the outsides of your pinwheels. They are so pretty! Thanks for sharing!

    Reply
  18. Darla says

    June 16, 2011 at 1:06 PM

    I wonder if you used stiffy glue on them if they would spin? Totally cute idea I agree.

    Reply
  19. Ashley says

    June 16, 2011 at 8:14 PM

    this is SOO cute!!! love it:) great tutorial

    Reply
  20. Anita @ GoingALittleCoastal says

    June 17, 2011 at 4:38 PM

    Really cute idea! I'm guessing you just ironed two different prints together with some fusible web?

    Reply
  21. Fishtail Cottage says

    June 19, 2011 at 9:47 PM

    So very cute! Thanks for sharing over here at Cottage Flora Thursday's! xoxo, tracie

    Reply
  22. btanders says

    June 20, 2011 at 1:54 PM

    Very cute and fun. Thanks for sharing!

    http://btanders.blogspot.com

    Reply
  23. freckled laundry says

    June 24, 2011 at 2:10 AM

    That is so cool. I love it! Thanks for linking with Air Your Laundry Friday! xo Jami

    Reply
  24. Leslie says

    June 25, 2011 at 1:25 AM

    What a fun idea!

    Reply
  25. Kirsten @ Mushki Loves says

    June 27, 2011 at 6:54 AM

    THis is ADORABLE! Such a fun idea! I need to make some of these! I am your newest follower! Iwould love it if you stopped by and followed me back!

    Reply
  26. [email protected] Bitsy Paper says

    June 24, 2012 at 12:02 PM

    How cute is this!? I love pinwheels and the tree adds a great element. I hope you'll link up to my Patriotic Project Parade going on now through July 4th.

    http://www.itsybitsypaperblog.com/2012/06/patriotic-project-parade-linky-party.html

    Reply

Leave a Reply Cancel reply

Your email address will not be published. Required fields are marked *

Primary Sidebar

Hi! I’m Jaime

Jaime Costiglio

Hello!

Thank you for stopping by.
Join me for lots of DIY.

Read more

Get new posts via email

Handbuilt Holiday: Gift Project Plans

handbuilt holiday gift project plans

Collection of DIY gift project plans to build.

The Home Depot Tool Prospective

THD Prospective

Tools to consider for the DIYer.

Archives

The Home Depot Logo
Copyright © 2023 Jaime Costiglio · Custom site by Moonsteam Design

Privacy Policy