They say necessity is the motherhood of invention and this project is a prime example. When you have a vision of how a space should be but are presented with minor hurdles you figure out a solution. And in this case the solution was to make my own beadboard paneling. Lucky for you I’m sharing the process down below if you happen to find yourself in a similar situation.

A DIY tutorial to make your own beadboard paneling. How to make beadboard using 1/4″ plywood and screen moulding.
At long last the keeping room in our antique farmhouse is finally getting the attention it deserves. And I’m beaming with pride seeing this room come to life like it was always meant to be. In my mind I always wanted exposed beams and a paneled wall treatment and I finally made it happen.

Keeping Room Fireplace Wall Before:
We’ve lived in this home almost 9 years and aside from painting the walls we haven’t done much to this room.

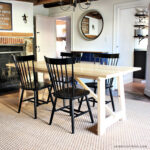
Fireplace Wall After:
And now after a few laborious weeks I think its safe to say this room is complete.

Room Makeover:
- removed plaster and lath ceiling to expose wood beams
- installed beadboard wall treatment
- modified fireplace mantel
- built simple work table
- installed new chandelier and sconces

Wall Before
I started with a plaster wall. I had just removed the ceiling in the photo below so you can see where the old ceiling met the wall. Naturally the horizontal wood beam is recessed from the plaster wall so I added blocking to give me a spot to attach the beadboard up near the new ceiling.

Beadboard Installed
After all the panels and beads are were installed I added a plain trim piece at the ceiling. We are ready for paint!

Completed Wall
And finally the completed after with lighting, furniture and decor. Like it was always meant to be. We cannot get enough of this keeping room now, it’s extremely cozy and comfortable especially when everyone is home.


So many good angles and photos to share I couldn’t narrow it down. If you’re looking for the details on how to make this beadboard wall treatment scroll down a bit for the tutorial.


Below I’m sharing the process to make beadboard paneling from scratch. Of course there are lots of different ready-made beadboard products on the market but none at 1/4″ thick which is why I choose to make my own. Unfortunately the existing door moulding only allowed for a 1/4″ thick wall treatment (unless I replaced the door moulding – not a good idea if you can avoid it) so I opted to make the beadboard myself.
Supplies:
- 1/4″ plywood
- beaded screen moulding
- construction adhesive
- table saw
- laser level
- nail gun
- 1″ brad nails
- measuring tape & pencil
- jig saw
- outlet extender box
- wood putty
- chaulk
- primer
- paint
- 2″ angled shortcuts brush
- 6″ foam roller
- 150 grit sandpaper

Step 1: Start with a flat wall. You can see above where I had to install blocking on the beam (because I removed the ceiling) in order to provide a flush surface for the panels to rest / attach to.

DIY Beadboard:
The photo above is actually 5 pieces joined together to create a beadboard effect. From left to right:
- 1/4″ plywood with 30 degree beveled edge
- beaded screen moulding (one section)
- 1/4″ plywood with 30 degree beveled edge
- beaded screen moulding (one section)
- 1/4″ plywood with 30 degree beveled edge

Step 2: Begin with the plywood panels. Mine range in width from 6″ to 11″. That’s the beauty of DIY, you can create the paneling however wide you desire. Set your table saw blade on a 30 degree bevel and rip the boards. Both edges need a bevel on the face side.

Step 3: To create the bead I used a beaded screen moulding because it already has a ’rounded’ bead profile. The moulding comes with 3 beads across but I only wanted one bead so I ripped it on the table saw.

In order to rip thin pieces safely you need to install the zero clearance guard for your blade. But if you don’t have one you can use painters tape. First lower your blade all the way down. Then run the tape all the way from edge to edge on the saw surface – multiple layers makes a stronger surface. Then turn on your saw and SLOWLY raise the blade to puncture the tape, raising it just past 1/4″ high for the moulding thickness.

Step 4: Set the fence to the width of one bead and run the moulding through.
Installation:

Step 5: Set up a laser level to ensure your boards are vertical. I started at the corner of the mantel and worked my way across. Use construction adhesive on the back.

In Step 6: Secure the panels to the wall using 1″ brad nails.


Step 7: To attach the bead portion run a line of construction adhesive next to the plywood panel but not too close to ruin the beveled edge.

Step 8: Smoosh the bead into position.

For Step 9: Secure the bead using 1″ brad nails. I found the 18 gauge to be a little thick here, you may consider a 23 gauge brad nail.

Details:
Use your jig saw to make cuts around HVAC vents, outlets and mouldings.

For outlets be sure to install an outlet extender box. This keeps your outlet safe and away from the exposed edge of the plywood. For a complete how-to replace outlets over beadboard see my post here.


Step 10: The finish off the top I used a basic trim board with a scarf joint in the middle.

Finish:
Apply wood putty over any nail holes and chaulk any visible seams. Then sand well and prime. Also you could prime everything before installing but I think I was just too excited to get it up on the wall :). Sand again after the primer to knock down all the fuzzies.

Lastly paint in your favorite color. I used Benjamin Moore Advance in satin finish color: old Salem grey. It’s a color we have in other parts of our home so I opted to stay the course. However the satin finish is amazing, it lets just enough light bounce while also providing an enamel like surface for the mantel. I highly recommend this paint for cabinets, trim, and any hard working surface.


Thanks for joining me for this beadboard wall project. Please leave any questions in the comments below and be sure to follow me on social media for sneak peeks, tools and project inspiration:
SHOP THIS PROJECT:


This is absolutely gorgeous! Your skill set never ceases to amaze me. I wish I had your skills and a home as fabulous as yours!
Thank you Karen, its been a long road (slow and steady) but so fun to update and fix and love on it.
Thank you for making this tutorial. We had a veranda (french for conservatory, I think.) The house had a sort of squared ‘U’ shaped back with the bottom of the ‘U’ being 30 feet long, and the left side-wall being 4-feet 3-inches long and the other being 9 and half feet long. So we had a veranda placed which is all glass and extending out 7 feet from the base of the ‘U’ wall. That leaves those once exterior stucco walls now being interior stucco wall. My initial plan was to create a mosaic to cover it. That is when there was a 7 foot white stucco wall just 35 feet away an a lawn of weeds in between for a view. I’ve been busy and now there is a garden in between. I realized last year that a busy garden mosaic wouldn’t be able to complete with the actual garden. It has taken me until today to realize what would be nice would be simple bead board paneling to cover the stucco. That it will be less work and time not to mention the cost factor of making then installing the mosaic makes it that much more attractive. The problem is that I can’t find a vendor for bead board in France. So I guess I will make it. I need some clear instructions with no-nonsense stuff and found your blog. Thank you. I will start next Tuesday.
Jamie,
The faux tongue and groove beadboard you came up with is an absolutely brilliant idea and well executed! The room looks great.
Hats off to you.
Philip
Thank you Philip. I was limited by the door trim / plaster wall situation so I had to get creative with only 1/4″ depth. It was fun and although time consuming I’m glad I was able to keep the thickness down.
Hi! Your home is absolutely lovely. This is the exact look I am going for in my own antique farmhouse 🙂
Where did you find those candle sconces you’ve hung above your fireplace? They are just what I’m looking for.
Thanks in advance!
Thank you Honora, the sconces are from Circa Home Living here: https://circahomeliving.com/products/tp-171-two-arm-oval-tin-sconce?_pos=9&_sid=5ae1199b8&_ss=r
This post is amazing on many levels! Thank you so much!
Quick question. When beveling the plywood do the cuts aim away from the screen molding or towards it? Said another way, if you just installed the beveled plywood wall without any bead molding would the point of the plywood “V” ( where the plywood wants to meet) be touching the wall, or would the tip of the V be out on the room side?
Thanks for the help! Your work is amazing!
Thanks Mike, to answer your question yes the cut aim away from the screen molding. The bottom point of the V sits against the wall and the top outer edges of the V sit out into the room. I hope that helps.
Beauuuutiful wall panel.. do you mind me asking what sizes you made.. you mentioned 6″-11″.. what are the in between sizes?
Thanks Dina, the widths vary – 7.5″, 8.5″, 10″ – all different.
Hi
I love the look of your wall panelling.
Did you have any problems with the wood drying and causing larger gaps with time?