A place for everything and everything in its place. Today it’s a DIY locker and bench unit for my friend’s mudroom area.

Build this locker style mudroom locker and bench units for your space. With an organized system all the shoes, jackets and things have a place!
My friend has four kids who need designated, individual spaces to store their coats, shoes and all kinds of stuff kids collect. And she lives in an old home built way before ‘mudrooms’ were invented.
I drew up plans and constructed this locker and bench unit for what is now her new mudroom space just inside the door:

I designed the unit to fit the wall space we had and then I built wood bins to fit inside the first shelf space:


This transformation went from 6 hooks on the wall and a hope chest in the BEFORE picture:

TO 15 hooks inside 5 lockers, 5 large shoe baskets and 10 cubby shelves which all takes up just about the same amount of floor space. So fresh, so organized even if the items inside aren’t completely organized she now has a designated space for things.
Each locker has lots of hooks for backpacks, coats, umbrellas, sports gear, etc:

And the baskets under the bench go WAY back, 22″ deep, so there’s plenty of room for multiple pairs of shoes and boots:

I drew up the plans by modifying a few of Ana White’s plans to meet our size requirements.

I used Ana’s small locker cabinet:


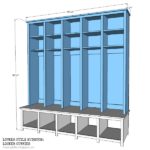
Ultimately my plans looked like this:

The locker portion is 81″w x 68″h x 14″d and the bench is 80″w x 18″h x 24″d
Here’s how I made the locker and bench units:
1. Construct bench box and add dividers:

2. Add face frame with 1x2s and back footer is a 1×4:

3. Prime and paint three coats Benjamin Moore high gloss white enamel:

4. Construct locker unit using 1x4s for shelf and base cross supports:

5. Prime and paint same as bench:

6. Prime and paint backing prior to attaching.
Secure lockers to bench with mending plates in back and L brackets in front sides. And don’t forget to add hardware using hanging hooks.

SHOP THIS POST:


LOVE them, jaime! they look AMAZING!!!!!
Thanks Cassie, that was a beast of a build but soooo worth it for all the storage.
Where did u buy the bottom baskets to fit?
Hi Kristen, I think the bottom baskets were from Homegoods – years ago.
I could look at your sight all day – love it! These turned out great!
Thank you, please feel free to look all day 😉
Oh I love it. How fun is this. Such a great storage piece. Looks beautiful. Hugs, Marty
Thanks Marty. So much storage, divided and organized makes a momma happy!
Wow! I mean really, wow! That turned out amazing! Wish I had a space for something like that in my house.
Jeanine
where are these L brackets located? curious.
looks great!
Man… I wish we had the space for that in our house. It would come in really handy when the kids start school and sports in a few years.
super and functional:)
Storage never looked so good!
Wow! Very cool! I want one so bad!
Wow. You did a fantastic job. Looked complicated to me 🙂 It's a great alternative to a mudroom….not many here in California. It's really beautiful! great job!
Wow..it is gorgeous!!! You did a beautiful job! ~ Judy
What a lot of work! Wow! I really am impressed by these because they are also beautiful.
I'm so impressed! They are fantastic! Thank you for sharing. Visiting from DIY Project Parade. Would love it if you would share this at my Make it Pretty Monday party at The Dedicated House which goes live at 8am CST on Monday. http://thededicatedhouse.blogspot.com Hope to see you at the bash! Toodles, Kathryn @TheDedicatedHouse
Um, wow! I'm stunned at your expertise with those power tools! Seriously … this diy is WAY over my head …
… but the results are simply amazing …
🙂
Linda
WOW! I bet they are so happy with that much more functional "mudroom." I LOVE this project! I blog over at http://www.2crafty4myskirt.blogspot.com/ Every Friday I feature a fellow crafter. I would love to feature you and this porject in an upcoming Friday. If you are interested please let me know [email protected]
Those are so gorgeous, they really make the place look smart! I love the look of lockers like that: both stylish and functional 🙂
Wow. I am seriously impressed. I know there was a lot of thought and work put into those! I love Ana White and what you've built here would definitely make her proud! 🙂
Oops! Forgot to put my new page: http://www.thisthatandlife.com I'm not under RustChic anymore! 😉
Amazing!
Okay. Seriously. Can you fly into Pittsburgh?! You're awesome. This is amazing!
So cool! I'd love to see it once it's all filled up with the stuff of 4 kids!
GREAT idea!! Liz
Wow! That is fantastic, I really need something like that for my kitchen, thanks for the step by step.
OMG, what a fabulous piece of work!!! I think I need one!
Wow – absolutely brilliant!!!
Love this! Where did you get the baskets from?
Love this! Where did you get the baskets from?
We really love this and are looking to copy it. I've been looking around at baskets and can't find anything close to the depth you found. Where did you find these baskets? Thanks!
L.O.V.E. this. I want one so bad but inside my garage since I don't have space inside. Can you tell me how much the materials came to?
Lisa
What wood did you use? Plywood? White Pine boards? I'm trying to build one my self but don't know what type or thickness to use. Thanks! And very impressive work!
I am also curious about what type of wood you used as well? And any idea on what the materials cost you? Great project!
Absolutely love this design! What's better than custom cubbies for your entryway or laundry room? Definitely will be trying your plan out!
How do you attach the shelves to the upright dividers? You can't screw / nail them in from the sides because there is a shelf on the other side of the divider!
Remhed the shelves are attached using pocket holes from the underside. Both units are built using pocket holes where ever possible and then filling the holes with plugs.
I'm making one for some friends. unfortunately they too want painted, but oh well.
Thank you for the quick response Jaime- I couldn't see the pocket holes since you plugged them in! So the "feet" on the front of the bench is actually the 1×2 trim pieces, right? I assume that is plenty sturdy? You then say the back "footer" is a 1×4 but I can't see in the pic how you have that attached / arranged. The front feet are not 4" off the ground, so how are you doing that back footer? Thanks!
Remhed – yes the feet are 1×2 trim except at both ends which are solid 3/4" ply all the way back. The back footer is attached using pocket holes and a 1×4 is actually 3 1/2" high. So you have 3 1/2" on the front side from the bottom of the shelf to the floor. Add your 1×2 trim which is 1 1/2" wide (minus 3/4" to cover the shelf edge) and now you've only got 2 3/4" clearance from below the trim to the floor and that's what you're seeing in the pic.
This is almost exactly what I need for my kids. I am hoping my dad and I can build it. Thanks so much. One question for right now-I noticed that there is beadboard and trim up behind the cabinet. The room we are putting these in already has beadboard in it that goes about 30" up the wall with trim on top. How did you attach the unit to the wall with the beadboard and trim still in place?
My husband is building this for me, and I am doing the painting. Did you use a paint sprayer, brush, or roller to do the painting?
Jaime, I'd also love to know where you got the baskets. Great job!!
Do you have exact instructions to make this? For someone who has never done it before?
Yes here: http://thatsmyletter.blogspot.com/2015/10/locker-style-mudroom-locker-cubbies.html
Nice article and thanks for sharing.
Work Lockers
OMG, thank you for these plans. I'm not very confident doing it myself. There are five of us in our family and I thought out just making 2 of two lockers – mommy doesn't really need one, right? This is perfect!! Thank you again!
Where did you get your bottom baskets?
The baskets are from Homegoods. I highly suggest sourcing the baskets FIRST and then building to fit.
This is 3/4" plywood and pine boards. I used pocket holes and finish nails to build. The link to the full plans is here: http://thatsmyletter.blogspot.com/2015/10/locker-style-mudroom-locker-cubbies.html
Can I ask about how much it cost for the parts
The cost varies depending on where you live but estimate about $400 for the whole unit (lockers and bench).
Perfection! Exactly what I am looking for. Thank you so much for sharing your plans and thoughtful attention to detail! — Kate, http://www.housemixblog.com
I don’t have any children in the home. But heck we all need storage. This is exactly what I had in mind for a look, only we will sink it in the wall. Thanks for your showing just how you guys did it. Spot on!
You are very welcome Denise, thank you for taking the time to leave a nice note. Good luck with your build.
We are making this with 7 “lockers” for my family! I can’t wait for it to be finished! It’s exactly what my 5 kids and their “stuff” need!
Great news, I love hearing from other families who are creating organized space for ‘all the stuff’. Please share once it’s all complete, I’d love to see the finished project 🙂
Thanks for this info, great job – this will have your kids organized in a jiffie. I’ve sent this to my hubs to show him that yes, you can have 5 cubbies and narrow-ish ones and with the rational I was thinking about as we too have x5. We plan on using reclaimed timber and ‘something’ with a plastic lining in the bottom tubs for their winter boots so we can wash them out come summer time etc.
I have a question??
We are planning on making this.
We are concerned that the plywood edges would look unfinished and not take the paint well.
Did you put a face plate on all edges?
Hi Sara, I think you’re asking about the plywood edges on the shelves? Those are the only cut edges that don’t have a face frame or trim. I used birch plywood has an okay edge then I filled any voids with wood filler and sanded smooth. If you want to cover those cut edges you could add a 1×2 trim to the shelves given that there’s a face frame on the lockers so you have depth to do that.
Can you please tell me where you got your hooks for the lockers? Beautiful piece! Thank you!
Hi Corinne, it’s been a few years but I’m almost positive the hooks are from Home Depot.
I wanted to say a HUGE thank you for publishing this. I modified it slightly (used two 1×12 for the bench top glued/screwed together) but this is really great! My family loves it! Even added a custom pink hook for my wife.
Here’s a link to the finished thing. https://i.imgur.com/DzoelNY.png
For those curious like me i used two mending plates on the back from homedepot (two L shaped on the sides and two T shaped in the middle) and two brackets on the front inner sides (you can kinda see them in the screenshot) and two brackets to anchor it to studs on the top.
Over all the plans were great and I really appreciate you making them public. This was my first big wood working project so thank you!
Thank you Guy, so nice of you to share your build and modifications. Very glad you were able to make use of the plans, it looks beautiful!!!
We just built similar lockers for our family of 6. I am stuck at the hooks. I know I want to get a lot of hooks for all the bags and coats my kids have. I noticed you have one on the back wall and one on each side wall. I like that, and I think I’d like to do that oo. How does that work? Do you wish you had one hanging from the ceiling? How did you chose to insall the hook on the back wall higher than the hooks on the sides? Do you ever scrape your arms on the side hooks as you reach for the back hook? I’m wondering about installing my hooks on the back wall lower that the ones on the sides to avoid this possibility, and I’m curious if you have insights about that as you’ve lived with this for some time. Pehaps I am WAY overthinking this:). I’ve been accused of that before!
What did you end up doing with the hooks?