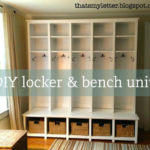
You can have the biggest, best mudroom in the world but without some organization in the form of a closet or compartmentalized unit your mudroom won’t be functional. Let’s make that amazing mudroom space completely functional with locker style cubbies for all the jackets, hats, gloves and gear.

Build these locker style mudroom locker cubbies for your space. With an organized system all the shoes, jackets and things have a place!
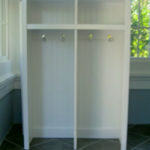
I’m back sharing the locker style mudroom build and today it’s the top portion of locker cubbies with two open shelves above.

To refresh your memory I am referring to this DIY locker and bench unit I built for a friend back in July 2012. After a bazillion requests I’ve finally made plans to share with my readers so you can build it yourself.

Locker Cubbies with Bench
Last week I shared the shoe cubby bench plans here and this week we will complete the project with the upper locker cubbies.

Materials:
- 3 – ¾” plywood sheets
- 7 – 1x2x8 boards
- 2 – 1x4x8 boards
- 2 – ¼ plywood sheets (or beadboard for backing)
- 1 ¼” pocket hole screws
- wood glue
- 1 ¼” finish nails
Cut List:
- 1 – ¾” plywood @ 80 ½”l x 14 ¾”w (top)
- 6 – ¾” plywood @ 68”l x 13”w (dividers)
- 6 – ¾” plywood @ 14 ¾”l x 13”w (shelves)
- 4 – ¾” plywood @ 15 1/8”l x 13”w (exterior shelves)
- 6 – 1×4 @ 14 3/4”l (cross support)
- 4 – 1×4 @ 15 1/8”l (exterior cross support)
- 1 – 1×2 @ 76”l (top trim)
- 2 – 1×2 @ 68”l (side trim)
- 4 – 1×2 @ 66 ½”l (divider trim)
- 1 – ¼” plywood @ 68”l x 47 1/2”w (backing)
- 1 – ¼” plywood @ 68”l x 31 ½”w (backing)

Step 1: Attach sides to top using pocket holes. Use wood glue and 1 ¼” pocket hole screws. Keep ¾” inset from top edges, ¼” inset from back edge and 1 ½” inset from front edge.

Step 2: Attach shelves to dividers using pocket holes. Use wood glue and 1 ¼” pocket hole screws.

Step 3: Attach cross supports to frame at back. Use wood glue and 1 ¼” pocket hole screws.

Step 4: Attach face frame. Secure to unit using wood glue and 1 ¼” finish nails.

Step 5: Attach interior face frame to dividers. Use wood glue and 1 ¼” finish nails.

Step 6: Attach backing to shelves using wood glue and ¾” finish nails. Use two pieces and keep seam behind one divider.
The top locker cubby unit it secured to the shoe cubbies base using L brackets just on the interior of the vertical face frame at the edges of the locker portion. Mending plates were added on the back as well.
The details and plans for the shoe cubby bench portion can be found here:

Locker Unit with Cubbies
Make your mudroom amazing with a locker style unit built to fit your space. Plenty of room for shoe baskets, hanging space for jackets and gear plus two open shelves above for wood bins or baskets for off season storage.


These look fantastic!!
Thanks Megan. I finally got 'reply' added to my comments – only took me 7 years.
Interested in knowing how this can or should be secured against the wall?
^^ Mike: You could pop a few 2" screws through the upper 1×4 supports into studs and caulk/paint over the screw heads. If you want something a bit less permanent, get some L-brackets and hide them at the back of the upper shelves in the corners. One side of the bracket against the bottom or side of the upper cubby, one side against the back of the structure with 2" screws going into studs. 2 or 3 should be plenty to prevent tipping.
Or even put the brackets at the very top of the structure, completely out of sight
Awesome, thanks so much for the helpful suggestions, Jesse!
Just wanted to pass along my 'thanks' for these helpful plans. I managed to complete the locker storage unit and it fits rather well in my newly-renovated mudroom! 🙂
Photo of the completed unit is here:
http://mikelovesjulia.tumblr.com/post/160967339554/mudroom-storage-locker-using-helpful-instructions
Mike you are so welcome, thanks for sharing your completed project. Love your hardware choice and that wallpaper is so fun.
3/4" birch plywood and pine boards. The cost varies depending on where you live but estimate about $400 for the whole unit (lockers and bench).
Time for a new comment on this thread.
I modified the plans slightly, 4 instead of 5 lockers and 1 instead of 2 top cubbies, and added 1×2 to the edge of the top shelf. Overall, it was a fun project. Hard to tell but I finished it with Home Depot Behr Paint in Swiss Coffee Semi-Gloss. For the stain I used 3 coats of Espresso, followed by 3 coats of Semi-Gloss Acrylic on everything with a light 400 grit sand between coats.
For anyone thinking of building this. We bought the baskets first, then designed the width of the lockers based on them (found at Target), also for the pocket holes, make sure you don’t put them back-to-back…the screws will hit each other 😉
Thanks for the plans Jamie
https://imgur.com/a/dGPUulK
Is there a screw you recommend for the side hanging hooks? If I screw one hook on each side, the screws will run into each other.
Hi Nicole, Off set the hooks about 1/2″ so they aren’t exactly back to back. Hope that helps.
Great plans, thank you!!! Could you possibly give more details on how you secured the lockers to the bench section?
Thanks!
Thanks Ben, they are secured with L shaped mending plates in the front (behind the face frame) and flat mending plates on the backside.
Maybe I’m stupid but I can’t figure out how to install the supports and shelves at the same height using pocket hole screws can someone help please?
Hi Brittany, Are you asking about the 1×4 shelf supports in step 3? You attach the shelf supports direclty under the shelves after you’ve attach the shelves to the vertical dividers. Keep the pocket holes to the back as per the sketch. Hope that helps.
For the pocket holes in the cross supports on the back, do you do two on each side?
Yes, two pocket holes always. If you only do one it creates a pivot point and the board can swivel. Two makes a solid joint.
Hi! I love these plans and I’m sketching it right now to make it a tad smaller for our area.
I have a question, though. 🙂
When measuring out the interior face frame, you have them each measured at 66 1/2”. If the height of the exterior ones is 68”, and you deduct 2” for the top trim, wouldn’t the interior face frame height be cut to 66”? I’m just thing to figure out where the extra 0.5” is coming from.
Thanks so much!
Hi Kelsey, The trim is a 1×2 which is actually 3/4″ x 1 1/2″ so it’s only 1 1/2″. Hope that helps.
Thanks so much for these plans, we are making it this weekend! I was wondering how you painted it. Did you hand paint or use a paint sprayer? Also do you recommend wall paint or cabinet paint or trim paint? Thanks for the help!
Hi MaryBeth, Glad to hear you’re boiling the lockers! I painted these with a brush and roller and I used primer and then I think it was semi-gloss white. If I had to do all over again I would use my sprayer, still primer and then Benjamin Moore satin enamel. Good luck!
These are exactly what we need in our mud room. I would love to have doors on ours to hide what’s inside – any thoughts on adding doors? Thank you!
Hi Emily, yes you can definitely add doors. I would do something similar to the doors on this sideboard: 1/2″ inner panel with 1×3 frame around the perimeter. https://jaimecostiglio.com/diy-extra-long-sideboard/ Also be sure to get the full wrap hinges for easy installation. Good luck!
I built the bench yesterday – turned out great. I used butcher block for the base and will be building the shelves this weekend. Thanks for the great plans.
Hi Matt, Love hearing this – thanks for sharing. Send a photo once you get the lockers in too!
I love these! My husband’s partway through building it right now! I’m going to paint it and get the hooks and baskets picked out 🙂 What size baskets fit in the cubbies?
Hi! Can you provide. Link for the baskets you purchased?! We are almost complete with thr bench and will be building the locker section soon!
Hi Melissa, the baskets are from Homegoods. Sorry that’s not very helpful since they don’t have links. Good luck with your build!