• Home
  • Blog
  • About
  • Contact
    • Disclosure
    • Privacy Policy
  • SHOP
  • Widget area for main menu

    • Email
    • Facebook
    • Instagram
    • Pinterest
    • Twitter
    • YouTube
  • Skip to primary navigation
  • Skip to main content
  • Skip to primary sidebar

Jaime Costiglio

build - paint - sew

  • BUILD
    • BEDS
    • BENCHES
    • DESKS
    • DRESSERS
    • GAMES & TOYS
    • SCRAP WOOD
    • SHELVES
    • STORAGE
    • TABLES
  • TOOLS
  • PAINT
    • CRAFTS
    • FURNITURE
    • HOME DECOR
  • SEW
    • GIFTS
    • HOME DECOR
    • POUCHES
  • HANDBUILT HOLIDAY
    • 2021
    • 2019
    • 2018
    • 2017
    • 2016
    • 2015
    • 2014
    • 2013
  • GIFTS
    • BABIES
    • KIDS
    • FOR HER
    • FOR HIM
    • TEACHERS
    • WEDDINGS
  • SEASONAL
    • 4TH OF JULY
    • FALL
    • HALLOWEEN
    • CHRISTMAS
    • SUMMER
    • SPRING
    • ST. PATRICK’S DAY
    • THANKSGIVING
    • VALENTINE’S DAY
    • WINTER
  • SALTBOX PROJECT
    • BATHROOMS
    • DINING ROOM
    • EXTERIOR
    • FAMILY ROOM
    • FOYER / MUDROOM
    • KIDS BEDROOMS
    • KITCHEN
    • LIVING ROOM
    • MASTER BEDROOM
    • PLAYROOM
  • SCROLL SAW

DIY Tower Shelves with Doors

November 14, 2010

Lily’s new shelves. 
diy tower storage cabinets
I gave myself a real challenge to build these tower shelves (in a custom size and layout) just to see if I could do it and I think it’s safe to say judging from the picture that I can.

So that picture above was slightly altered, here’s the real deal:
diy tower storage cabinets
And a before shot when there were no tower shelves:
baby nursery area before

The story is my sister-in-law B and her husband P have a new baby, Lily, in a one bedroom apartment in NYC and although there is plenty of space, it was the use of the space that got me going.  And of course all the inspiring pictures of other things people had made on Ana White’s blog which made me think I could make something great too.

On a recent visit (and my first visit to their place) I saw the layout and my mind got working.  Thank goodness I travel with my tape measure (that’s normal right Mom and Megan?), I measured up the space and made some drawings.  You know something like this from PBKids but lets not pay $1400 for it – who wants to do that?  And we needed to make some hanging space.

Madison Changing Table System
image from Pottery Barn kids

So I combined a few ideas from Ana – the 5 cube tower bookcase and the doors from the nursery armoire – and adjusted it all to fit the measurements. 

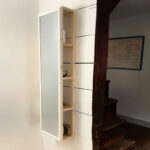
I wanted to make the most use of the space so I started with 18″ x 18″ x 82″high and worked my way backwards.  Which by the way is a tiny bit difficult because of the thickness of wood (nominal versus actual size) but slowly I got it.  And actually 18″ is great for depth, anything deeper and stuff just gets lost back there. 

I started with 2 plywood sheets (4’x8′) ($14 each) and had the guys at Home Depot cut them down to manageable size but I wanted to make use of the entire sheet – no scraps. 
These are the cuts I had Orange guy make:

1- 16″ x 48″
3 – 16″ x 80″ (although one came out at 15 1/2″ – nominal size thing again – but that was okay because I used that for the actual shelf pieces)

I also bought 10 (1’x2’x8′) #2 pine boards ($3 each) and 2 (2’x4’x1/2″) sheets ($33 each) for the doors.  I had the beadboard for the backing from another project and I had 1/4″ for the door stiles from the kitchen renovation.  I also had the closet rod leftover from previous owners in the basement.

For hardware I bought 1 box (50) 2″ (#8) wood screws ($5) , 6 hinges ($7), 2 sets closet rod assembly kits ($5), 2 wooden knobs ($2), and 2 door magnets ($3).  I had 2″ finish nails, 1 1/4″ brad nails and 5/8″ brad nails.

So in all I only spent $186.  And that includes the (4) pink woven bins ($10 each at Homegoods) which I did buy prior to constructing the shelves because again I wanted to make the most use of each shelf with no wasted space so I needed the height of the bins in order to determine the shelf height.  Good thing I did because I was able to make four shelves instead of just three.

Here’s some progress photos:
The shelves are complete without doors or hanging rod:

diy tower bookshelves
Here you can see the 18″ depth and clearly they are made of plywood and lots and lots of wood putty covering those screws:
diy tower bookshelves
And here are the bins I bought prior to constructing the shelves, without them I would not have know how high to make each shelf to make the most of our 80″ high piece:
bins for storage bookshelf
diy tower storage without doors
Primed and painted (semi-gloss white which I had), doors and knobs on:
diy tower storage shelves with doors
Close up of door:
diy tower storage shelves with doors
And behind the door we have the hanging space:
diy tower storage shelves with doors
And now we are loaded in the minivan for our delivery to NYC:
diy tower storage shelves with doors
All in place in their new home ready for Lily to fill up:
diy tower storage shelves with doors
A closer look:
diy tower storage shelves with doors
One last side by side:
diy tower storage shelves with doorsdiy tower storage shelves with doors
And for some real decorating fun:
diy tower storage shelves with doors

By far my largest and most time consuming project but not too difficult.  Lily now has much more storage and hanging space that was designed to fit and make the best use of the space we had.  And all for a fraction of the retail price (pretty sure PBkids would charge about $750 for the towers, I paid under $200 for supplies).  I would definitely do it again, so where do we need furniture in our house?  I can probably think of a few things to make.

You may also like...

  • DIY Wall Mirror with StorageDIY Wall Mirror with Storage
  • DIY 3 Drawer Nightstand with PlansDIY 3 Drawer Nightstand with Plans
  • DIY Primitive Nightstand with PlansDIY Primitive Nightstand with Plans
  • DIY Painted Pipe Base Wood DeskDIY Painted Pipe Base Wood Desk
Share this post:

Filed Under: BUILD, DIY, FURNITURE, FURNITURE, HOME DECOR, ORGANIZATION, PAINT, SHELVES, STORAGE4 Comments

Reader Interactions

Comments

  1. Leah says

    November 16, 2010 at 3:14 AM

    Beautiful, I love this! You did an amazing job, start to finish!

    Reply
  2. Late Bloomers says

    December 10, 2010 at 2:41 PM

    I want to build a custom hutch/pantry cabinet unit in my kitchen.
    I had a hutch, but sold it… and we miss the thing immensely, but most hutches you find on Craigslist do not allow for a coffee maker on the counter [coffee maker is too tall]
    Still mulling over what I want, but if I was to build it going to the ceiling makes the most sense- why waste space? Then wrapping the crown molding I want in here across it as well….and glass doors with lighted sections… I hate having champagne taste on this beer budget.
    Oh and I have NOT TOOLS! Wanna make me a 'Must have tool' list?

    Reply
  3. Sawdust and Paperscraps says

    February 18, 2011 at 5:39 PM

    These are fantastic! Thanks for linking up and showing off your skills. I would actually love to see your must have tool list as well. It would be interesting to see if someone else has some awesome gadget that I've never heard of.

    Reply
  4. - Brittany says

    March 17, 2011 at 2:03 PM

    Love those shelves Jaime! Nice job on them and a smart storage solution.

    Brittany
    http://www.prettyhandygirl.com

    Reply

Leave a Reply Cancel reply

Your email address will not be published. Required fields are marked *

Primary Sidebar

Hi! I’m Jaime

Jaime Costiglio

Hello!

Thank you for stopping by.
Join me for lots of DIY.

Read more

Get new posts via email

Handbuilt Holiday: Gift Project Plans

handbuilt holiday gift project plans

Collection of DIY gift project plans to build.

The Home Depot Tool Prospective

THD Prospective

Tools to consider for the DIYer.

Archives

The Home Depot Logo
Copyright © 2023 Jaime Costiglio · Custom site by Moonsteam Design

Privacy Policy