Thanks to Home Depot for sponsoring this pantry makeover post. When spaces don’t function to the best of their ability I feel obligated to correct the issues at hand. Our pantry feel into that problem, it was a fine space but it wasn’t functioning to the best of its ability and I’m sharing how I fixed that. This is an inexpensive pantry makeover almost anyone can tackle.

Makeover your dark and dingy pantry with two simple tools. An inexpensive pantry makeover that looks like a million bucks.
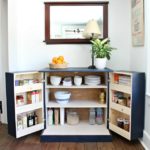
Everyone loves a beautiful, bright, organized pantry. There’s something about displaying food items on visible white shelving in organized groups that tickles our fancy. And I’m going to share exactly how I achieved this look for very little cost.

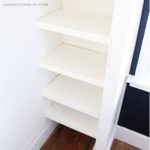
Did you get a good look of the before photo above? This pantry was dark and dingy. The shelves were not pretty and we could never see anything.
Solution:
- paint shelves and walls white
- add lighting

For seven years we lived with that gross pantry and now we finally have a magnificent space to store food. The shelving is basic 3/4″ plywood and I painted them with satin white paint. The walls are painted white as well. And the most spectacular part is the addition of lighting.

Again another before shot above with so much gross, dirty off white paint and darkness. And now the after:

Do you hear the angels singing? The addition of lighting makes a world of difference. We were fortunate enough to already have an outlet in the pantry so no electrician required. As a result I used plug-in LED strip lights inside the pantry with a switch that I mounted on the interior door trim.

These lights are super easy to install and you can join two strip together to make a long set if your space requires more.

Supplies:

Depending on the condition of your shelving you may or may not have to do some sanding prep work. Our shelves were pretty gross so I sanded off the grime to start smooth and fresh.

The light kit I used is 10′ long, just enough to go up and around the door frame. You can link two sets of lights together with a connector piece to make a 20′ strip if you have a taller and wider door frame.

I love how the sticky light strip sits just inside the door frame moulding. It’s flat and sticks flush to the wall but emits so much light. For the complete step by step instructions on this project please visit the Home Depot Blog here.
Thanks for joining me for this inexpensive pantry makeover project. Please follow me on social media for sneak peeks and more project inspiration:
Instagram / Pinterest / Facebook / Youtube / Twitter
SHOP THIS PROJECT:


Putting light strips in a pantry or closet is such a great idea Jaime ! Thank you!
Thanks Lisa, it was so easy and I just wish I had done it sooner.
Looks great!