• Home
  • Blog
  • About
  • Contact
    • Disclosure
    • Privacy Policy
  • SHOP
  • Widget area for main menu

    • Email
    • Facebook
    • Instagram
    • Pinterest
    • Twitter
    • YouTube
  • Skip to primary navigation
  • Skip to main content
  • Skip to primary sidebar

Jaime Costiglio

build - paint - sew

  • BUILD
    • BEDS
    • BENCHES
    • DESKS
    • DRESSERS
    • GAMES & TOYS
    • SCRAP WOOD
    • SHELVES
    • STORAGE
    • TABLES
  • TOOLS
  • PAINT
    • CRAFTS
    • FURNITURE
    • HOME DECOR
  • SEW
    • GIFTS
    • HOME DECOR
    • POUCHES
  • HANDBUILT HOLIDAY
    • 2021
    • 2019
    • 2018
    • 2017
    • 2016
    • 2015
    • 2014
    • 2013
  • GIFTS
    • BABIES
    • KIDS
    • FOR HER
    • FOR HIM
    • TEACHERS
    • WEDDINGS
  • SEASONAL
    • 4TH OF JULY
    • FALL
    • HALLOWEEN
    • CHRISTMAS
    • SUMMER
    • SPRING
    • ST. PATRICK’S DAY
    • THANKSGIVING
    • VALENTINE’S DAY
    • WINTER
  • SALTBOX PROJECT
    • BATHROOMS
    • DINING ROOM
    • EXTERIOR
    • FAMILY ROOM
    • FOYER / MUDROOM
    • KIDS BEDROOMS
    • KITCHEN
    • LIVING ROOM
    • MASTER BEDROOM
    • PLAYROOM
  • SCROLL SAW

DIY Rolling Console

May 8, 2015

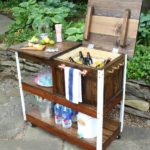
Gearing up for summer?  I know I am and last summer we desperately needed some additional counter space outdoors for serving food and drinks so I built this outdoor rolling console.
diy outdoor rolling console

A DIY tutorial to build an outdoor rolling console. Great for serving food and drinks plus plenty of open shelf storage for your patio or backyard space.

When the weather turns warm we gain a whole lot of living space outdoors.  Both the front patio and backyard are heavily in use all Spring, Summer and Fall.  To make those spaces function to their best ability I’ve been slowly building furniture pieces to fit.  This rolling console provides a ton of extra counter space, serving area and storage.  Plus it’s on wheels so I can move it wherever we need it!

open slat shelves
Look at all that shelf space and the wheels allow me to move it anywhere with ease.  I love the warm wood tones of the cedar against the natural green and stone.
This console first appeared over at Ryobi Nation ahwile back and today I’m sharing how to build this outdoor rolling console.
cedar serving console
Scroll down for more detailed photos including a few building process tips.  The complete plans including materials and cut lists are down below.
serving console with slat style shelving
Please read through the plans entirely before beginning and follow all safety precautions when using power tools.
outdoor rolling console dimensions
Click here for a PDF version of the rolling console plans.

Materials:

  • 2 – 1x6x8 cedar
  • 6 – 1x4x8 cedar
  • 2 – 2x3x8 fir studs
  • 3 – 2x2x8 pine boards
  • 3 – 2x2x6 pine boards
  • 4 – 5” casters (at least 2 with brakes)
  • 1 ¼” exterior pocket hole screws
  • wood glue
  • 2 ½” exterior pocket hole screws
  • 2” finish nails
ryobi pneumatic nail gun to attach top boards

In Step 3 attach the top slats to frame. Glue and attach using 2” finish nails. Keep a ¾” overhang at front, back and sides.  Layout all the boards before attaching with equal spacing between boards.

rolling console step 4
In Step 4 attach the shelf slats to the frame.  Keep the slat flush to top of the 2×2 frame and attach using 1 ¼” pocket hole screws.
pocket holes to attach middle shelf slats
Be sure to sand well as cedar is very rough and fuzzy.  Seal with exterior grade polyurethane at least 2 coats.
outdoor rolling console free plans
SHOP THIS PROJECT:
For more outdoor building projects see this post:
five diy outdoor build projects

You may also like...

  • DIY Grill Cart or Bar CartDIY Grill Cart or Bar Cart
  • DIY Lemonade StandDIY Lemonade Stand
  • DIY Outdoor Toy Storage BinDIY Outdoor Toy Storage Bin
  • Outdoor Bar / Potting BenchOutdoor Bar / Potting Bench
Share this post:

Filed Under: BUILD, DIY, FURNITURE, SEASONAL, SHELVES, STORAGE, TABLES3 Comments

Reader Interactions

Comments

  1. Katherines Corner says

    May 9, 2015 at 1:38 AM

    Love this project. It is so practical and looks amazing too. I invite you to share at my Thursday hop ( you can link up through Sat midnight) Hugs! P.S. don't forget to enter my new giveaway.

    Reply
  2. Our Pinteresting Family says

    May 16, 2015 at 10:00 PM

    I love it. This is such a functional piece too.

    Reply

Leave a Reply Cancel reply

Your email address will not be published. Required fields are marked *

Primary Sidebar

Hi! I’m Jaime

Jaime Costiglio

Hello!

Thank you for stopping by.
Join me for lots of DIY.

Read more

Get new posts via email

Handbuilt Holiday: Gift Project Plans

handbuilt holiday gift project plans

Collection of DIY gift project plans to build.

The Home Depot Tool Prospective

THD Prospective

Tools to consider for the DIYer.

Archives

The Home Depot Logo
Copyright © 2023 Jaime Costiglio · Custom site by Moonsteam Design

Privacy Policy