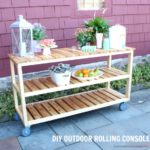
Love spending time on the patio and want to entertain family and friends but don’t have a surface for serving drinks? You need a bar cart! Today we’re making this DIY grill cart or bar cart, whatever serves you best.

A DIY tutorial to build an outdoor bar cart complete with free plans. Serve and store cold drinks outdoors with this portable bar cart.
Just in time for summer I built a bar cart. This is my own version of the grill cart that is part of The Home Depot DIY Workshop coming up this Saturday, June 20th at 10am:

I can’t wait to show you all how to build the grill cart Ben Uyeda of HomeMade Modern designed for the workshop!
This Saturday, June 20th, 2015 I’ll be at the Buffalo store #1286 making the grill / bar cart:
The Home Depot #1286
4405 Milestrip Rd
Buffalo, NY 14219
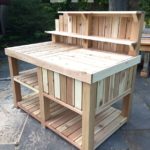
Below you’ll find all the details on my version of the grill cart which I made into a bar cart complete with hidden cooler storage.

The bar cart is a bit wider than Ben’s grill cart and has a cooler compartment made to fit a standard 30 quart foam cooler (about $3 at The Home Depot). Or you could line it with a big plastic bag and just plop the ice and drinks right inside.


There’s plenty of open shelf space for storage and serving items.

And I added copper towel bars and hooks to fancy things up a bit. Also, I intentionally choose screws with a brassy, copper color to attach the metal vertical supports because they add a decorative industrial look.

Copper fittings make great towel hooks! I’ll show you the details down below how to make these cuties for the bar cart.

If you’re curious and want to learn more about how to make a grill cart please join us this Saturday, June 20th at The Home Depot. Click on the bucket to register, type in your zip code to find the nearest store hosting the workshop.

And now for the plans to build my version of the grill cart as a bar cart. As always use caution and follow all safety requirements when operating power tools.

Bar Cart Materials:
- 6 – 2x4x8 studs
- 4 – 1x8x8 boards
- 3 – 1x4x8 boards
- 1 – 2x2x6 board
- 1 – 1x6x6 board
- 4 – 2×2 angle irons @ 36”
- 3”, 2” & 1 ½” screws
- 2 ½” & 1 ¼” pocket hole screws
- 4 – casters
- cutting oil
Cut List:
- 4 – 2×4 @ 39 1/2” (long shelf supports)
- 10 – 2×4 @ 19” (short shelf supports)
- 5 – 2×4 @ 16” (center shelf supports)
- 4 – 1×8 @ 42 1/2” (shelf sides)
- 2 – 1×4 @ 42 ½” (shelf center)
- 2 – 2×2 @ 15 1/2” (top shelf center supports)
- 14 – 1×4 @ 12” (cooler compartment sides)
- 4 – 1×6 @ 12” (cooler compartment sides)
- 6 – 1×8 @ 27 ¼” (top)
- 2 – 2×2 @ 15” ends cut 20 degree miter not parallel

Step 1: Make shelf frames. Attach short ends to long ends using 3” screws. Then attach center supports to frame using 2 ½” pocket hole screws. Make
two. ** The middle shelf requires one center support. **
two. ** The middle shelf requires one center support. **

Step 2: Attach shelf boards to frames using 1 ½’ or longer countersunk screws.

Step 3: Make top shelf frame. Use pocket holes and 2 ½” pocket hole screws.

Step 4: Make cooler compartment. Attach planks to frame using pocket holes and 1 ¼” pocket hole screws to create cooler compartment.

Step 5: Attach top shelf and cooler compartment to middle shelf.

Step 6: Attach metal L angle irons to shelf frames. Be sure to predrill irons using cutting lubricant and paint them prior to attaching to bar cart.

Step 7: Make left side top surface. Attach boards from top using 1½” countersunk screws.

Step 8: Make cooler compartment lid. Finish nail 2×2 cross supports into 1×8 boards then flip over and attach from top using countersunk screws.
Step 9: Finish as desired. Attach wheels and accessories.

Details:
I used hinges on the frame to attach the right side cooler compartment lid to the bar cart.


To make the copper pipe hooks I used the above 1/2″ fittings.

Use a 3/4″ spade bit (make sure the bit size matches the threaded side of the adapter).

Drill a hole deep enough for the threads and screw adapter into hole. I wrapped the adapter with tape first and then a cloth before using pliers to screw it in securely. I hope you enjoyed this bar cart tutorial. Hopefully you have just the spot for this furniture piece.

Disclaimer: The Home Depot partners with bloggers such as me for DIY Workshop program. As part of this program, I received compensation for my time. They did not tell me what to purchase or what to say about any product mentioned in these posts. The Home Depot believes that consumers and bloggers are to form their own opinions and share them in their own words. The Home Depot’s policies align with WOMMA Ethics Code, FTC guidelines and social media engagement recommendations.

I love that your version has a spot for a cooler. So practical.
Thanks for this! My husband and I just finished ours. We saw yours and loved it so we decided to make it. It was much more expensive than I anticipated, but was a lot of fun making.
@Monicaramrem–
Just curious; my husband and I want to make this this weekend. How long did it take you guys and about how much did it cost?
Sarah
@Moincaramrem this grill cart took me about 2 days to complete. The cost will vary everywhere but I'm estimating about $100 for lumber.
How thick are the angle irons used? Thank you
The angle irons are 1/8" thick. Good luck with your project!
Great project!
Do you have or know of any plans to build a pizza prep cart or table with containers for pizza toppings? I haven’t had much luck finding any online. I have a left over kitchen counter I would like to use for the cart. Thank you!
Hi Dale, I haven’t seen any pizza prep carts but my friend Sadie did a makeover for a coffee cart: https://www.theawesomeorange.com/blog/mobile-coffee-cart-makeover that may be a starting point. Good luck with your project!
Thanks a lot, I will take a look at that. I really loved your cart!
I am planning on making this cart for my outside area, I was looking through the plans and had a few questions
1. I couldn’t see where it tells you how many of each kind of screw you need and which screws you use when? should all the screws be flat headed screws?
2. In the PDF you have some boards different colors at each step what does this indicate?
3. Is there a guide for which cuts should be made from which of the boards so that their is enough wood.
4. Can you drill through the angle irons with regular drill bits or do you need special bits to go through metal?
Thanks so much for the help
Sorry – I meant $80