Let’s build a classic lemonade stand for big kids.

A DIY tutorial to build a big kids size lemonade stand. The perfect place to sell lemonade and treats complete with removable signage.
It’s hard to believe but of all the pieces I have built never have I made an official lemonade stand. So when a friend asked me to build one for an event I said of course! She requested a stand similar to Kristyn’s at Lil’ Luna here and I got to building.

It’s big, like big enough for a small adult but not overwhelming for kids. The overall dimensions are 48″w x 24.5″d x 77″h.

And I added a removable chalkboard to the front.


There’s plenty of counter space on the cedar planked top.

And also plenty of space behind to add at least two chairs.


I painted the word ‘lemonade’ on both sides of the sign so it will be visible for customers coming from all angles.

Below I’m sharing my details on how to build the lemonade stand. Also be sure to check out Kristen’s post for more information.
Shopping list:
- 5 – 1x6x8 cedar planks
- 4 – 1x4x8 cedar planks
- 2 – 2x3x8 studs
- 2 – 2x4x8 studs
- 2 – 1x3x6 pine board
- 1/4″ plywood pieces
- 2×2 @ 12″ or 4 – 3″ scraps
Cut list:
- 4 – 2×4 @ 29 1/4″ (legs)
- 4 – 2×3 @ 9″ (cross supports)
- 2 – 2×3 @ 43″ (front cross supports)
- 1 – 2×4 @ 43″ (back cross support)
- 14 – 1×6 @ 29 1/4″ (base sides & front wrap)
- 6 – 1×4 @ 48″ (top)
- 2 – 1x3x6 (sign posts)
- 1 – 1/4″ply @ 10″ x 48″ (sign)
- 4 – 2×2 @ 3″ (sign post guides)
- 1 – 1/4″ply @ 24″ x 35″ (chalkboard sign)
- 2 – 1×2 @ 23″ (chalkboard sign backer)

Step 1: Build the frame. Start with the short ends then connect using the longer front and back cross supports.

Notice the pocket holes going upwards later for attaching the top.

Step 2: Assemble the top. 6 boards across all connected flush using pocket holes.

Step 3: Attach the top to the base frame using the predrilled pocket holes and 2″ screws.

Step 4: Prepaint the front and sides of the slats then sand to distress.

Step 5: Attach slats to front and sides using finish nails.

Step 6: Determine placement of sign posts and jigsaw a 1×3 opening with a little extra wiggle room.

Step 7: At the base of the frame support attach 2 scrap 2×2 pieces to guide the sign posts and hold them in position.


SIGNAGE:
Step 8: For the chalkboard secure 2 – 1×2 pieces at back. (I used 3/4″ screws predrilled from the front, putty and sand then paint with black chalkpaint.)

Step 9: Insert 2 screw eyes down into 1x2s.

Step 10: Determine where sign will hang and center. Predrill and screw in hooks.

Take care to be sure hooks DO NOT protrude beyond front edge, you don’t want customers getting poked by the hooks and also to prevent them from rubbing up against the chalkboard.

Step 11: To make the lemonade sign paint the plywood backing white. Then print out letters using Microsoft Word Gloucester MT Extra Condensed font at 700 point. Line up the print outs on the plywood backing and trace the letters with a ballpoint pen using heavy pressure.

Step 12: The pressure of the pen will leave a slight indent in the wood. Paint on and inside the indent with bright yellow.

Step 13: Create depth by painting a dark brown shadow down and to the right of every letter. Let dry then sand to distress. Lastly attach the sign to the posts. And slide the posts down into holes and guides below.

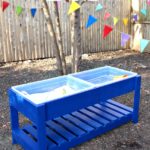
If you’re looking for a smaller kid size version try this play stand.


This is just too cute!!
Oh my gosh this is incredibly cute! I bet your kids got a kick out of selling their goods!
Do you know the weight?
Thanks for asking. To be honest I don’t know the exact weight as I built this years ago for a friend. I was able to move it around fine by myself so it had to be under 40 pounds.