An absolute necessity in any workshop is a miter saw. But like dominos that means the next necessity is a place for the miter saw to live. I’m sharing the plans today for this DIY miter saw station built with easy to install Simpson Strong-Tie hardware and stud lumber. Check out the details and printable plans down below.

A DIY tutorial to build a miter saw station. Make this super sturdy miter saw table to fit your miter saw using my free plans.
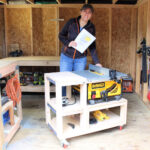
Awhile back before I had the shed shop space I used to haul my miter saw in and out of the basement. It worked great for my situation however now that I have a permanent workshop space in my shed it’s time for a miter saw station.

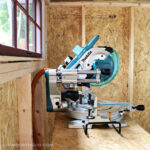
Using good old reliable rigid tie brackets and stud lumber I built this miter saw station to fit my shed space and my saw. But it’s very easy to customize to fit your space and your saw. I use a cordless Makita 10″ compound sliding miter saw these days and I absolutely love it. It’s precise and has a finesse about it that makes my previous miter saws feel a bit clunky. Also you can see the slider is mounted ON THE SIDE versus sticking out the back which means this whole set up takes less space in my small shed shop.
Miter Saw Table
- permanent home for miter saw
- includes tons of storage
- easy to customize
- fits any miter saw

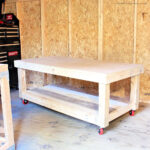
I added a second shelf on the far side for more storage. And you’ll notice I made my shelves out of scrap 3/4″ boards I had lying around. No sense in buying new plywood when you can make use of lumber you have on hand.

The most important item to note about this miter saw station is the placement of the center shelf. You will need to measure your saw from the base to the top of the work plate in order to determine exactly where to attach the center shelf. Also be sure to use a level when installing the shelf to take into account your floor situation. And although it’s extremely secure and stable I will say things tend to shift a tiny bit with the seasons.

Storage Possibilities
- half shelf for battery charger
- deep enough for Kreg Foreman
- consider dust control – vacuum / dust stopper size

Of course there’s so many options you could add to make the most of your miter saw station. Start with the basic work station and build on from there.
This saw table measures just shy of 7 feet long, 28″ deep and counter height at 36″.

Click here for printable PDF version of the plans.
Supplies:
- 20 RTC rigid tie corner brackets
- 8 RTA angle brackets
- #8 – 1 1/4″ strong drive screws
- 3″ spax wood screws
- 1 1/4″ spax wood screws
- lumber

Carefully measure your space and make any necessary adjustments to the plans before you begin. Start with the side base frames and be sure to slide on the center rigid tie brackets so you have them accessible for later attaching the center shelf.

I opted for a middle shelf for extra storage. You can add this later so don’t feel obligated to install it now. I used RTA angle brackets and 2×2 boards for a slim profile.


Truth be told I don’t think you need those center supports on the side frames but I added them anyways. You definitely need the center support on the center shelf in order to prevent the shelf from sagging.

Thanks for joining me for this miter saw station workshop project. Please leave any questions in the comments below and be sure to follow me on social media for sneak peeks, tools and project inspiration:
Instagram / Pinterest / Facebook / Youtube / Twitter
SHOP THIS PROJECT:


Thank you for the plans, it was just what i was looking for. I made a few changes though due to the RTA & RTC brackets were not readily available so i opted for dowels and bolts. I also went with 100mm x 38mm timber instead of the 100mm x 50mm.
Slide out extensions will also be added
Wow, thank you so much for the free plans.
Serendipitously I had actually bought virtually the same materials today at the hardware store (thanks to help from Keith).
I have not built anything since third grade, and this will be my first of many woodworking projects. I am not sure at all why I fell in love with woodworking so intensely, but I did and I cannot get enough of it.
Right now I am aspiring to be a beginner, and websites like yours are great for people like myself.
Mrs. Costiglio,
Thank you for your great Miter Saw Table design. It’s so strong and durable. I truly love it and it works well in my limited workshop space. I am looking to build a table saw and would love a similar design. Thank you again!
Best Regards,
Chris Castellaw
Hi Jaime
Great woodworking projects. Could you please share the name of software used to make the plans?
Thanks,
Rahul
Hi Rahul, I use SketchUp to make my plans.
Hi Jamie,
I keep looking at your materials list and the table, counting the number of RTC connectors and I keep getting 20 of them (8 on each side and 4 in the middle). You have 12 listed. This would be in addition to the 8 RTA connectors. Am I missing something?
Thank you!
Scott
Hi Scott, thank you for catching that – yes you are correct there should be 20 RTC connectors. My apologies.