A super sweet treat this week, we’re starting off with this kids pretend patisserie play stand. My fellow blogger friend Stefanie over at Brooklyn Limestone puts together the most beautiful parties and her daughter’s 3rd birthday was nothing short of amazing.

A DIY tutorial to build a kids play patisserie stand. Make your own kids play bake shop counter for all the yummy treats.
It all started when Stefanie posted a quick sketch of her Pretend Play Paris theme over on Instagram. And I saw it and knew I could build it, so I offered. Hence long story short we came up with plans, I built it (plus 2 more playstands) and delivered the unfinished stands to her Brooklyn home. And we only live about 45 min. from each other so it’s a win, I get to build and she gets the stands!

Play Stand
Today I’m sharing the plans for the kids play patisserie with step by step instructions including cut lists. Everything can be found down below but first you must see the finished patisserie play stand.

For the love! And that’s the birthday girl enjoying some pretend treats. So all the party details and sources for play food are over at Brooklyn Limestone here, be sure to check it out.

Kids Patisserie
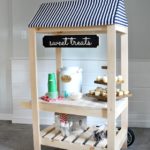
Stefanie did all the finish work using a fresh and fun mint paint color with beautiful lettering for the signage.

As a result above are all the playstands set up and ready to party.
French Themed Play Stands:

The pretend food is so tempting, I want to be a kid again!

Below is the unfinished patisserie play stand as I delivered it to Stefanie:

Below are step by step instructions including supplies and cut lists. Always be careful and follow all safety precautions when using power tools.
Supplies:
- 1 – 1x12x8 pine board
- 1 – 1x10x6 pine board
- 2 – 1x2x8 pine board
- 1 – ¼” plywood scrap @ 31” x 4”
- 6’ – ½” x ¾” flat moulding
- 1 ¼” pocket hole screws
- 1 ¼” wood screws
- 1 ¼” finish nails
- ¾” finish nails
- wood glue
Cut List:
- 1 – 1×12 @ 31” (top)
- 2 – 1×12 @ 27 ¼” (sides)
- 2 – 1×10 @ 29 ½” (shelves)
- 2 – 1×2 @ 29 1/2” (shelf trim)
- 2 – ½” x ¾” moulding @ 23”, ends mitered 45 degrees (sides menu frame)
- 2 – ½” x ¾” moulding @ 9 1/4”, ends mitered 45 degrees (top/bottom menu frame)
- 2 – 1×2 @ 27” (sign posts)
- 2 – 1×2 @ 31” (sign cross supports)
- 1 – ¼” ply @ 31” x 4” (sign)

Step 1: Attach sides to top using wood glue and 1 ¼” pocket hole screws.

Step 2: Attach shelves to sides at an angle using wood glue and 1 ¼”pocket hole screws.

Step 3: Attach shelf trim to shelves using wood glue and 1 ¼” finish nails. Attach at front and sides for good measure.

Step 4: Attach trim for menu frame using wood glue and ¾” finish nails.

Step 5: Attach sign cross supports to posts using wood glue and 1 ¼” pocket hole screws.

Step 6: Attach sign board to cross supports using wood glue and ¾” finish nails.

Step 7: Attach sign posts to stand using wood glue and countersunk 1 ¼” screws.


I love the pastry! Did you cut, shape & paint all of those too?
How much did the materials cost in total?