
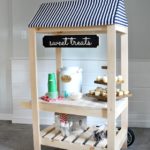
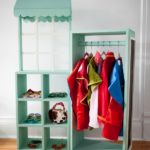
Today is the last Paris Party Playstand and we have the menagerie. If you’re just joining in, on Monday I shared the diy kids patisserie playstand and Wednesday was the boutique. My fellow blog friend Stefanie at Brooklyn Limestone put together the most beautiful Paris themed birthday party for her daughter and I built the playstands:

Stefanie did all the painting, lettering on the signs and styling for the party. How beautiful?!
Below I’m sharing the free plans to build the menagerie.

Below are step by step instructions including supplies and cut lists. Always use all safety precautions when operating power tools.

Supplies:
1 – ¾” plywood sheet
2 – 1x2x8 pine board
1 – 1x6x6 pine board
1 – 1x4x6 pine board
1 ¼” pocket hole screws
1 ¼” wood screws
1 ¼” finish nails
wood glue
Cut List:
1 – ¾”
plywood @ 14” x 36” (top)
plywood @ 14” x 36” (top)
1 – 1×2 @ 20” (sign cleat)
4 – 1×2 @ 27 ¼” (legs)
2 – ¾” plywood @ 14” x 34 ½” (bin base &
shelf)
shelf)
1 – ¾” plywood @ 12” x 34 ½” (bin back)
4 – ¾” plywood @ 12” x 12 ½”, cut angle as
noted (bin sides & dividers)
noted (bin sides & dividers)
1 – 1×6 @ 34 ½” (bin front)
2 – 1×2 @ 6” (sign supports)
1 – 1×4 @ 26” (sign)

Step 1: Attach cleat to underside of top at center
using wood glue and 1 ¼” countersunk screws.
using wood glue and 1 ¼” countersunk screws.

Step 2: Attach legs to top using
wood glue and 1 ¼”pocket hole screws.
wood glue and 1 ¼”pocket hole screws.

Step 3: Attach bin back to base using
wood glue and 1 ¼” pocket hole screws. Note
predrilled pocket holes at sides for later attaching to legs. *Be sure to predrill pocket holes in base
piece at underside for attaching to legs later.
wood glue and 1 ¼” pocket hole screws. Note
predrilled pocket holes at sides for later attaching to legs. *Be sure to predrill pocket holes in base
piece at underside for attaching to legs later.

Step 4: Attach bin sides using wood
glue and 1 ¼” pocket hole screws.

Step 5: Cut notches in bin front as
per sketch. Use a jigsaw.
per sketch. Use a jigsaw.

Step 6: Attach bin front to bin using
wood glue and countersunk 1 ¼” screws.
wood glue and countersunk 1 ¼” screws.

Step 7: Attach bin dividers using
wood glue and 1 ¼” finish nails.
wood glue and 1 ¼” finish nails.

Step 8: Attach bin to legs using wood
glue and 1 ¼” pocket hole screws.
glue and 1 ¼” pocket hole screws.

Step 9: Attach lower shelf to legs
using wood glue and 1 ¼” pocket hole screws.

Step 10: Attach sign supports to sign
back using wood glue and countersunk 1 ¼” screws.
back using wood glue and countersunk 1 ¼” screws.

Step 11: Attach sign supports to cleat
and top using wood glue and countersunk 1 ¼” screws.
and top using wood glue and countersunk 1 ¼” screws.


Perfect! This is exactly what I have been looking for. My son needs somewhere to put his toys and spaces for his bigger construction trucks, lamp and pictures. Thank you for the plans!
They are so perfect! What great friend you are. Thanks for sharing with us too. 🙂