
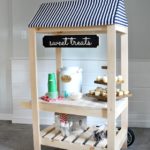
Paris Party Playstand Week continues today with the boutique. If you’re just joining in, on Monday I shared the diy kids patisserie playstand I had built for my friend Stefanie at Brooklyn Limestone. She put together the most beautiful Paris themed birthday party for her daughter and I built the playstands below:

All the finish work including the painting and lettering plus all the styling details are spot on, isn’t this amazing?! I want Stefanie to be my mom.
I’m sharing the free plans to build the boutique down below.

Below are step by step instructions including supplies and cut lists. This build is separated into 3 parts: cubbies, window and closet. Be sure to read through all steps before making any cuts and always use all safety precautions when operating power tools.
Supplies:
3 – 1x12x8 pine board
2 – 1x3x8 pine board
2 – 1x2x8 pine board
4 – ¾” x ¾” square dowels @ 36” each
10’ – ½” x ¾” flat moulding
1- ¼” plywood handy panel (2’ x 4’)
1 – 1” circular dowel @ 19”
1 ¼” pocket hole screws
2” wood screws
1 ¼” finish nails
¾” finish nails
wood glue
Cut List:
CUBBIES:
1 – 1×12 @ 18” (top)
2 – 1×12 @ 27 ¼” (sides)
3 – 1×12 @ 8” (dividers)
3 – 1×12 @ 16 ½” (shelves)
WINDOW:
2 – 1×3 @ 24” (window sides)
4 – 1×2 @ 6 3/8”, both ends 45 degree miter
(awning supports)
(awning supports)
4 – 1×2 @ 4 ½” (awning base supports)
4 – 1×2 @ 16 ½” (awning cross supports)
2 – 1×3 @ 16 ½” (awning top cross supports)
12- ¾” x ¾” sq. moulding @ 5 ¾” (window
vertical frames)
vertical frames)
4- ¾” x ¾” sq. moulding @ 16 ½” (window
horizontal frames)
horizontal frames)
2 – 1×3 @ 16 ½” (window frame top)
4 – ¼” plywood @ 18” x 6 3/8” (awning sides)
2 – ¼” plywood @ 18” x 2 ¼” (awning scalloped
edging)
edging)
CLOSET:
2 – 1×12 @ 40” (sides)
1 – 1×12 @ 18” (top)
1 – 1” circular dowel @ 19” (hanging rod)
1 – 1×12 @ 16 ½” (base)
2 – ¾” x ½” flat moulding @ 37 7/8”, both ends
45 degree miter (sides frame)
45 degree miter (sides frame)
2 – ¾” x ½” flat moulding @ 9 3/8”, both ends
45 degree miter (top & bottom frame)
45 degree miter (top & bottom frame)

Step 1: Attach sides to top using wood glue and 1 ¼” pocket
hole screws.
hole screws.

Step 2: Attach first divider to top using
wood glue and 1 ¼” pocket hole screws.
wood glue and 1 ¼” pocket hole screws.

Step 3: Attach first shelf to sides using
wood glue and 1 ¼” pocket hole screws. Also
secure shelf to divider using 2” countersunk screws.
wood glue and 1 ¼” pocket hole screws. Also
secure shelf to divider using 2” countersunk screws.

Step 4: Attach second divider to
first shelf using wood glue and 1 ¼” pocket hole screws.
first shelf using wood glue and 1 ¼” pocket hole screws.

Step 5: Attach second shelf to side
using wood glue and 1 ¼” pocket hole screws.
Also secure shelf to divider using 2” countersunk screws.
using wood glue and 1 ¼” pocket hole screws.
Also secure shelf to divider using 2” countersunk screws.

Step 6: Attach last divider to shelf
using wood glue and countersunk 1 ¼” screws.
using wood glue and countersunk 1 ¼” screws.

Step 7: Attach bottom shelf to sides
using wood glue and 1 ¼” pocket hole screws.
Also secure shelf to divider using 2” countersunk screws.
using wood glue and 1 ¼” pocket hole screws.
Also secure shelf to divider using 2” countersunk screws.

Step 1: Attach awning supports to
main window frame using wood glue and 1 ¼” pocket hole screws.
main window frame using wood glue and 1 ¼” pocket hole screws.
Make 2.

Step 2: Attach awning cross supports
to sides using wood glue and 1 ¼” pocket hole screws.
to sides using wood glue and 1 ¼” pocket hole screws.

Step 3: Attach window frame supports
to cubby top at center using wood glue and 1 ¼” pocket hole screws. Begin window frame by attaching vertical
frame pieces to cubby top using wood glue and 1 ¼” pocket hole screws.
to cubby top at center using wood glue and 1 ¼” pocket hole screws. Begin window frame by attaching vertical
frame pieces to cubby top using wood glue and 1 ¼” pocket hole screws.

Step 4: Attach horizontal window
frame to vertical supports and sides using wood glue and 1 ¼” finish nails.
frame to vertical supports and sides using wood glue and 1 ¼” finish nails.

Step 5: Attach vertical window frame
supports to horizontal using wood glue and 1 ¼” pocket hole screws.
supports to horizontal using wood glue and 1 ¼” pocket hole screws.

Step 6: Attach horizontal window
frame to vertical supports and sides using wood glue and 1 ¼” finish nails.
frame to vertical supports and sides using wood glue and 1 ¼” finish nails.

Step 7: Attach vertical window frame
supports to horizontal using wood glue and 1 ¼” pocket hole screws.
supports to horizontal using wood glue and 1 ¼” pocket hole screws.

Step 8: Attach top horizontal window
frame to vertical supports and sides using wood glue, 1 ¼” finish nails and 1
¼” pocket hole screws.
frame to vertical supports and sides using wood glue, 1 ¼” finish nails and 1
¼” pocket hole screws.

Step 9: Attach awning sides to frame
using wood glue and ¾” finish nails.
using wood glue and ¾” finish nails.

Step 10: Use a jig saw to cut out
scalloped awning edge pieces.
scalloped awning edge pieces.

Step 11: Attach scalloped awning edge
to frame using wood glue and ¾” finish nails.
to frame using wood glue and ¾” finish nails.

Step 1: Predrill 1” hole for rod
about ½” deep into side. Insert using
wood glue and secure with finish nails from exterior. Attach side to top using wood glue and 1 ¼”
pocket hole screws.
about ½” deep into side. Insert using
wood glue and secure with finish nails from exterior. Attach side to top using wood glue and 1 ¼”
pocket hole screws.

Step 2: Predrill 1” hole for rod
about ½” deep into other side. Insert
using wood glue and secure with finish nails from exterior. Attach side to top using wood glue and 1 ¼”
pocket hole screws.
about ½” deep into other side. Insert
using wood glue and secure with finish nails from exterior. Attach side to top using wood glue and 1 ¼”
pocket hole screws.

Step 3: Attach base to sides using
wood glue and 1 ¼” pocket hole screws.
wood glue and 1 ¼” pocket hole screws.

Step 4: Attach frame moulding to side
using wood glue and 1 ¼” finish nails.
using wood glue and 1 ¼” finish nails.


Oh love this! So cute 🙂
They are all so adorable! My friend's mom wants to do a little play area/store for her Grandkids, I think these will be perfect.
So I have just discovered your blog, and I am IN LOVE!!! I started my own blog over a year ago, and although I think my content is excellent, I can never get my pictures to look so clean and crisp like yours and so many other blogs. The amount of work you have put into creating such fantastic tutorials is truly amazing. Thank you!!! (If you want to check out my blog, it is before3pm.com)
I saw the play boutique on brooklynlimestone's blog, and thought it was absolutely adorable! So, my husband and I – okay I only did the painting – decided ti make it for our granddaughter's 3rd birthday, and it was an instant hit! Now all she and her little sister want to do is play dress up. Thank you so much for sharing the plans! 🙂