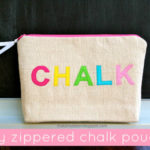
Let’s make easy to sew boxy drop cloth canvas pencil pouches with rainbow print lining and rainbow colored zippers. These DIY boxy pencil pouches make a great party favor or gift idea.

A DIY tutorial to make boxy pencil pouches. Sew these boxy style pencil pouches perfect for writing implements, travel accessories and more.


I made these pencil pouches as part of a party favor for my daughter’s birthday. First off I made these pencil holder party favors and then started thinking about how would the girls would transport their favors home?

Which lead me to come up with the solution to make these boxy pencil pouches. Naturally they are made to fit pencils, pens, markers, almost any writing implement you could need.

I used a pattern from spiegelstiksels blog. Fair warning the pattern post is in Dutch and doesn’t seem to translate well but her pictures give a good visual step by step of the process.


Here’s how to make the boxy pencil pouches:
Step 1: Make a paper pattern using the dimensions from spiegelstiksels blog post here.

Step 2: Cut 2 drop cloth exterior, 2 cotton lining, 2 interfacing, and 1 – 10″ zipper (I used 12″ metal zippers purchased as a rainbow set from Zip It here.)

In Step 3: Start by sewing in the zipper between the lining and drop cloth exterior.

Step 4: Sew both sides of the zipper and then top stitch the drop cloth (and lining together) to keep from getting caught in zipper.

Step 5: Place right sides together and sew bottom seams, be sure to leave 4″ opening in lining at center to turn the pouch right side out later.

In Step 6: Sandwich the long ends together and stitch across, start and stop 3/8″ from ends.
Step 7: To make the mitered corners pinch open corners together and sew both lining and exterior.

Step 8: Turn the pouch right side out coming through the opening in the lining. Lastly slip stitch closed the opening in lining at center bottom. Add a cute ribbon onto the zipper pull if desired.

Thanks for joining me for this DIY boxy pencil pouch project. Please follow me on social media for sneak peeks and more project inspiration:


What darling pencil holders! I bet the would work for other things, too! I love the colors.
I would love if you would share this at my link party. http://www.realcoake.com/2013/03/real-family-fun-5.html
Take care,
KC
Visiting from Frugal Friday. I love these.
I love these! I was hoping to find instructions for something like this for my art pens and pencils when I travel! Thank you so very much! 🙂
I'm having trouble with the corners, can't seem to get them right. Do you have a picture of that step? The one on the Dutch site isn't clear to me either… not sure why I'm having such a hard time understanding! Thanks!
Sorry I don't have a photo of that step. I do hope to make this project again soon in a slightly larger size and will take better photos.
Please help… I'm (stupidly) having trouble telling if the paper template is in Metric system or US Inches. And approximately how long will it be when finished (for those who have tried making it). I tried to measure 24 inches and it took up 3 pieces of A4 paper! I don't want the pencil case to be too big though! Can someone please reply? I need this urgently!
It's been awhile since I made this pouch but I believe the pattern is in centimeters? My pieces look to be about 12" x 7" roughly. Hope that's helpful.
Hi. On step 7, do you mean that all layers are sewn together or lining and ext separate?
7. To make mitered corners pinch open corners together and sew both lining and exterior.
Hi Carol, it’s been awhile since I made these but I believe you sew the corners separately.
I’m loving this pattern, but boxing these corners is absolutely mystifying! I’m finding it impossible to sew them together or apart, and I would love your advice. Do you have pictures or any additional advice for that step? I just love that all the seams are hidden in this project!
Thanks Rayna, I don’t have any additional photos of this project (I made them awhile back) but if I remember correctly to make the mitered corners I sewed the lining and exterior separately.
Check out my source link here, there’s a good photo of the mitered corner near the bottom of the post. http://spiegelstiksels.blogspot.com/2011/08/de-pennenzak-voor-perfectionisten.html